
Your project plans make all the difference to project success.
While no plan is 100% foolproof, detailed project planning gives you and your team a clear roadmap to follow—one that outlines how you can meet your clients’ goals and your own.
Let’s take a closer look at the basics of project planning and how to create this actionable, single source of truth:
What is project planning?
Project planning means laying the groundwork of how the project will be done—defining the project’s who, what, when, and why.
The project planning process happens after the project has been approved and before the project officially kicks off. It builds on the high-level planning during your initial project quoting stage.
From that high-level plan, you create a comprehensive, actionable guide that details the important info and steps needed to execute the project.
What is a project plan?
A project plan is a comprehensive document that serves as a blueprint for the entire project, outlining the following key elements:
- Project scope: What the project will (and won’t) include
- Objectives: Specific, measurable goals for project success
- Deliverables: The tangible products, services, or results your team should produce
- Tasks: Individual activities and steps required to complete each deliverable
- Timeline: A schedule outlining when each project phase and task should start and finish, when deliverables will be submitted, and key milestones
- Budget and resources: The estimated costs of all the people, equipment, software, and materials needed for the project
- Communication strategy: How and when you’ll update clients on project progress
The project plan is a living document that should be updated throughout the project.
What are the benefits of project planning?
Project planning makes it much easier to execute projects. It gets your entire team on the same page about what will be done, when, and by whom. And establishes shared expectations with clients.
Project planning also offers:
- A clear roadmap: With everything outlined and in one place, your team knows exactly what to do and when. Which reduces missed deadlines.
- A way to control costs: Your project plan includes a detailed budget so you can track costs and reduce financial overruns. And since project plans also streamline your team’s work, your labor costs reduce over time.
- Better communication: By listing out key contact info and knowing your clients’ communication preferences, you can keep them in the loop without overloading them.
- Risk mitigation: Establishing shared expectations with clients before the project kicks off means you can align on the exact scope and budget from the beginning. So, you reduce the risk of scope creep, overspending, and overservicing—helping your projects stay profitable.
Project plan example
Let’s say you work at a marketing agency completing a website redesign for a client.
A very basic project plan might look like:
Scope:
- Scope includes: New website layout, new homepage, 10 subpages; new templates for feature pages, blog posts, the blog homepage, and product pages
- Scope doesn’t include: Blog content, copywriting for any pages beyond the homepage and 10 subpages, and product images
Objectives:
- Implement the company’s revamped brand design and messaging across the site
- Increases homepage conversions by 2%
- Increase page speed by 15% to deliver a more seamless user experience
Deliverables:
- New website homepage
- New page design and copy for the:
- About Us page
- Contact Page
- Features Page
- Pricing Page
(And so on)
- Features page template
- Blog homepage template
- Product page templates
- Blog post template
Tasks:
- Create wireframes for homepage layouts
- Implement new color scheme and fonts
- Design homepage header image
- Write copy for homepage
(And so on)
Timeline:
- September 10th: Design team check-in meeting
- September 15th: Submit wireframe homepage layouts for review
- September 17th: Submit homepage header image for review
(And so on)
Budget and Resources:
- Internal Labor costs: $12,000
- Internal team members: Designers (two), Developers (two), Project Manager (one), Copywriter (one)
- Freelance labor costs: $1,200
- Software costs: Figma, Webflow, Adobe Suite ($200)
Communication:
- Point of contact(s): John Smith, Marketing Manager
- One-hour Zoom call: Last Thursday of each month, 2:00 p.m.
- Weekly email updates to clients on Fridays
How to make a project plan in 9 simple steps
Now, here’s how to create a project plan of your own in nine simple steps:
1. Confirm the project scope
Getting clarity on the project scope from the beginning allows you and your client to align on expectations. This will help avoid frustration on both ends down the road.
Solidify the project scope asynchronously through email or Slack. Or review it live on a Zoom call.
Even if your initial quote isn’t super detailed, you and your client should walk away from your scope review with a clear understanding of what is and isn’t included.
Say you listed a “Discovery” phase and quoted 30 hours. Explain to your client what work will actually go into completing that phase—and what work will be considered “extra” or out of scope.
Since the client has already seen the quote, there shouldn’t be too many adjustments here. But it’s better to double-check the scope now.
Otherwise, you’ll either end up overservicing (and cutting into your margins) or missing work that your client assumed was included.
2. Define project phases or services
Once you’ve re-run the scope by your client, break it into defined phases (if you haven’t already done so).
This makes it easier to outline the project timeline, deliverables, and tasks.
Common project phases include:
- Ideation
- Discovery
- Design
- Development
- Testing
- Launch
For service-based projects, clearly define each service (e.g., brand strategy, content creation) included in the scope.
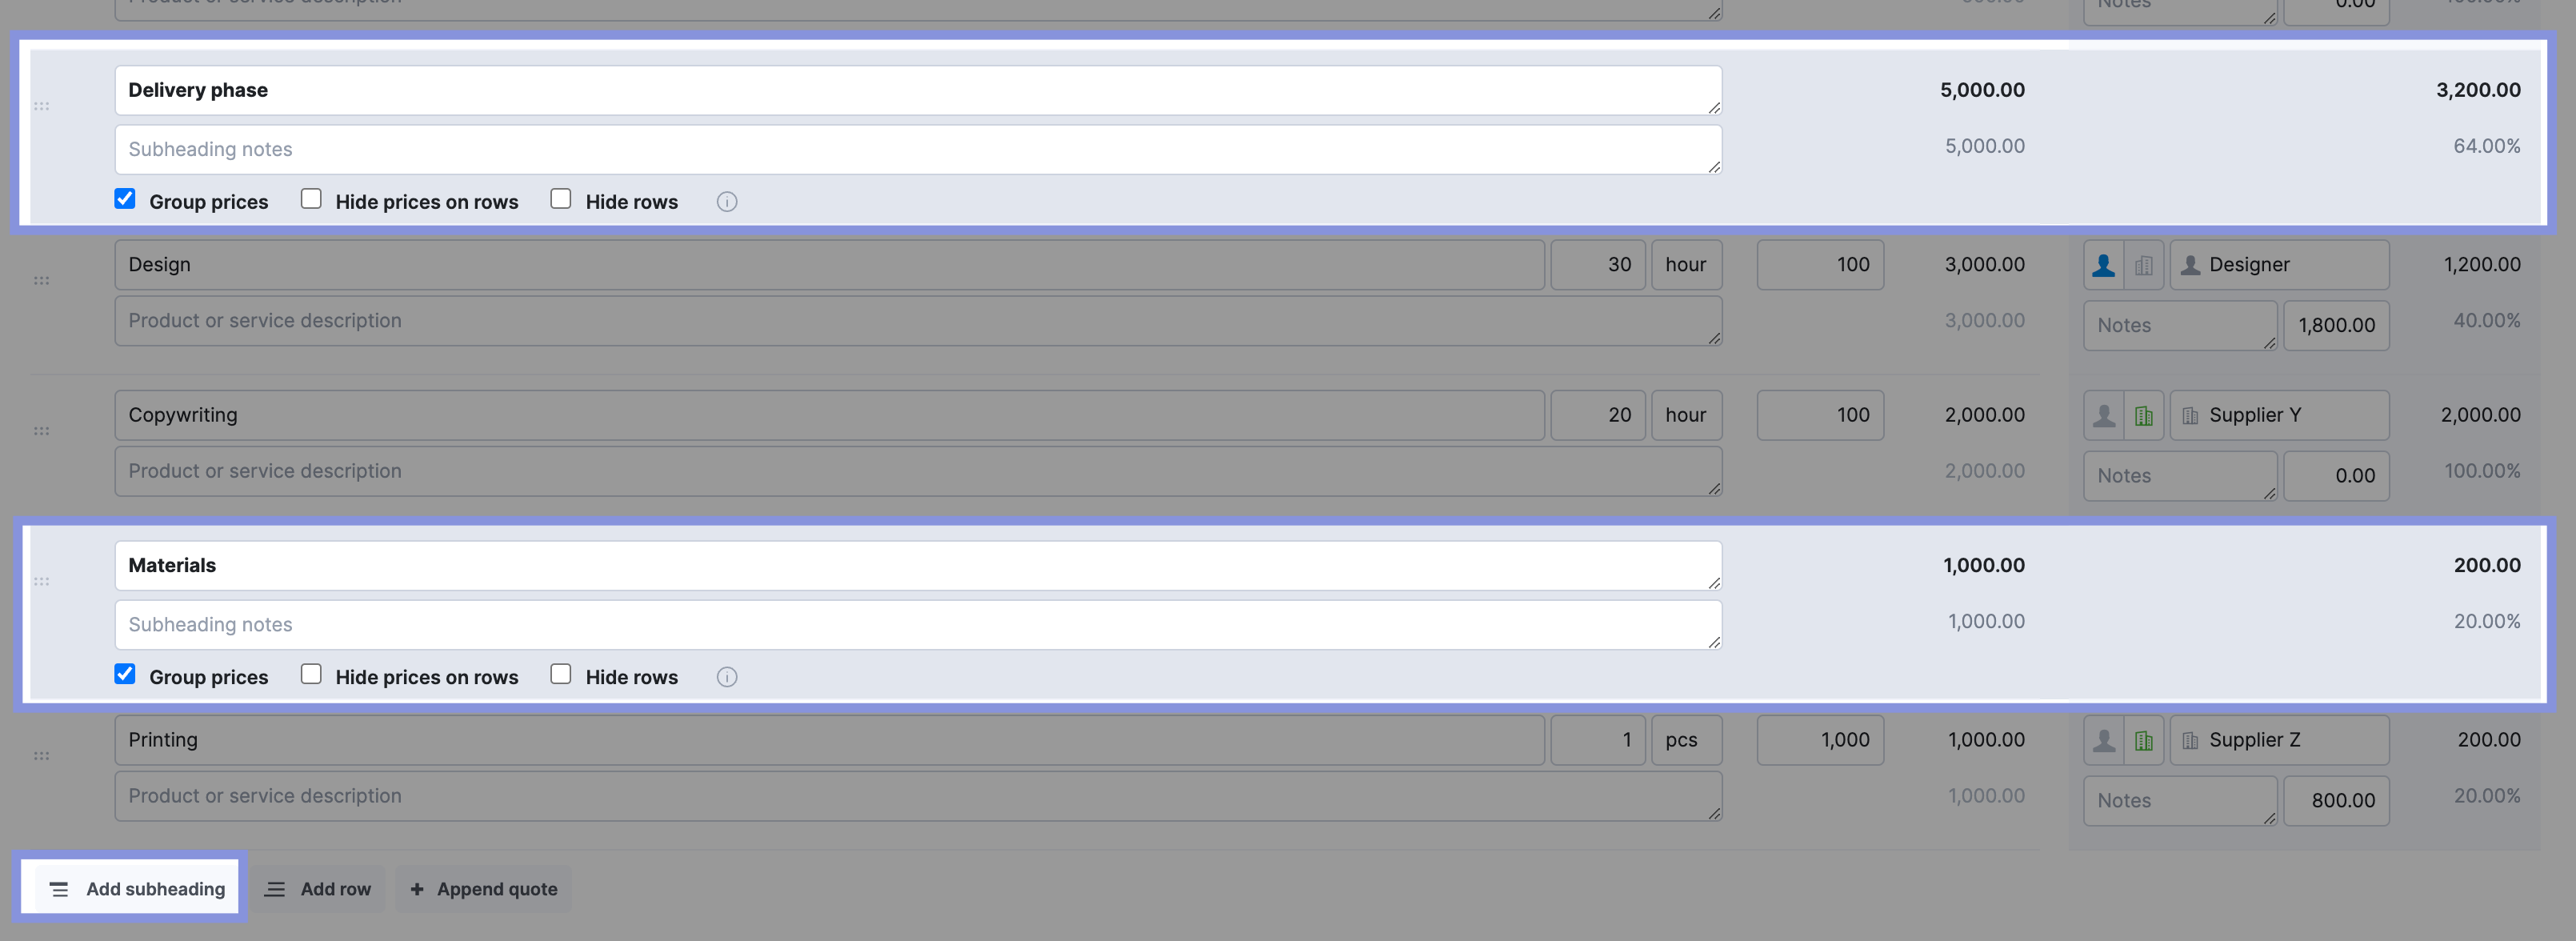
3. Create a Work Breakdown Structure (WBS)
A Work Breakdown Structure (WBS) is a hierarchical representation of all the work necessary to execute the project.
A WBS goes beyond the project scope and phases, listing out key deliverables and individual tasks.
With a clear WBS, you make sure all key steps and team assignments are covered.
And, with a clear view of everything required to finish the project, it’s easier to create a timeline and finalize your budget.
After you list all the tasks needed to complete the project, group related tasks into different “work packages” under the relevant phase or deliverable.
For example, tasks such as “outline web content,” “write web content,” and “add content to the CMS” might all fall under the “Web Content” work package:
- Web Redesign
- Web Content
- Outline web content
- Write web content
- Add content to CMS
- Web Content
Top Tip
Even if you have a simple project and don’t feel the need to use a traditional WBS, you and your team will still benefit from organizing tasks and deliverables in a project management tool.
For example, Scoro let’s you structure your quotes into phases with the use of sub-headings. Check out our guide to creating profitable quotes to learn more.
4. Estimate the time and resources needed for the work
Whether you use a WBS or a less granular approach, you’ll need to estimate the time each phase, deliverable, or task will take. And how many people you’ll need for each of them.
Why?
So you can establish a realistic timeline that aligns with your team’s capacity and labor budget.
If you develop your timeline based on guesswork, you’re likely to overpromise to clients and end up with rushed deliverables or missed deadlines.
By estimating the time needed for each task or deliverable in advance, you can also accurately understand your labor costs.
Start by verifying resource requirements based on the initial project cost estimates in the approved scope.
What roles are needed to complete the work?
For example, you might decide based on the deliverables that you will need:
- 100 hours of design work
- 50 hours of copywriting work
- 20 hours of project management
- 150 hours of development
Next, look at your team’s upcoming calendars and see who’s available in those roles to take on the work.
If you don’t have enough internal bandwidth, you can adjust your timeline (in the next step) or make proactive plans to outsource certain deliverables.
In Scoro, you can do this directly from the “Bookings” tab in when viewing any project.
If you’ve set up a quote in Scoro, you can see tentative resource bookings by turning the quote into a project and heading to the “Bookings” tab.
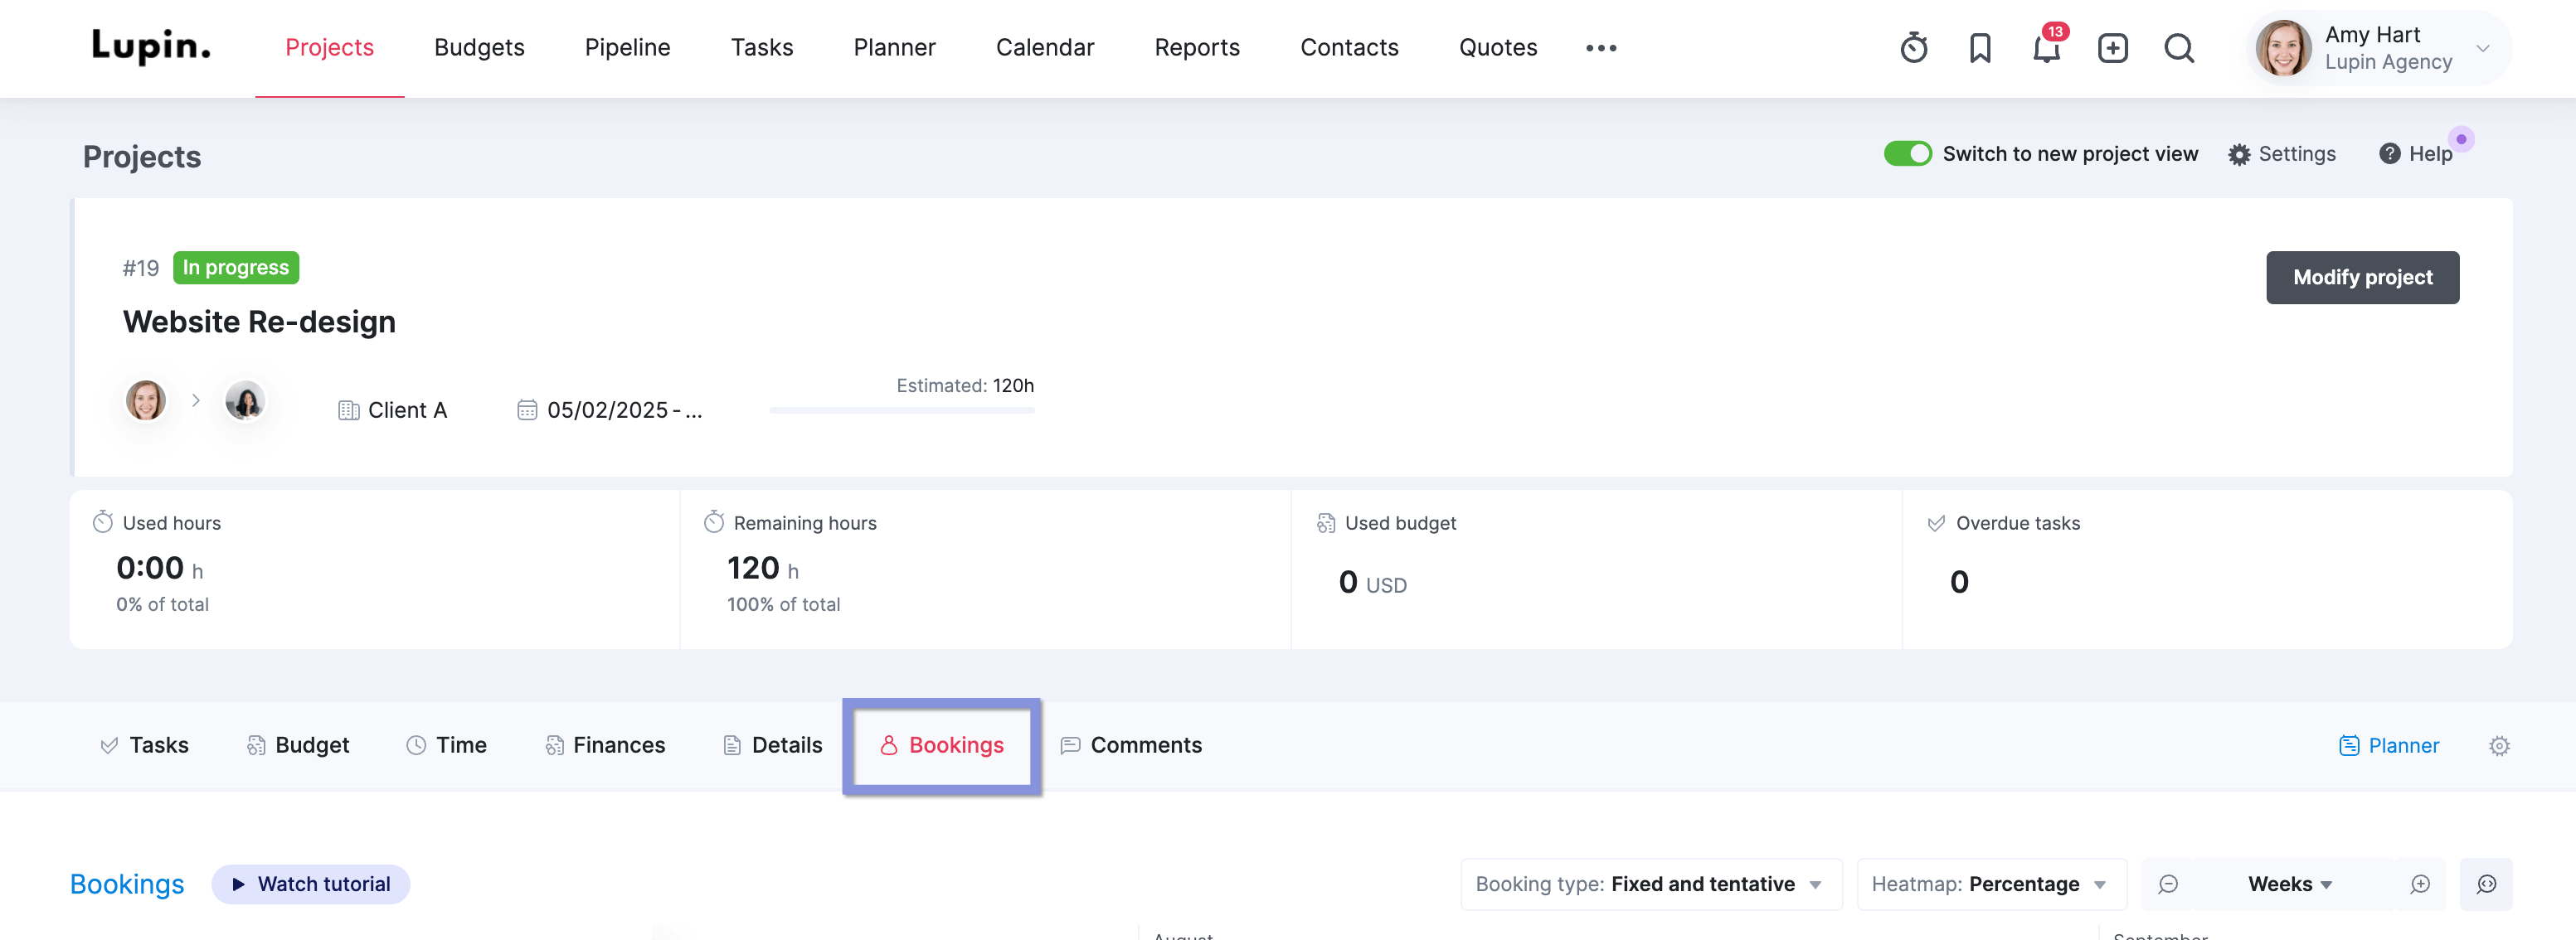
You’ll then see resource requirements (your team’s time) based on the deliverables and roles set in the quote.
All bookings (purple slash boxes) are tentative until you confirm them. You’ll see tentative bookings assigned to Placeholder roles based on your Quote.
For example, 50 hours have been assigned to the Project Manager and 30 hours to a Strategy Expert.
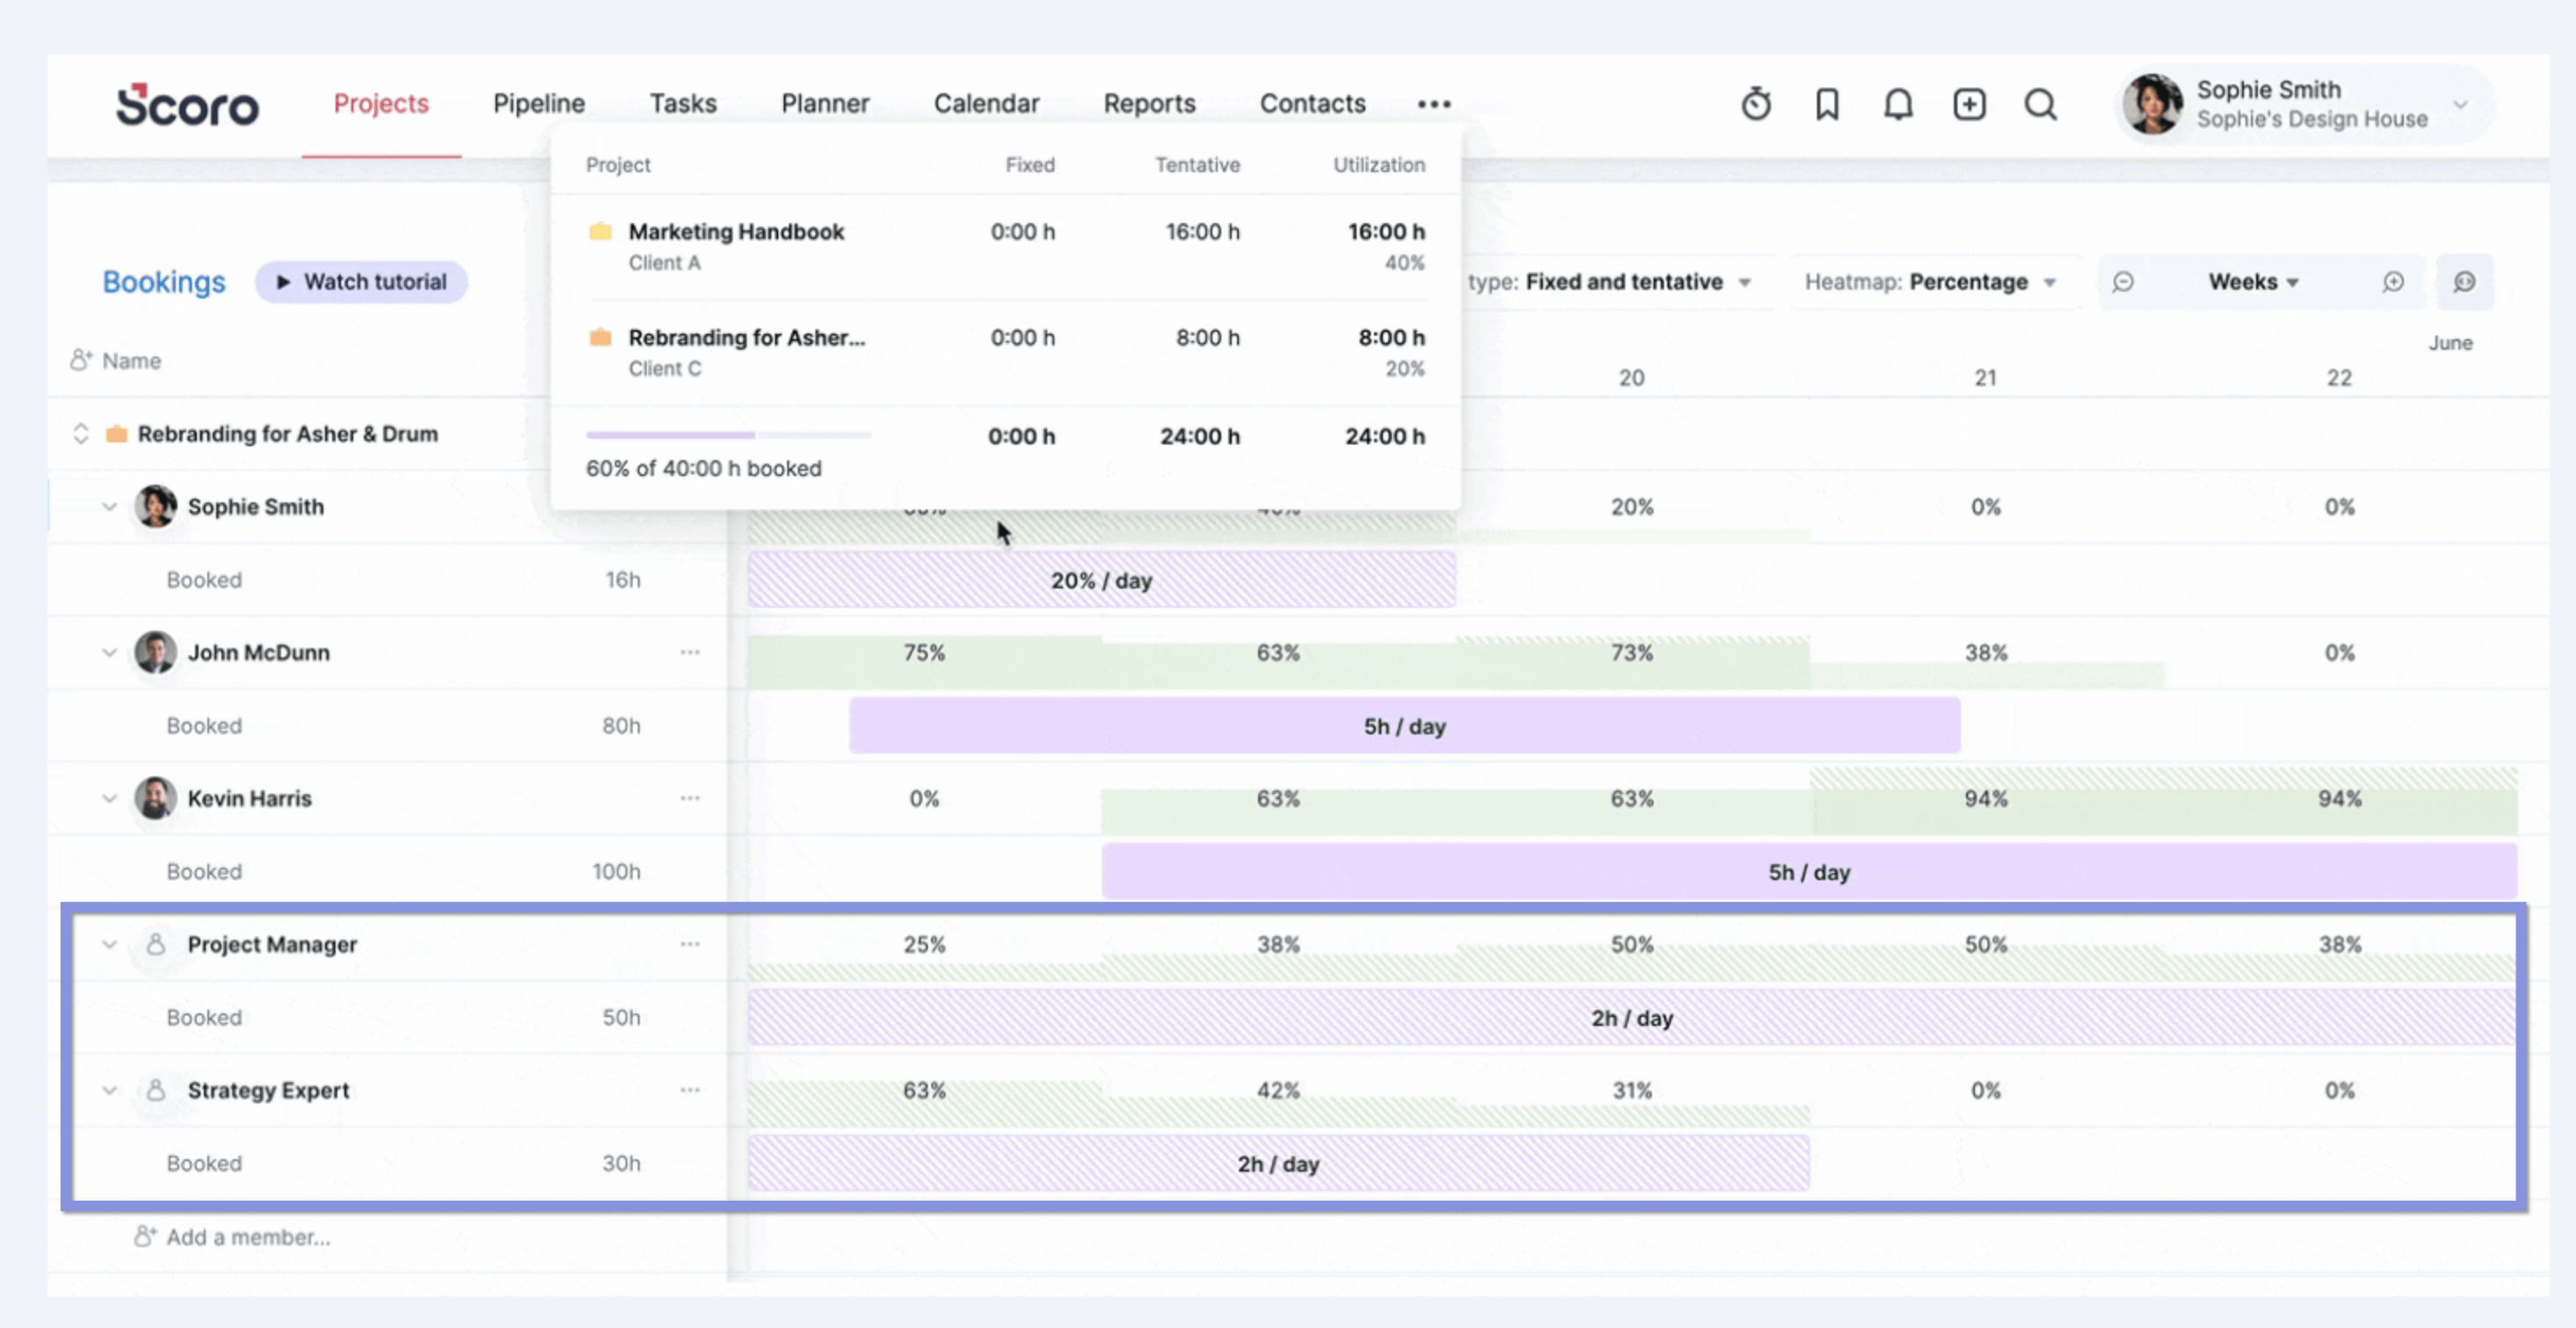
By default, those hours are spread out over the project’s duration. If you know that work will happen during a specific project phase, you can click and drag the end of the booking to adjust when the work will take place.
The green bars show the combined capacity of all team members within that role.
So, in this example, booking a Project Manager for 2 hours per day puts your PM team at 25% capacity early in the project but 50% capacity in the middle.
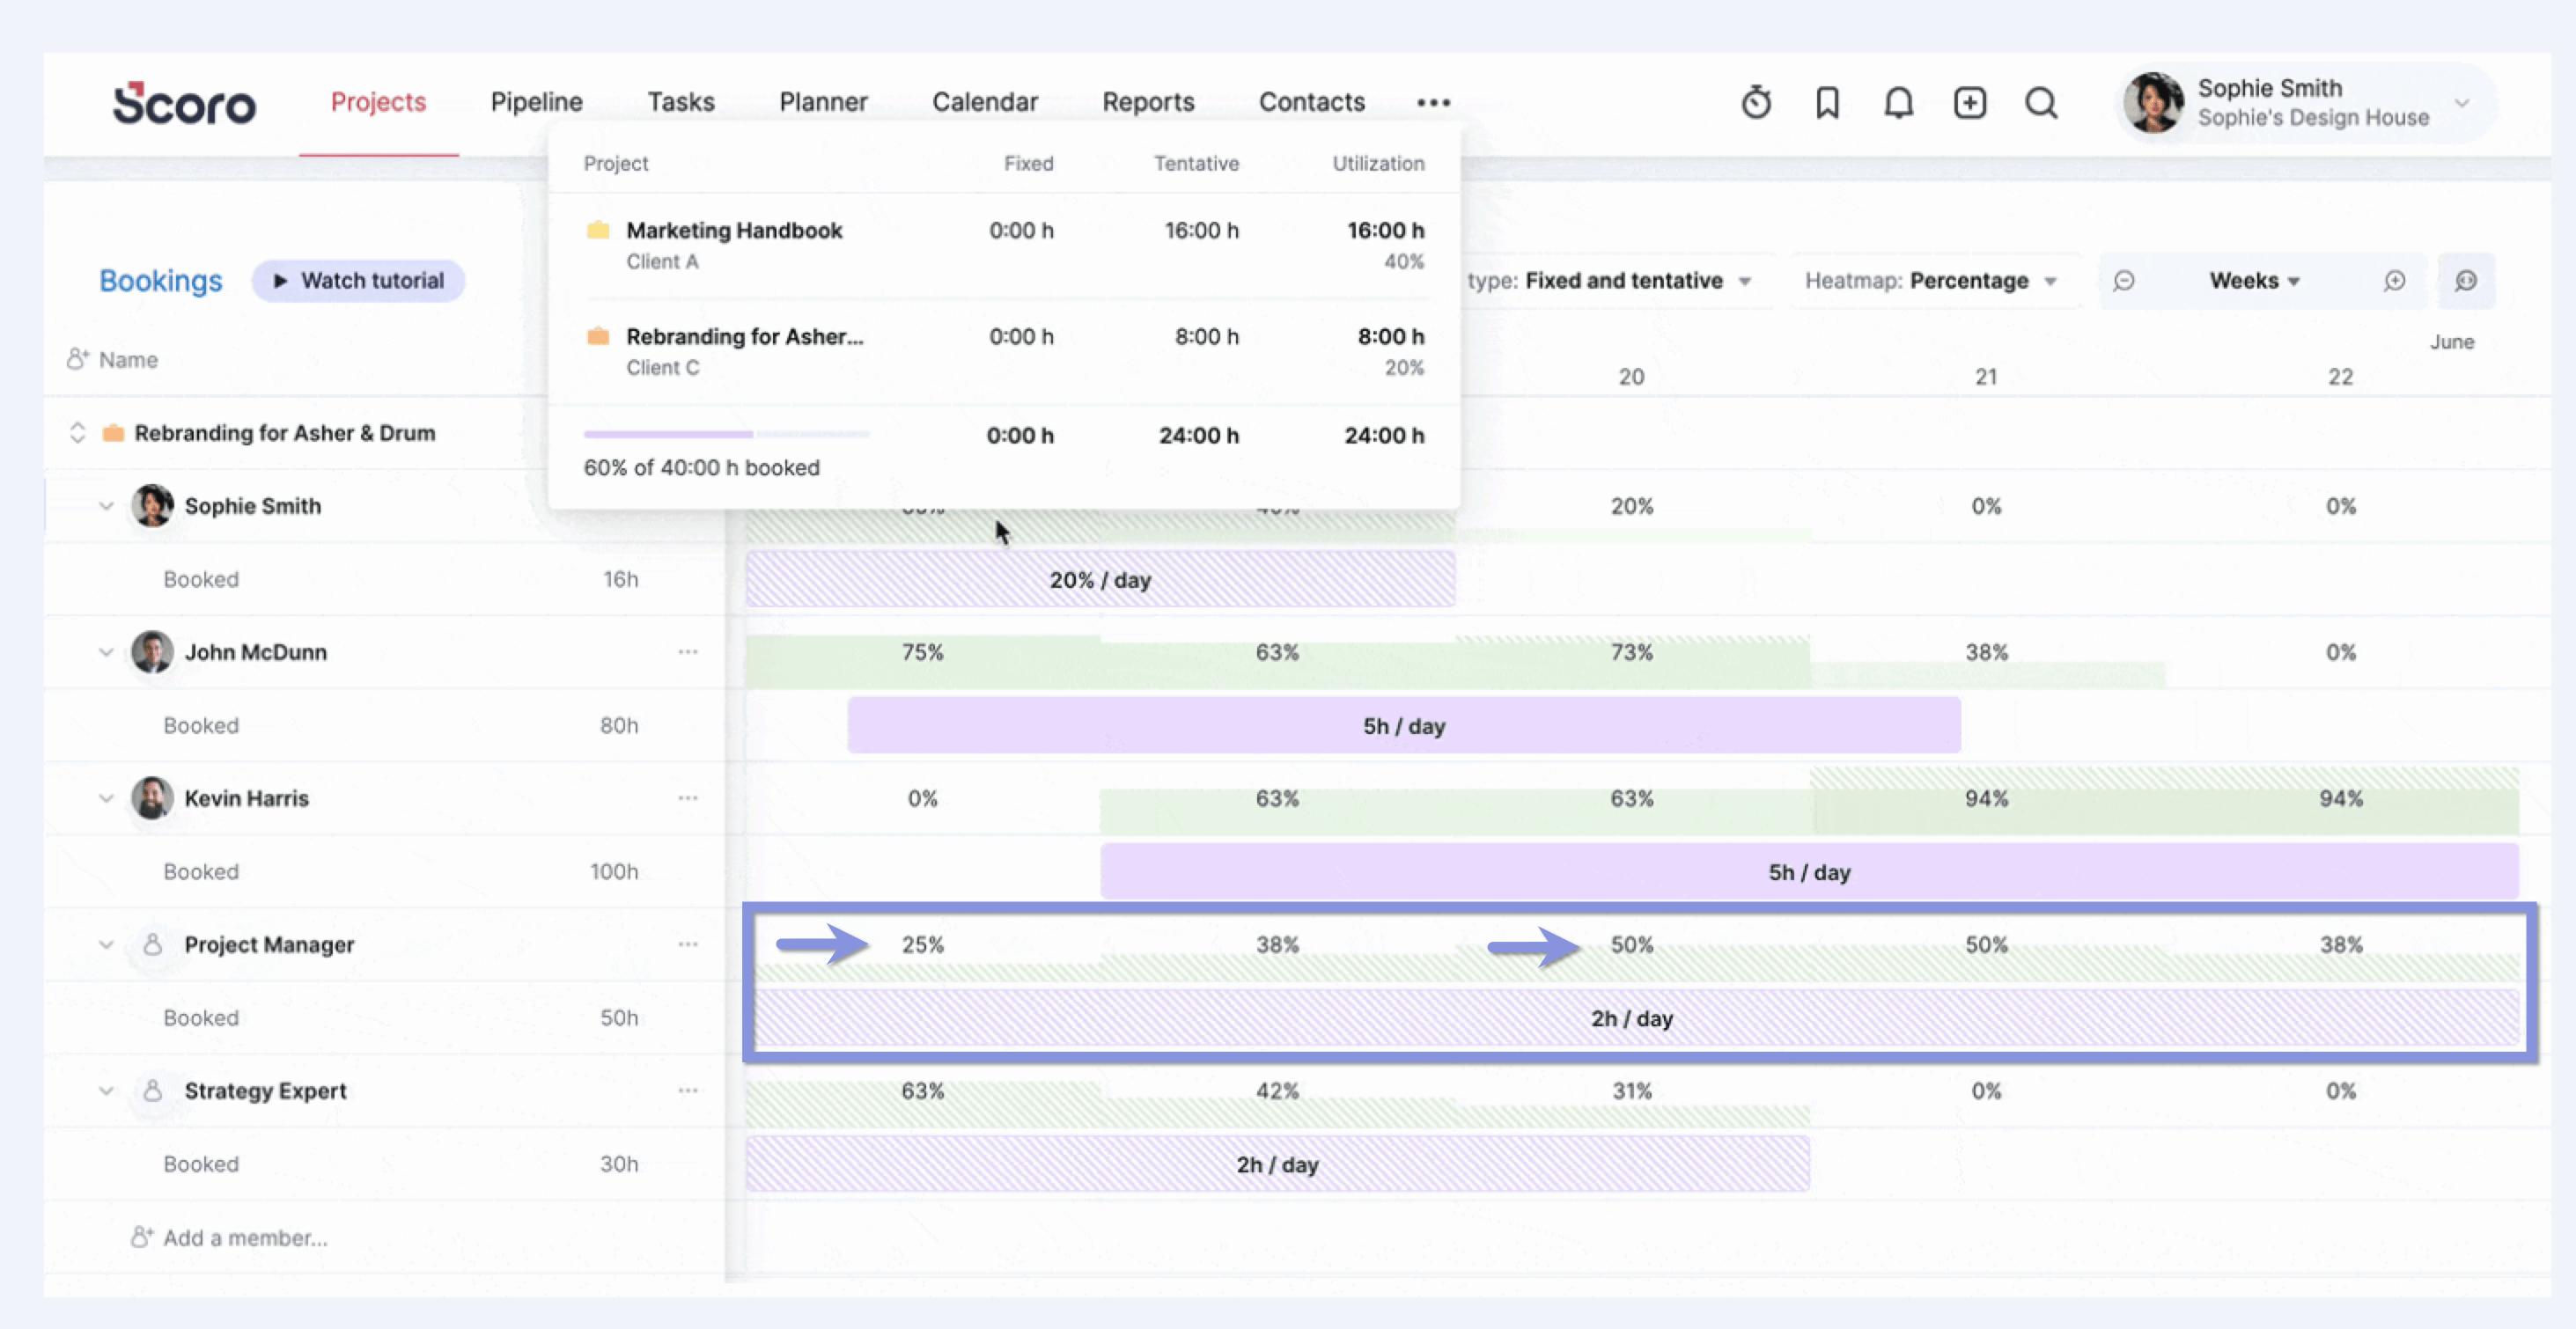
Knowing this, you may need to adjust the project timelines to suit your team’s availability or split work between multiple team members to avoid overloading any one team member.
5. Develop a project timeline
Now, take the deliverables and hours you just outlined and convert them into a clear project schedule.
Without one, you’ll likely encounter resource conflicts that force your team to scramble, resulting in lower-quality deliverables and unhappy team members and clients.
Instead, define deliverable and task deadlines in advance and make sure they fit in well with existing workloads.
You can do this manually by taking all your tasks and deliverables and adding them individually to a project management timeline.
As you add them, include:
- The task due date
- How long each task should take
- When the task can be started (i.e., identify any task dependencies)
Or you can speed things up with Scoro’s Gantt chart.
When you convert quotes to projects in Scoro, it automatically adds all your listed phases, milestones, and deliverables into a Gantt chart in the “Project” view.
To access it, click on any project and go to “Tasks” > “Gantt.”
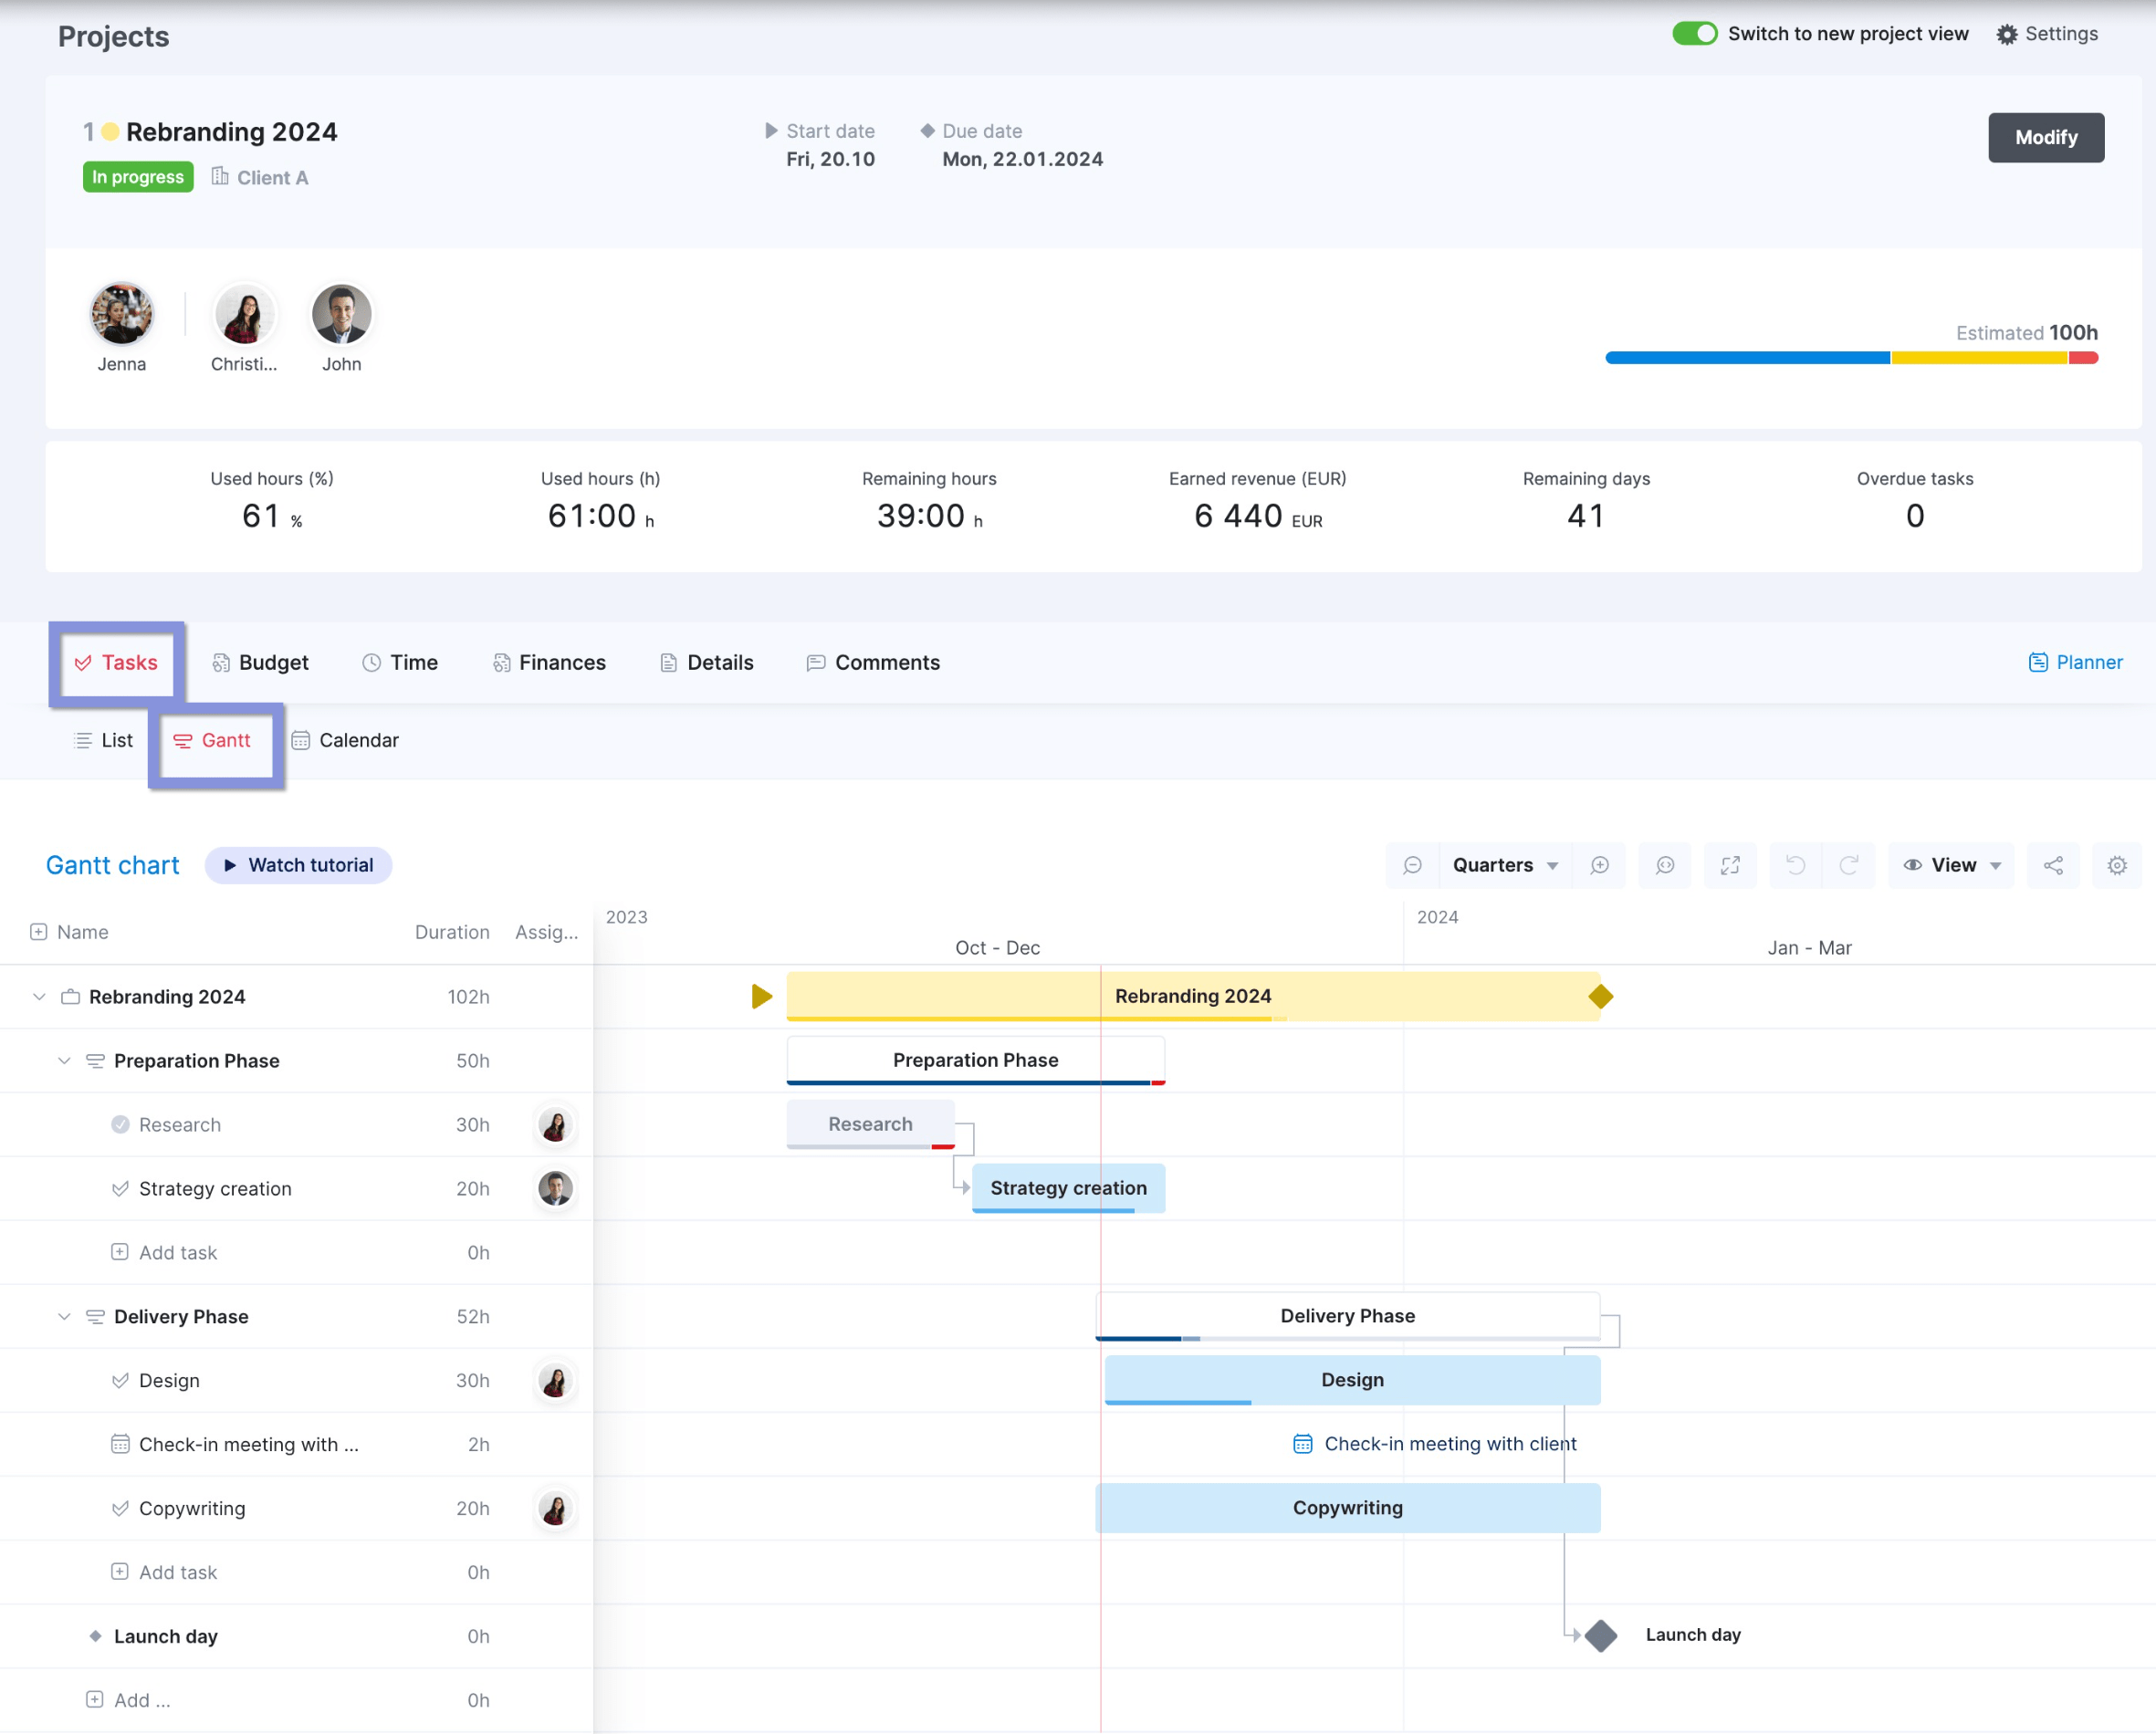
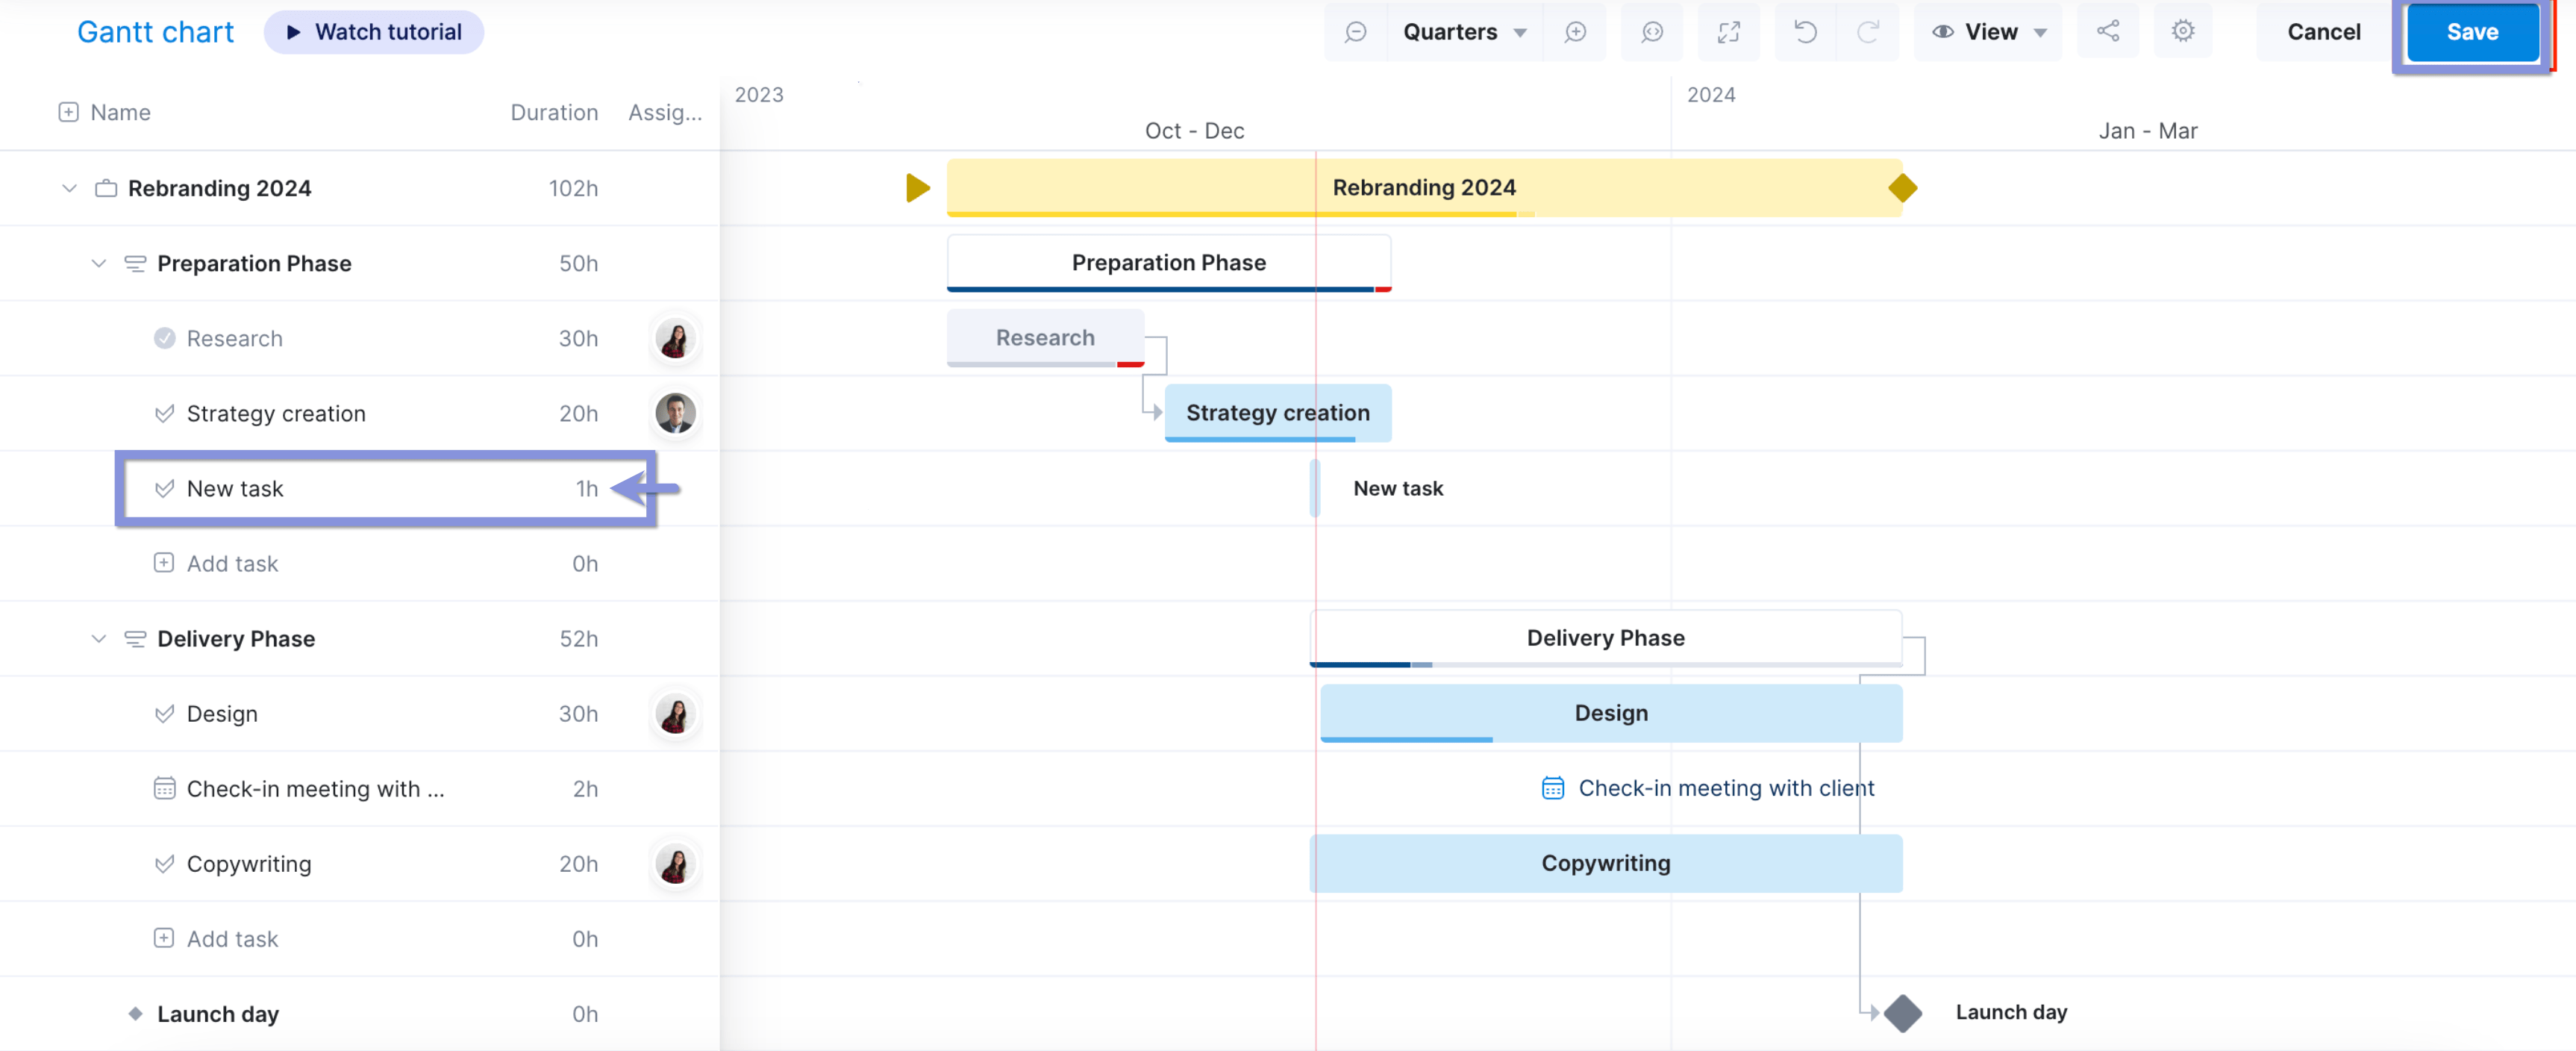
Now, click “Name” and one of the three drop-down buttons to add any additional tasks, phases, or milestones, respectively.
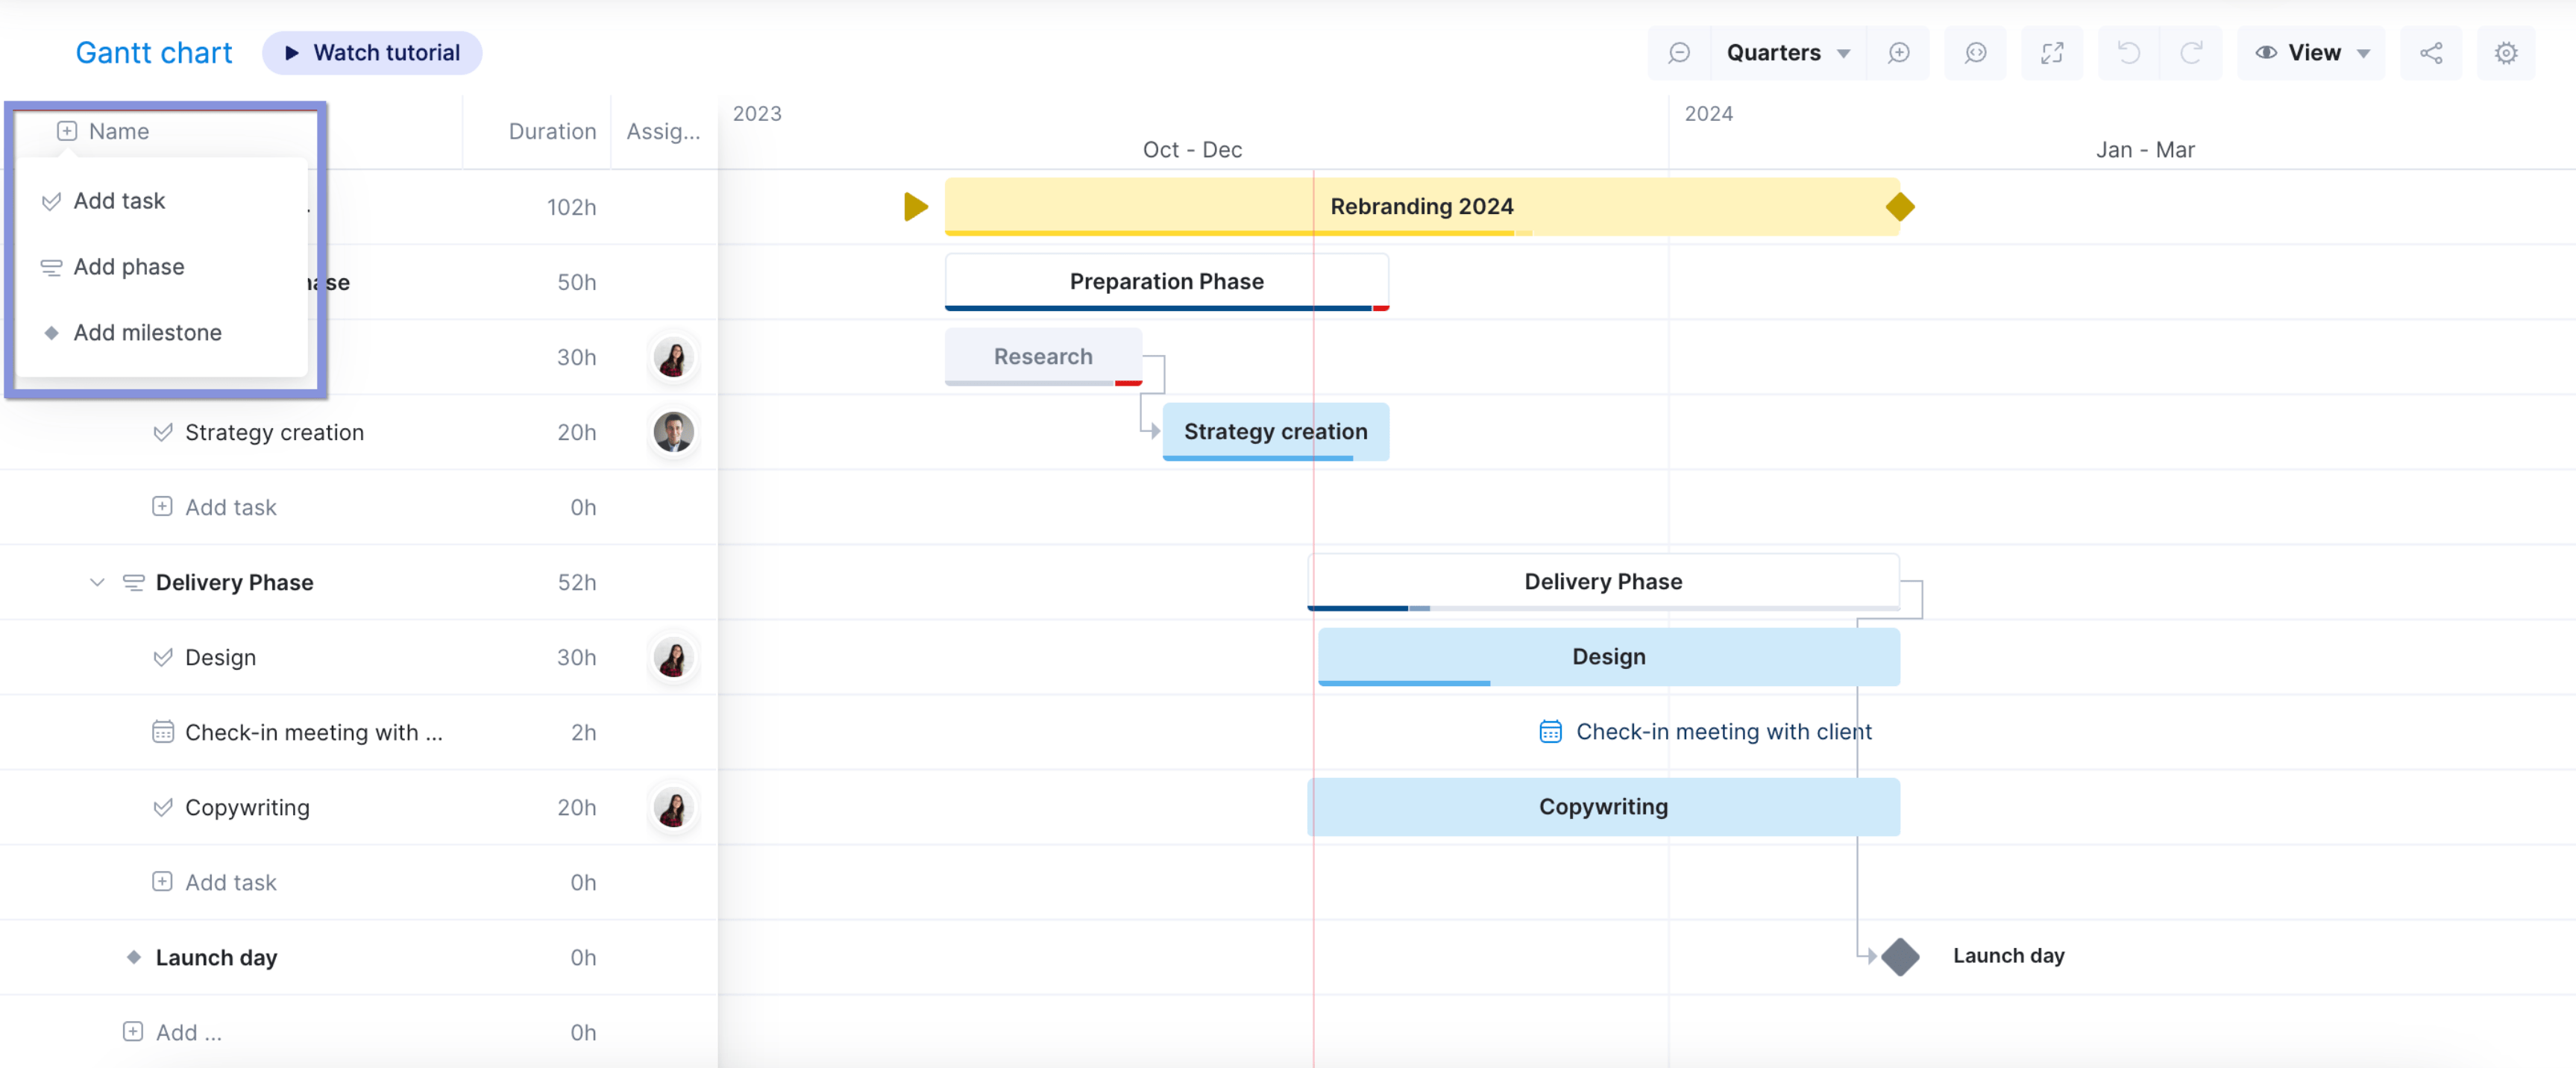
After you name a new entry, click the gray time column to set its estimated duration and click “Save.” Then, drag and drop it onto the chart wherever you need it.
After you add everything to the chart, review it to make sure the timeline is feasible. And
All deliverables and tasks fit within the assigned phases and estimated scope.
If not, adjust the estimated timelines for bigger milestones and deliverables. Then, communicate any changes to the client well before the project kicks off.
6. Assign team members to tasks based on skills and availability
Earlier, you determined which roles you needed and how many of them. Now, choose which specific team members you want to fill in those spots. And assign them day-to-day tasks.
This proactive resource planning and resource scheduling helps you:
- Make sure all the key project parts are covered, preventing potential delays down the road from resource shortages
- Maintain balanced workloads on your team so they can be productive but aren’t overwhelmed or burnt out
- Keep labor costs within or under budget
Many people manage these areas manually by cross-referencing individual calendars and messaging team members about their availability.
But that approach is difficult to implement at scale. And it creates opportunities for errors, leading to unbalanced workloads and project delays.
Instead, Scoro’s “Gantt” chart and “Planner” give you a centralized overview of everyone’s schedules.
So, you can quickly (and confidently) figure out who can take on which tasks and when.
The “Gantt” chart is best for flexible planning. Whether the project is scoped out into bigger pieces or you just want to give your team more control over their week, use it to assign deliverables to complete within a specific timeframe.
Go to “Projects” → “Tasks” → “Gantt” and look for unassigned project pieces that have a blank icon in the “Assignee” column.
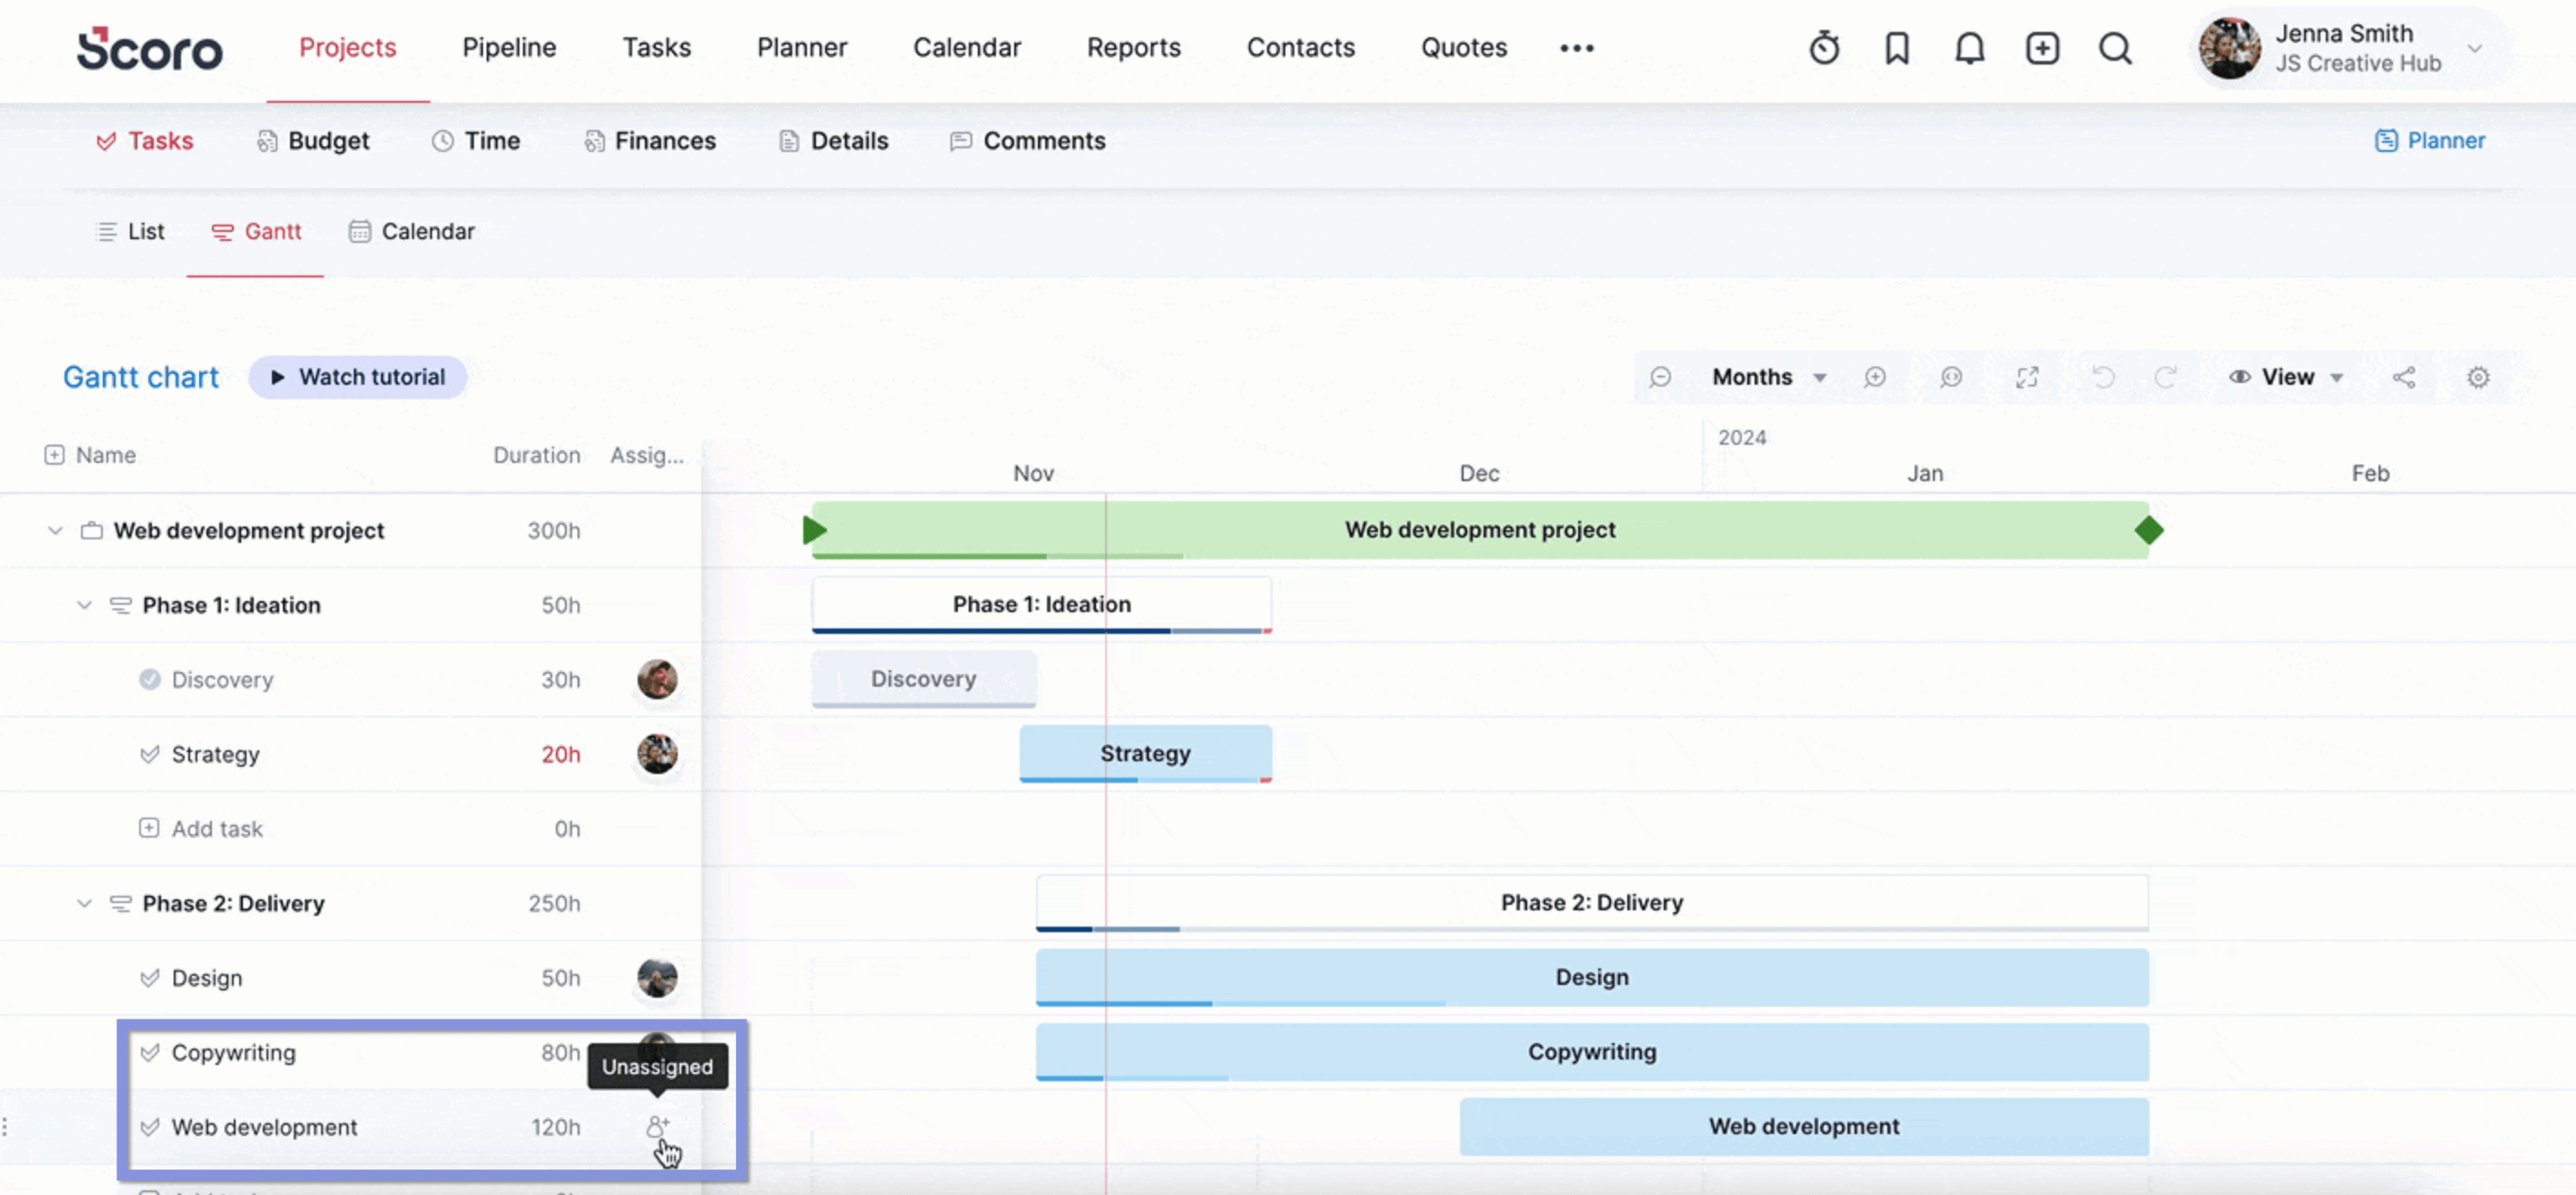
Click on that icon to open your team list. Now, hover over their respective profile pictures to see their available capacity (which Scoro automatically calculates).
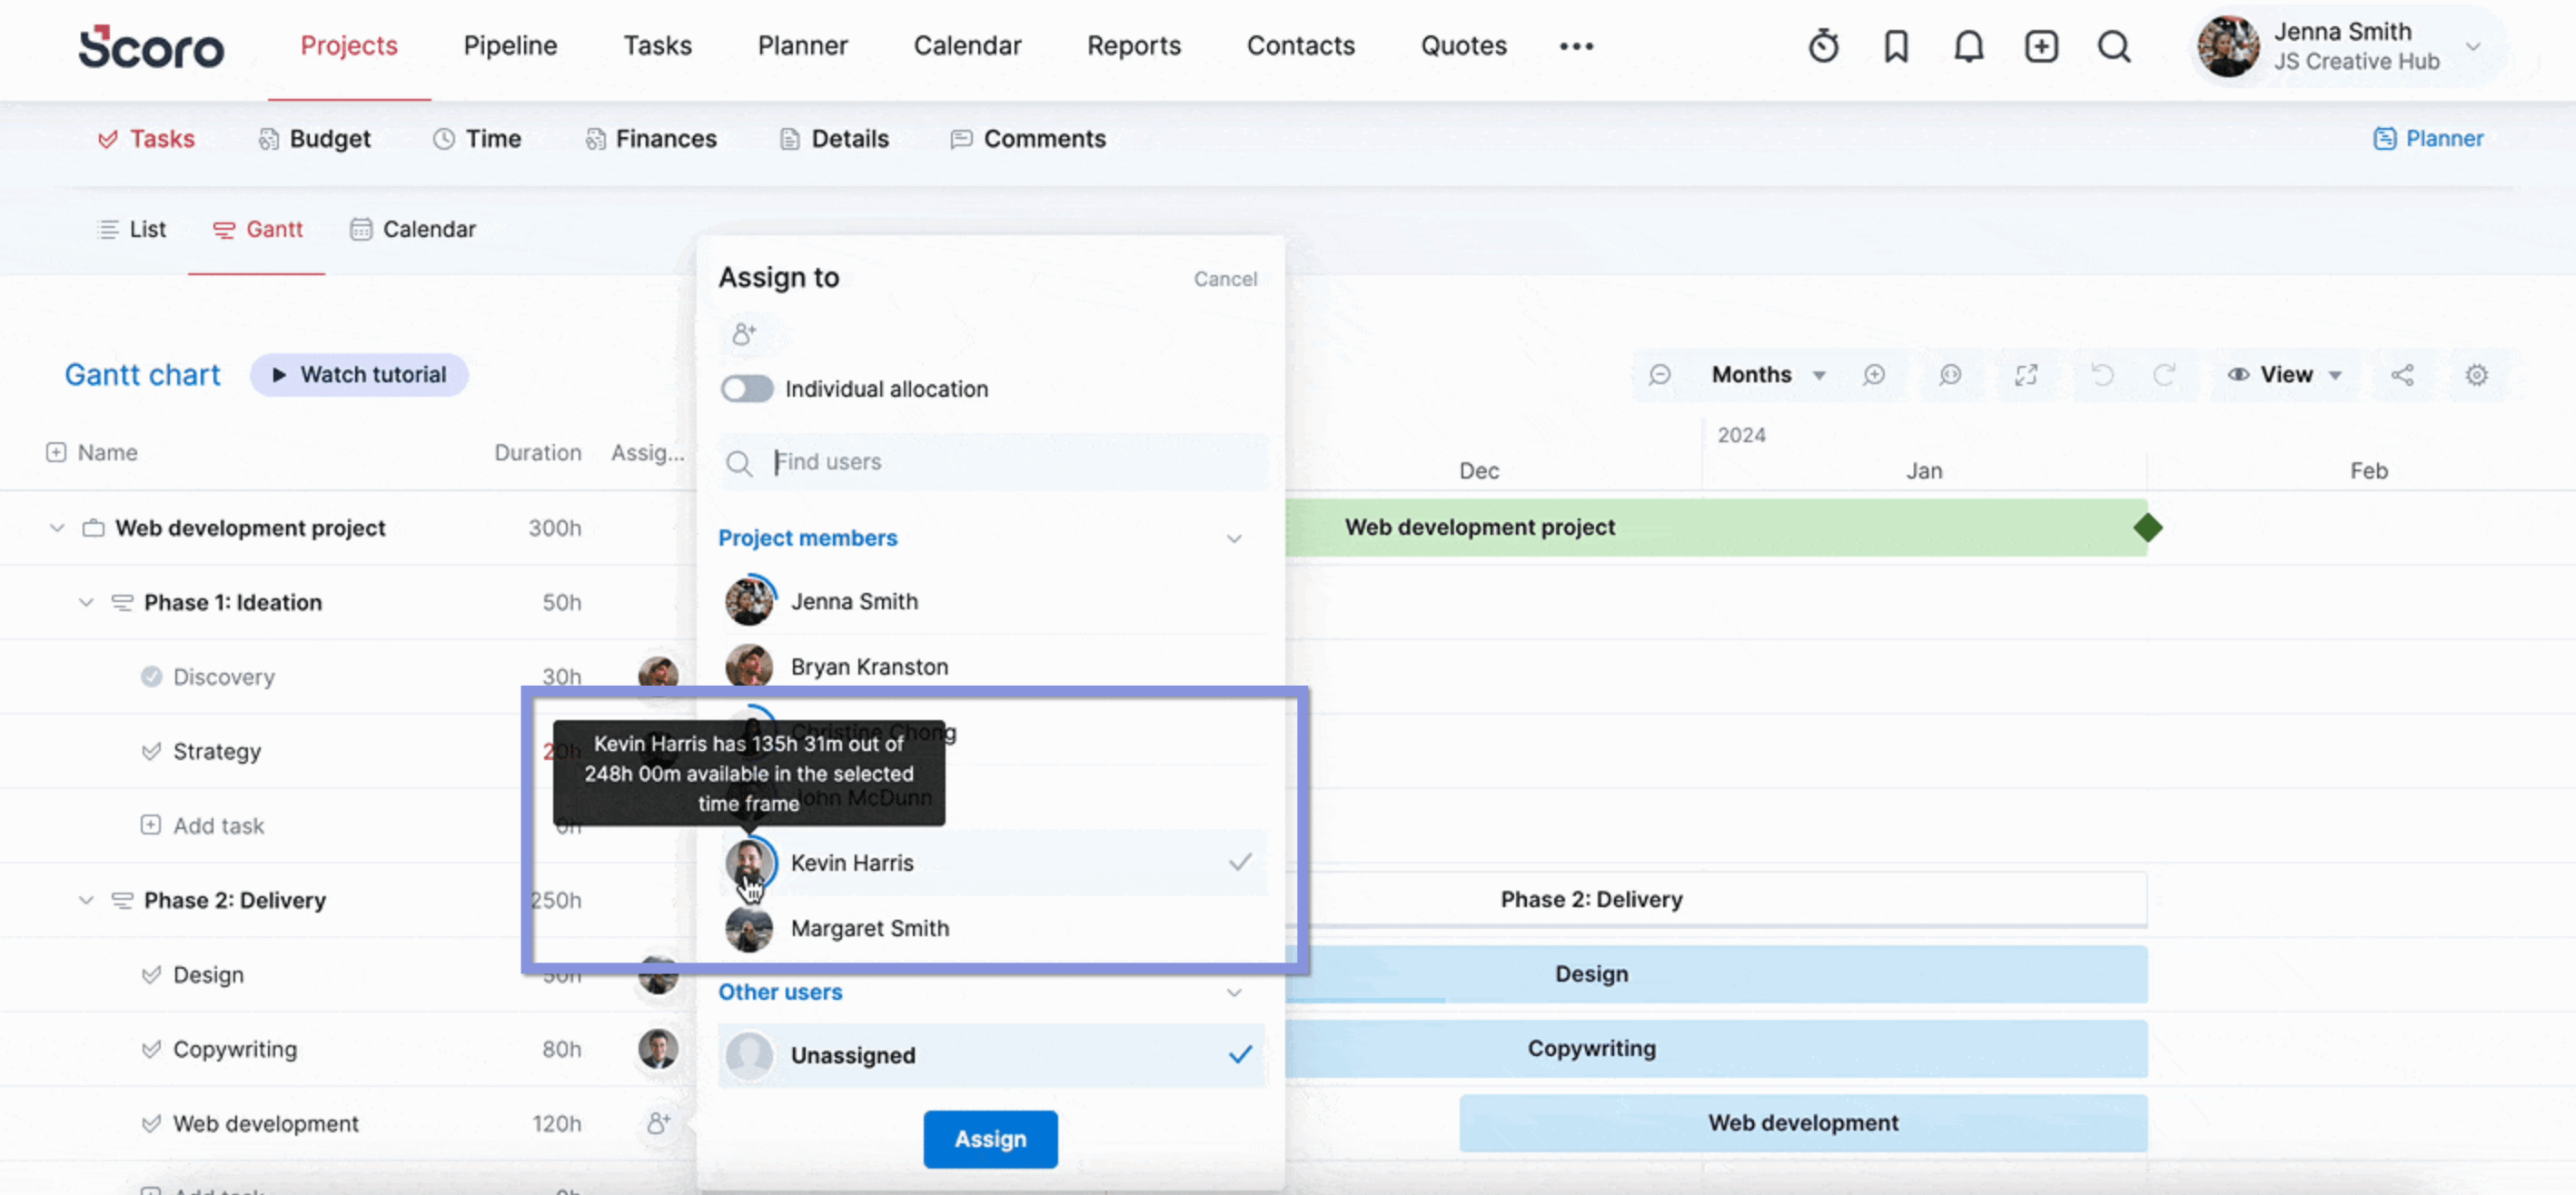
For example, the web development task above is estimated to take 120 hours. Kevin Harris has 135 hours available during that time frame, so he should be able to take on that task without any conflicts.
To give Kevin the work, you would click on his name and hit “Assign.” And then repeat across the other tasks.
If you prefer more granular work planning for your team, go to the “Planner” view.
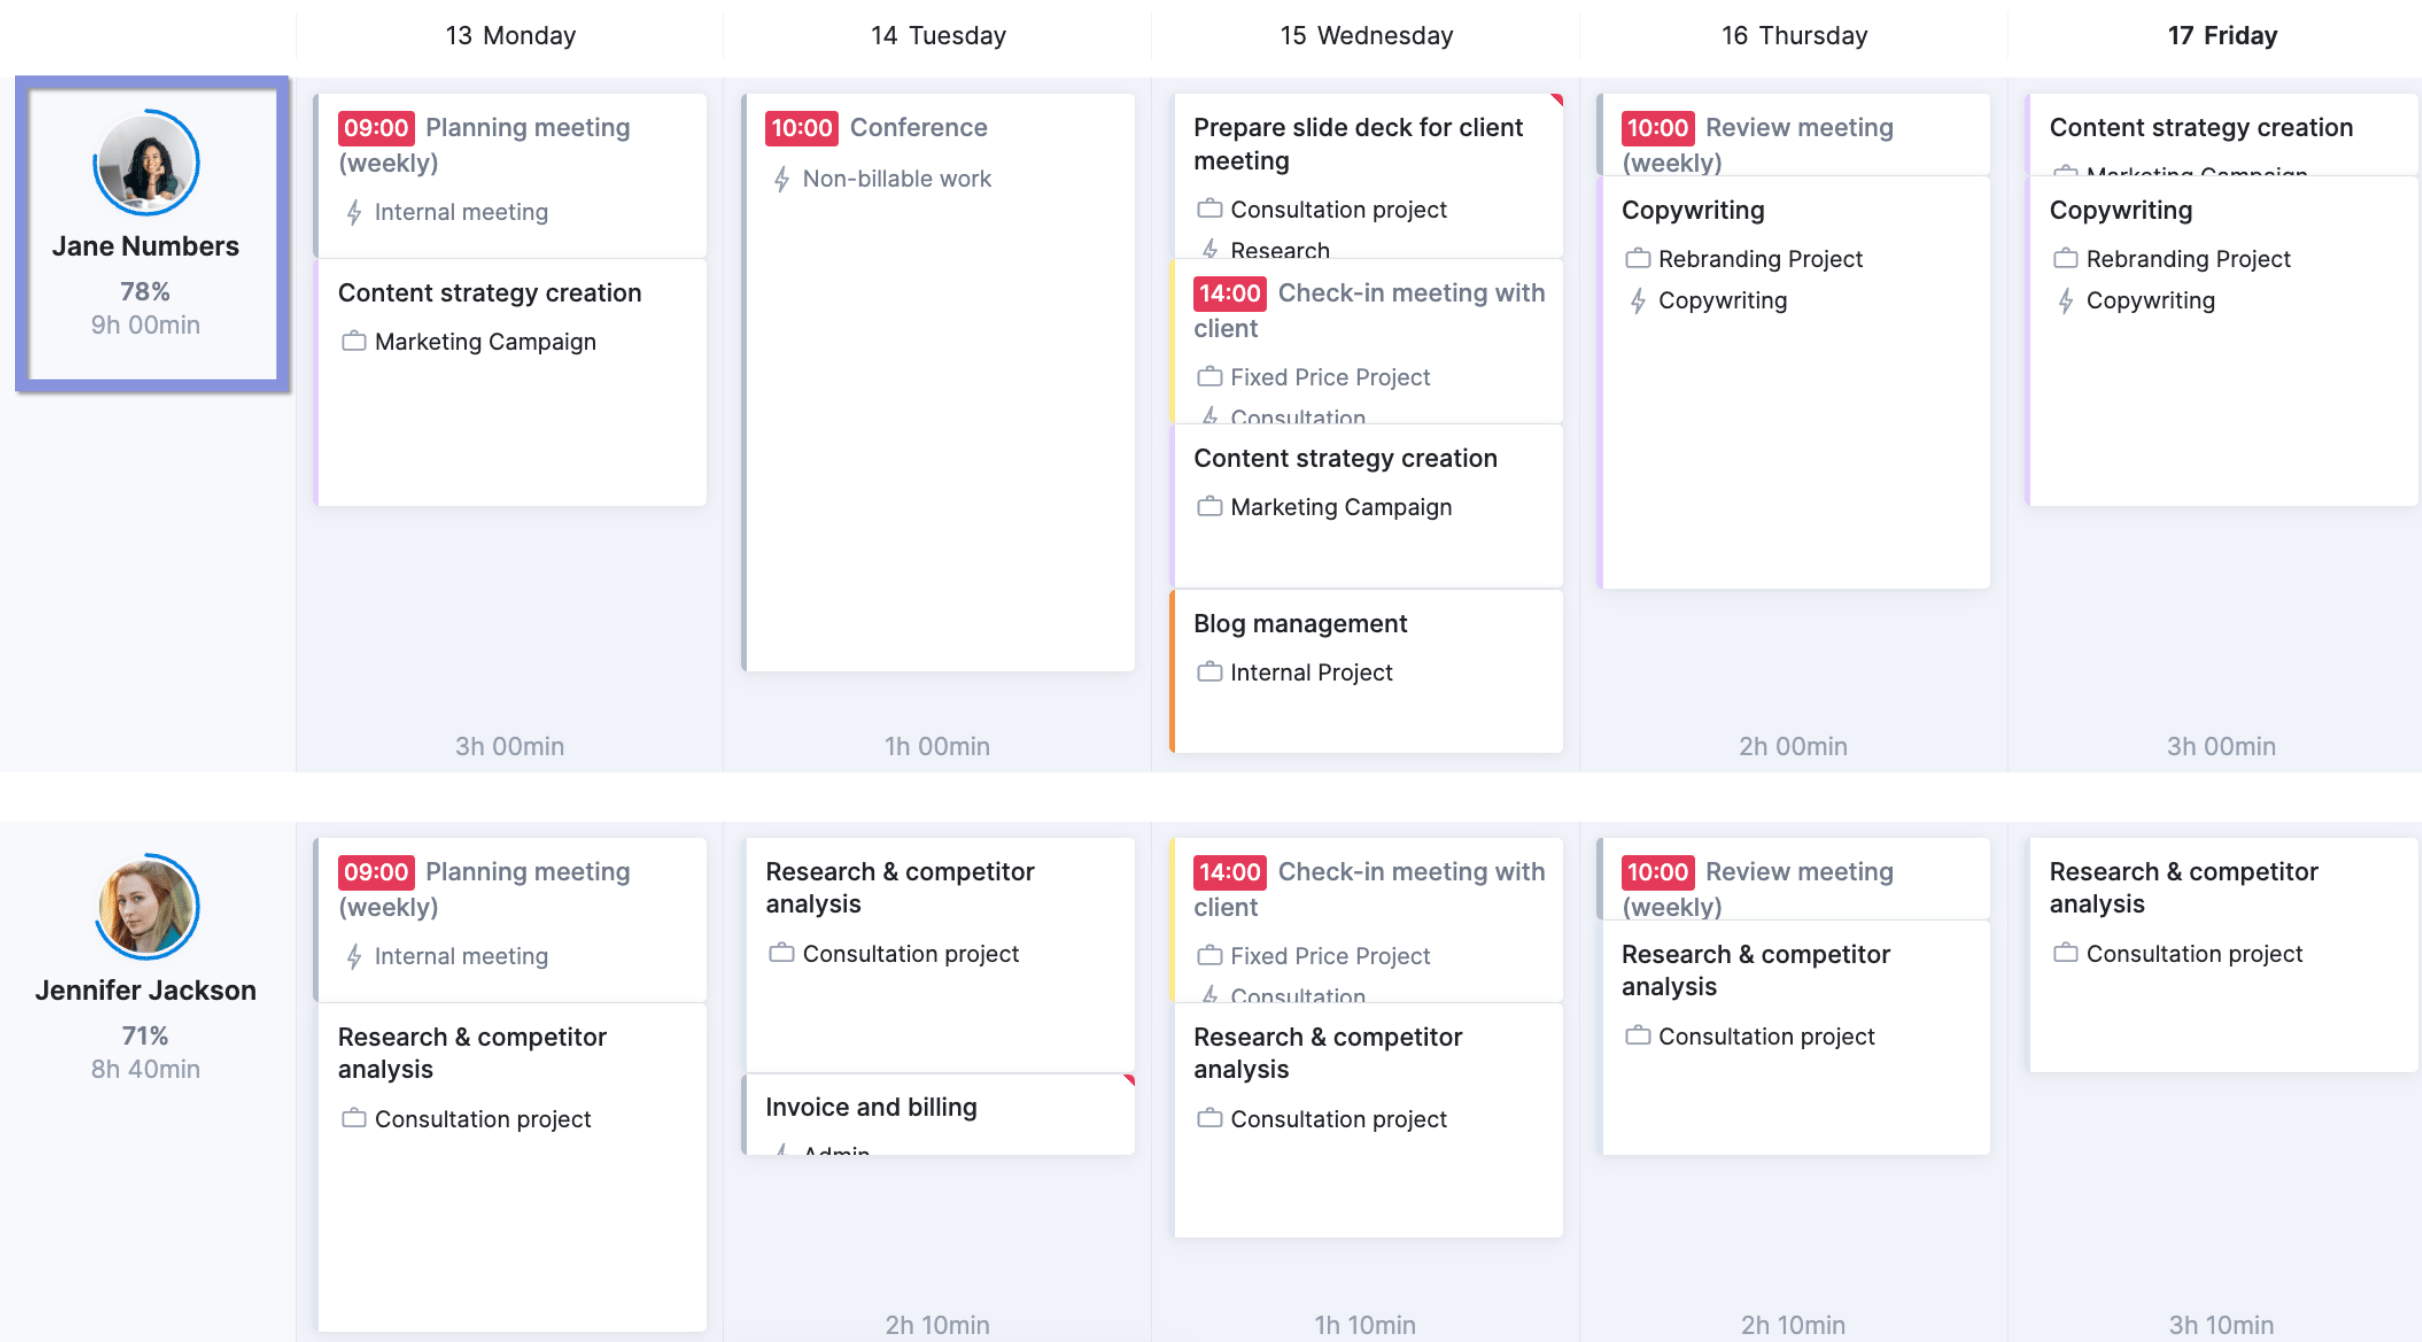
On the left sidebar, you’ll see all unassigned tasks across projects.
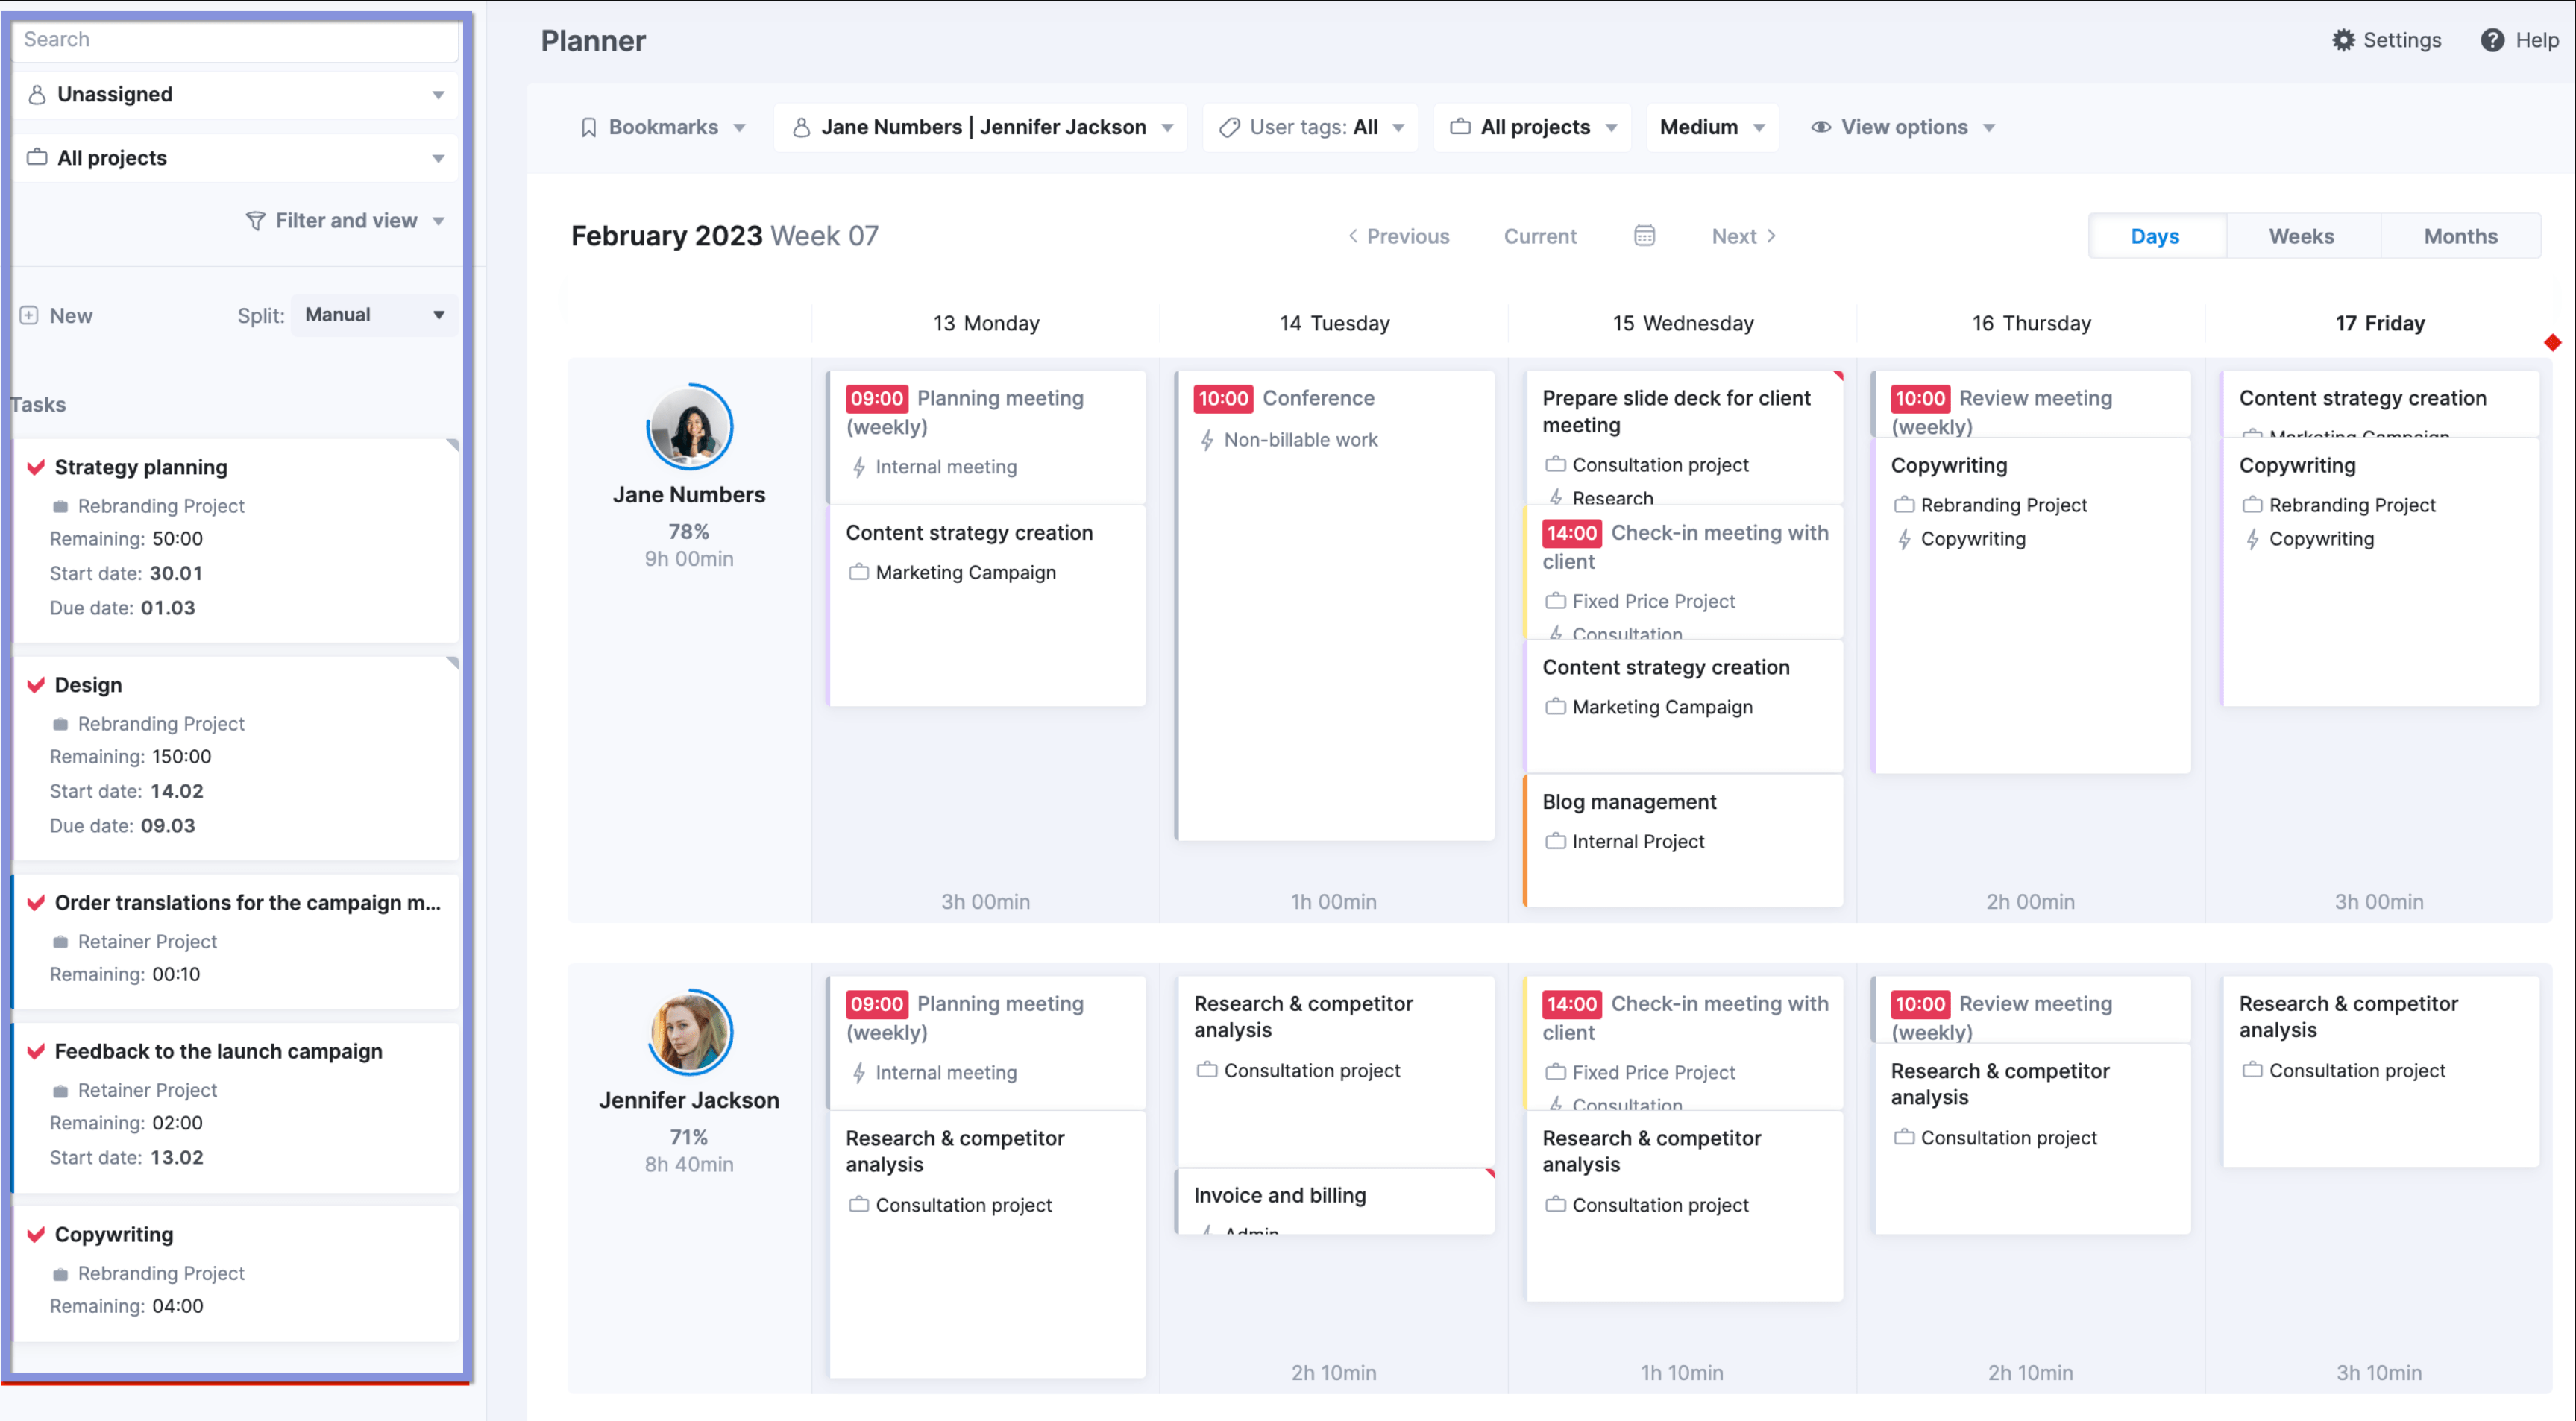
On the right, you’ll see your team members’ workloads on a daily, weekly, or monthly basis.

To only see a specific project, select it from the “All Projects” dropdown.
You can also see:
- How full their schedules already are (the blue bar around their profile picture)
- Their current booked capacity (the percentage beneath their profile picture)
- Their remaining capacity (the hours listed in gray beneath their profile picture)
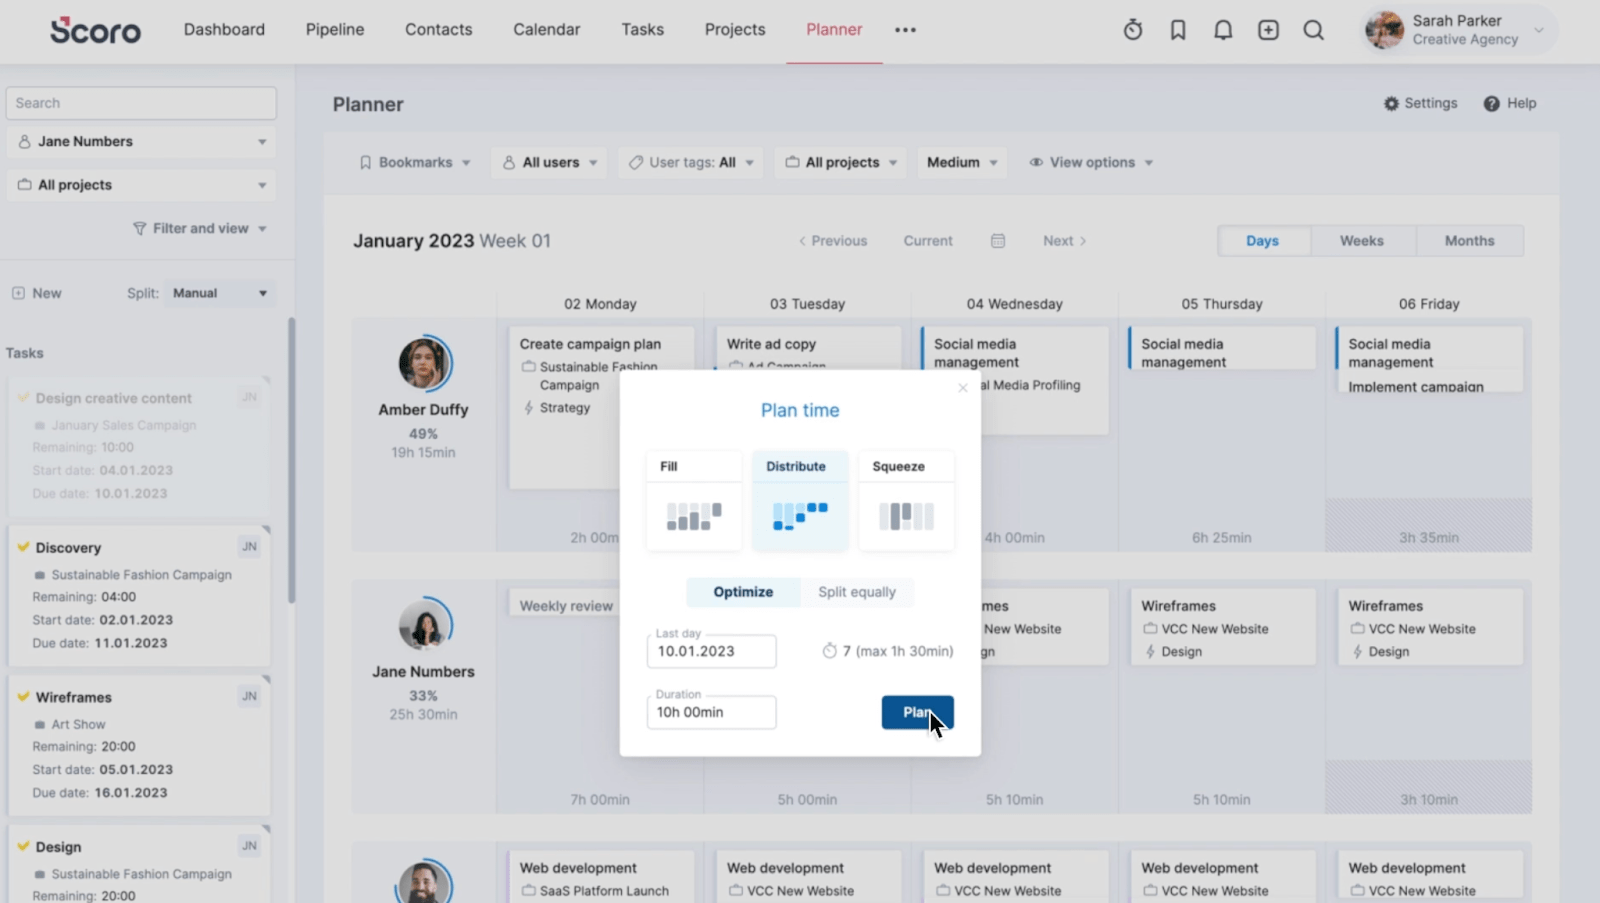
To assign work, drag and drop the task card onto the day you want the work to be performed. Then, you’ll see the “Plan time” box that gives you three options for how to schedule the time:
- Fill: Lets you fit the task into one day on the team member’s existing schedule
- Distribute: Lets you spread the task over multiple days
- Squeeze: Lets you push other tasks back to prioritize this one
7. Finalize your budget and cost-tracking system
Now that you’ve established your timeline, team, and tasks, review the project cost estimates from your initial quote to ensure that you’re still within budget.
Adjust your project budget accordingly so it’s as accurate as possible before you get started.
For example, if your labor costs are too high, go back to your Gantt chart or Planner and assign some of the tasks to team members with a lower labor cost. This precise financial foundation will help you avoid overspending and cutting into your margins during the project.
You’ll also need to track actual costs against estimated costs. This will help you monitor spending, identify potential overruns early, and take corrective action to avoid reducing profits.
The quote you created in Scoro can serve as your baseline budget, providing a clear starting point for cost tracking.
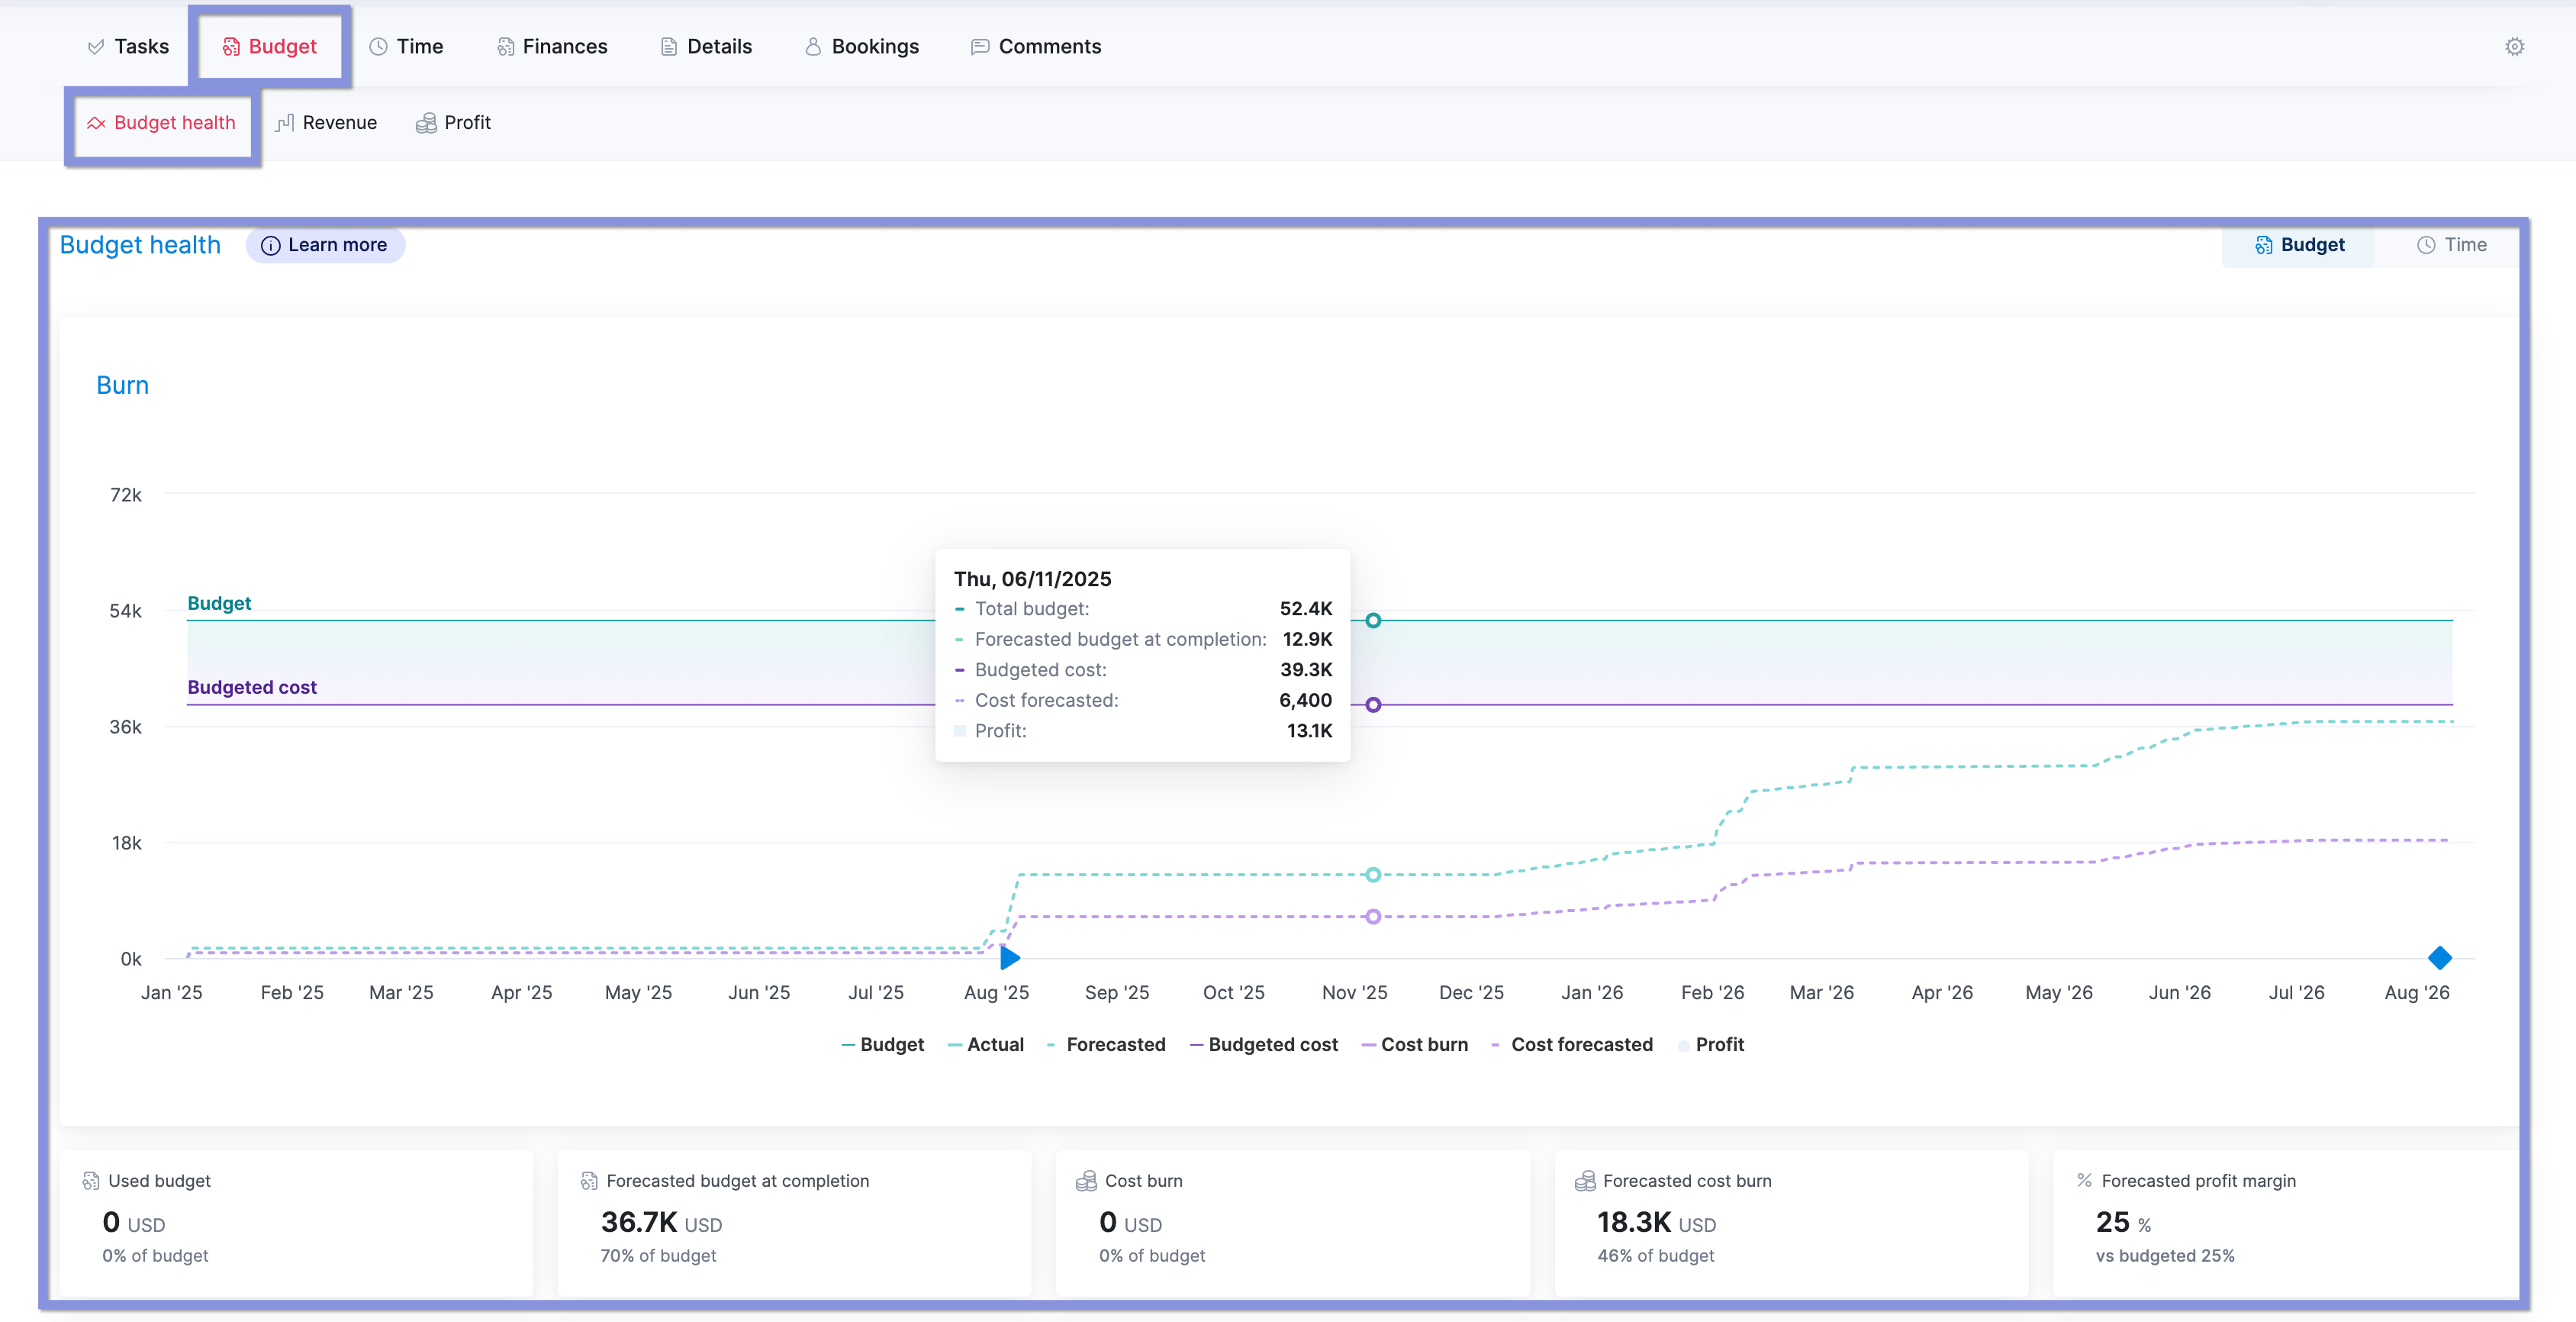
You can then use the “Budget health” chart for each project to monitor your spending.
This chart provides a visual snapshot of your project’s financial health, enabling you to monitor progress and make informed decisions.
It tracks key metrics such as:
- Profit & Profit Margin: Shows your projected profit and profit margin, giving you a clear picture of your project’s financial performance.
- Budget vs. Actuals: Compares your initial budget to your actual spending, highlighting any areas where you might be over or under budget.
- Forecast: Predicts your future spending based on current trends, allowing you to anticipate potential overruns and adjust your strategy accordingly.
You can find it by going to the “Budget” tab, and then clicking on the “Budget health” tab.
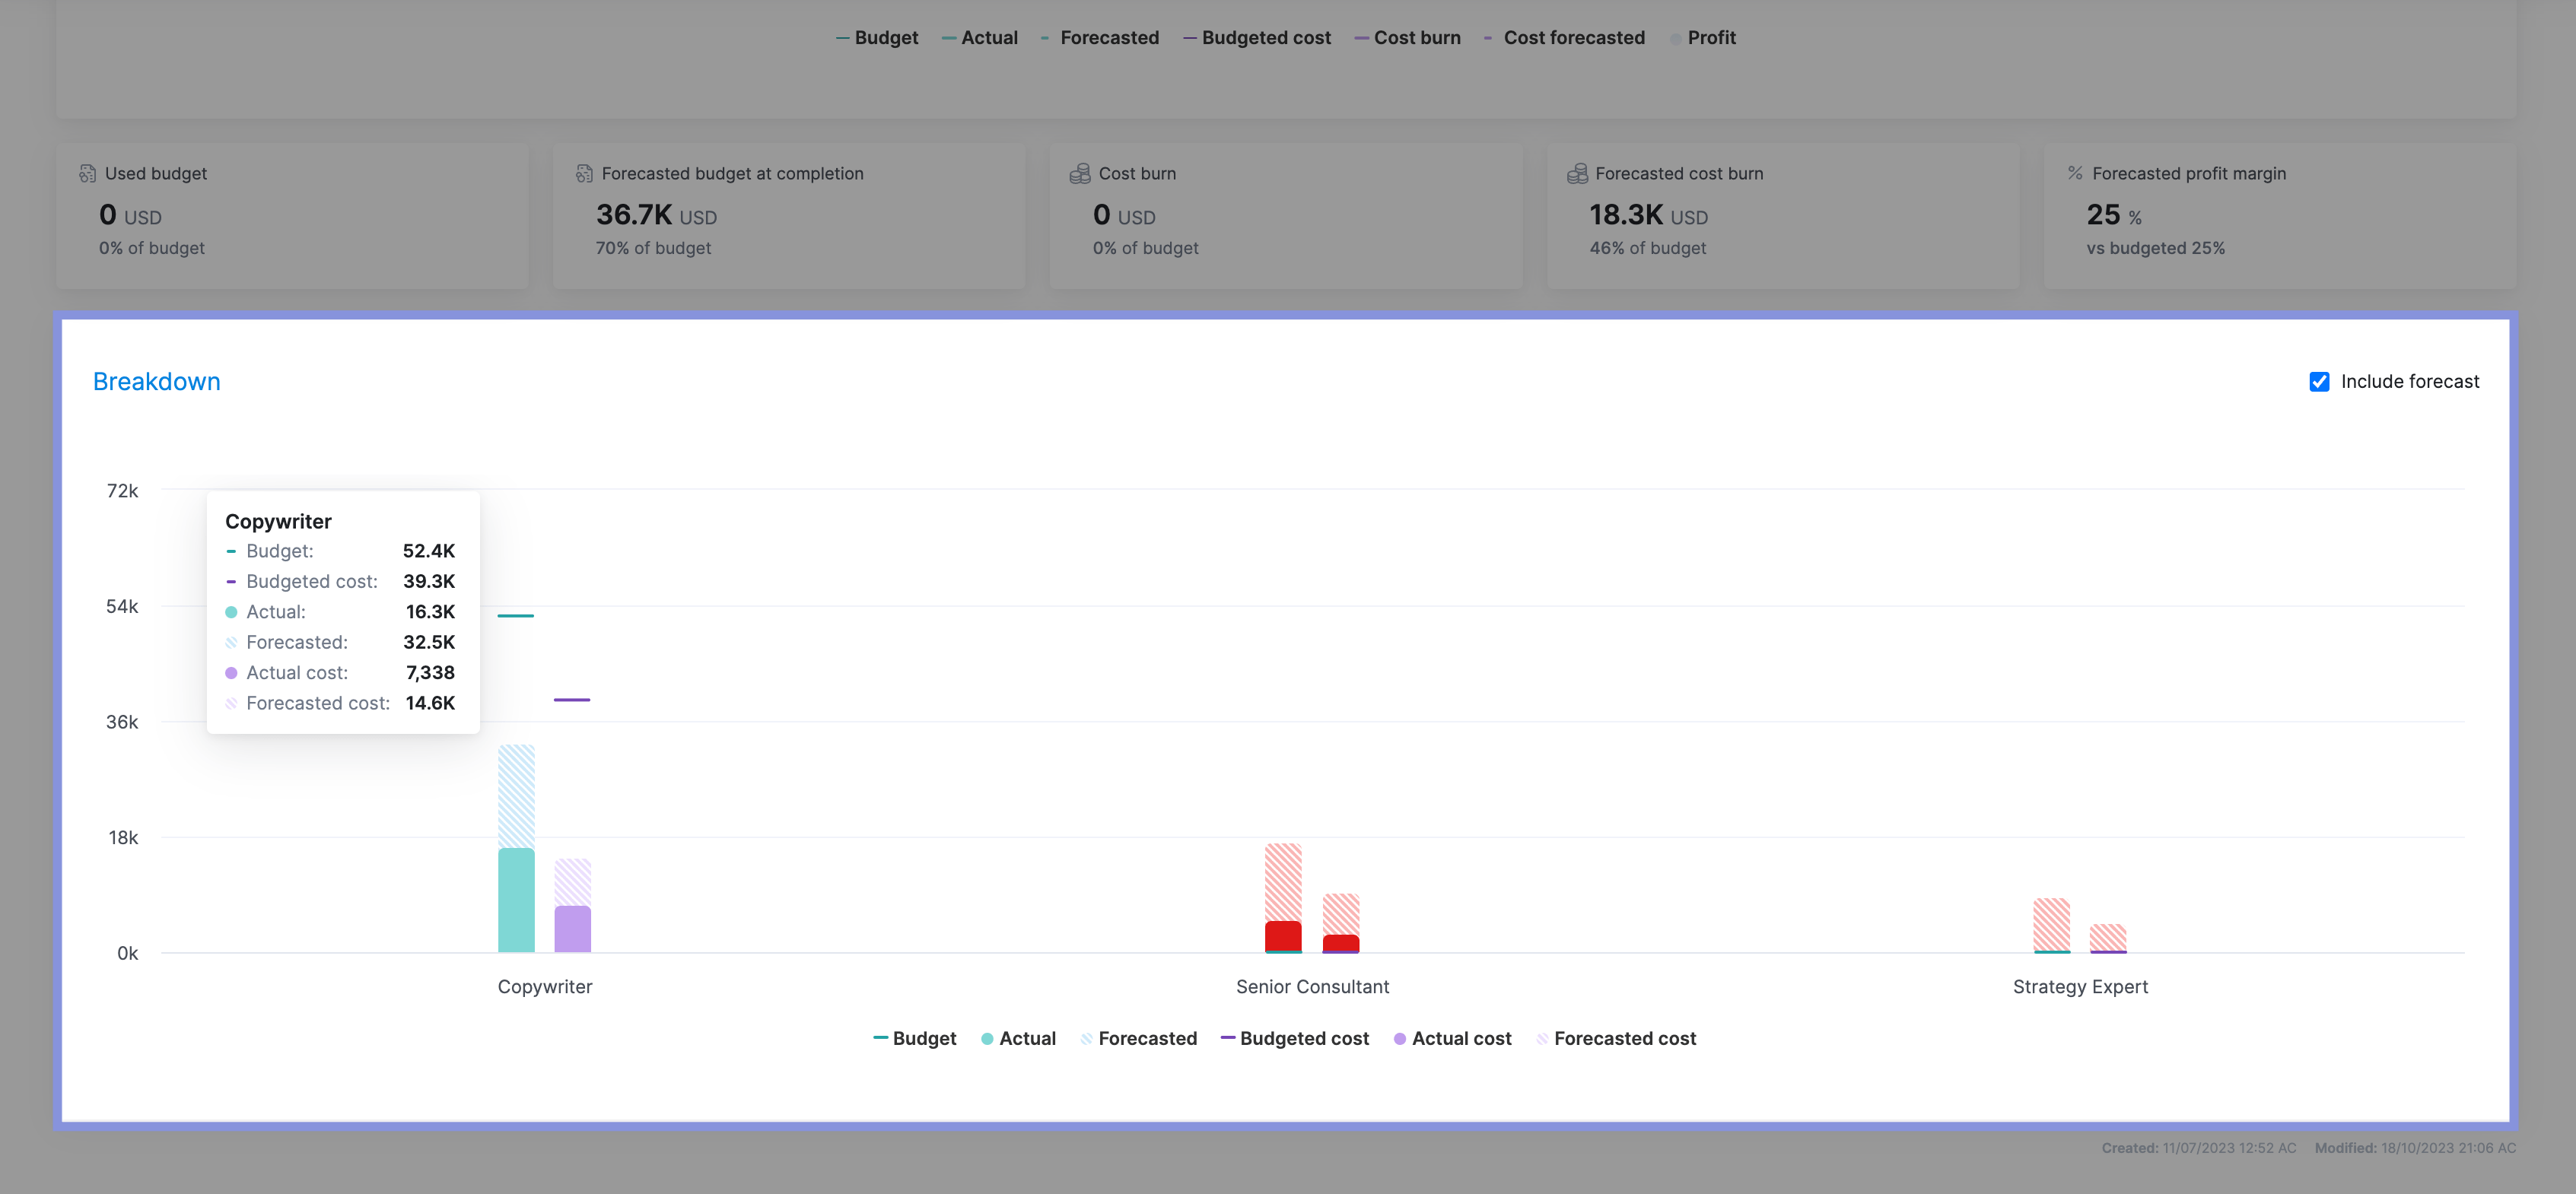
Under the “Budget health” chart, you’ll also find a breakdown of services showing the budgeted costs, actual costs, and forecasted costs for each specific service included in the project.
This breakdown provides a more granular view of your spending, allowing you to identify which services are contributing most to the overall cost and whether any are exceeding their allocated budgets.
8. Create a client communications and reporting strategy
Define how, when, and where to communicate project updates to your clients.
When the client knows they’ll get regular updates—and knows where to find them—you build greater transparency and trust. And you can all stay on the same page and proactively work together to address any issues.
Also, knowing the plan for communicating updates, requesting feedback, and reporting saves your team time—no more messaging each other to figure out who should contact clients (and when).
Consider discussing:
- How often you’ll provide updates: Weekly tends to make sense for retainers, big projects with lots of moving pieces, and projects that require consistent client feedback. Otherwise, bi-weekly or monthly updates are usually enough to keep clients in the loop on important milestones.
- Which channels to use: Slack, Microsoft Teams, email, Zoom—different clients have different preferences.
You can also use Scoro’s “Customer Portal” to streamline client communications by giving them an access-based, shared workspace with you and your team.
To set it up, go to “Settings” → “Customer Portal” → “Add new user.” Then, select their access level using the “Role” button (you can adjust access settings in the portal’s “Roles and Permissions” section).
Then, click “Save and send invitation.”

Once the client accepts, they’ll be able to see a version of their project dashboard based on their access level.
At a minimum, client dashboards usually include:
- Project progress
- A Gantt chart
- Planned and completed tasks
- Budget info

Clients can click on an individual task to see the files and work associated with it. If they need to review something, your team can tag them in a comment right on the respective task.
From there, they can review the file and leave feedback—all neatly organized within your Scoro dashboard.

This way, everyone has access to the same information, work moves forward faster, and important communication and details are kept in the loop.
9. Set up project monitoring processes
Once you have all the key project details laid out, define how you’ll monitor and measure project progress and success. And schedule regular project update meetings with your team to review your progress.
This includes:
- Establishing project KPIs and metrics
- Determining how you’ll track task progress
- Setting up regular (at least monthly) budget reviews
All these tactics create more opportunities to identify and discuss any challenges. And to make necessary adjustments to your project before it gets off track. This will help you improve your profitability by avoiding overspending and overservicing.
It’ll also help you deliver more on-time projects because you can proactively identify when project phases or tasks are falling behind schedule. And quickly get to the root causes and take corrective action. Like adjusting resources, reducing scope creep, or addressing skills gaps.
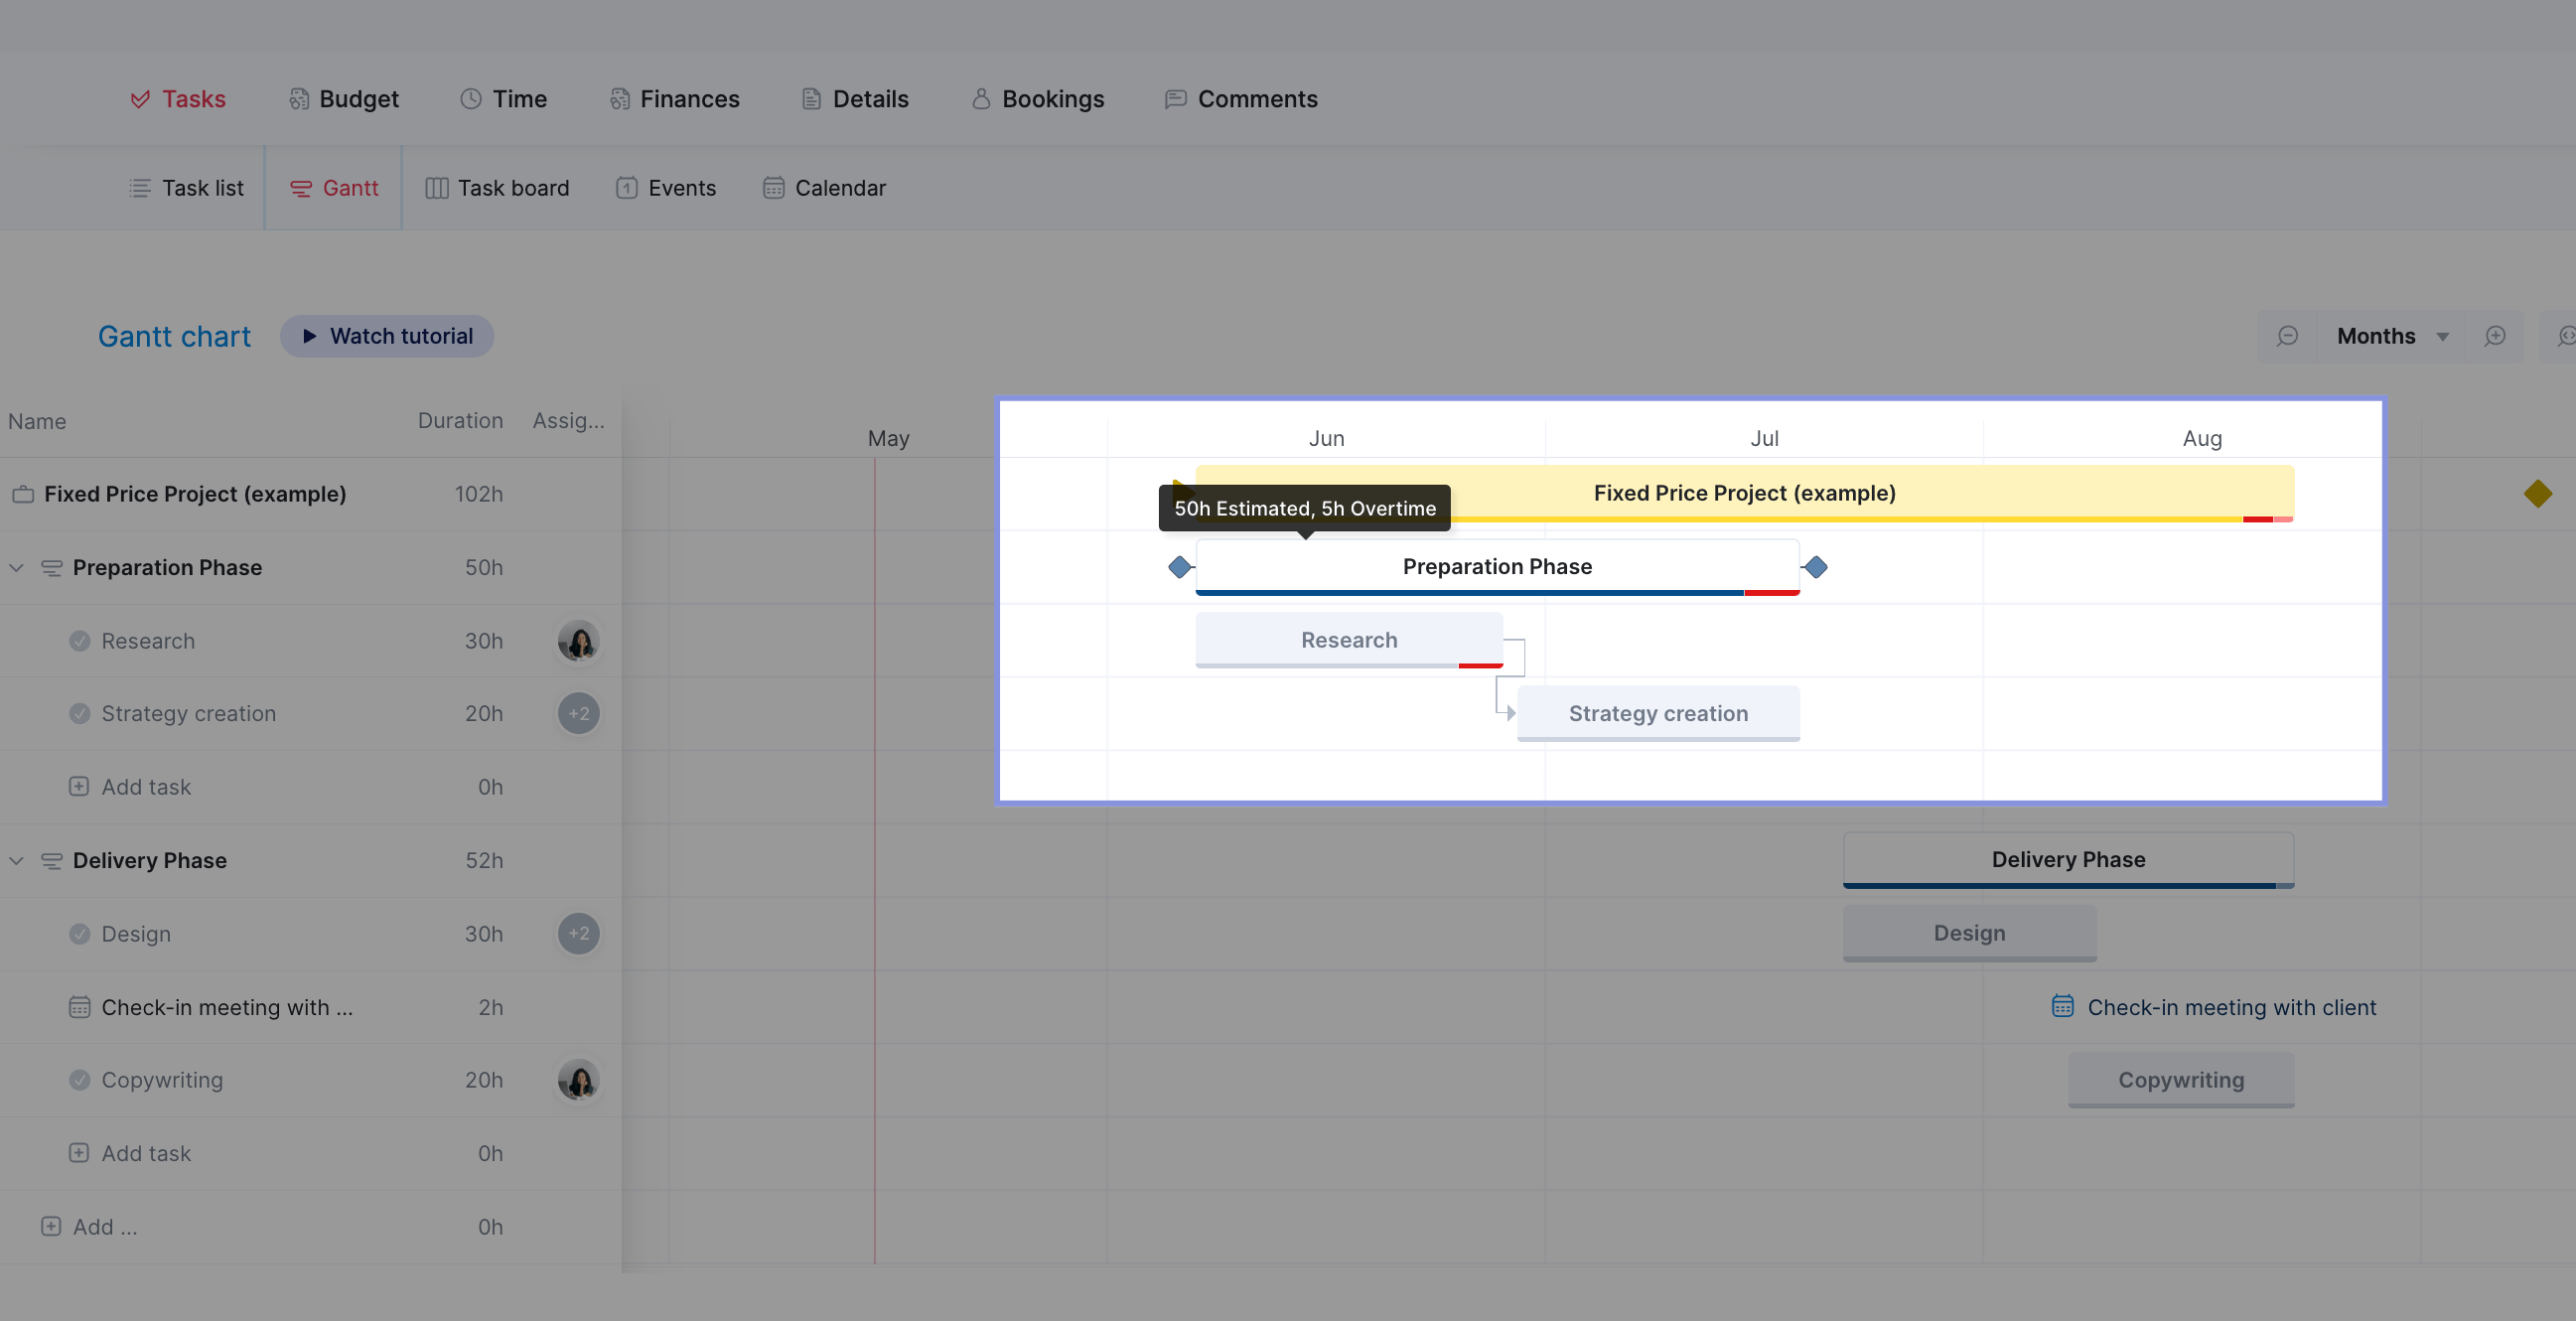
Scoro’s “Gantt” tab makes it simple to monitor project progress in real-time.
The vertical red line shows today’s date. So, you can quickly see if you’re on or off track with project progress. Any tasks that are grayed out are completed.
For more details on in-progress tasks or phases, hover over the bar to see how many hours are estimated, completed, and overscheduled.
Use this data to spot overservicing issues or backlogs. And connect with your team before delays start to impact deliveries and your profitability.
To keep an eye on KPIs and financial progress, go to “Budget” → “Quoted vs. Actual.”
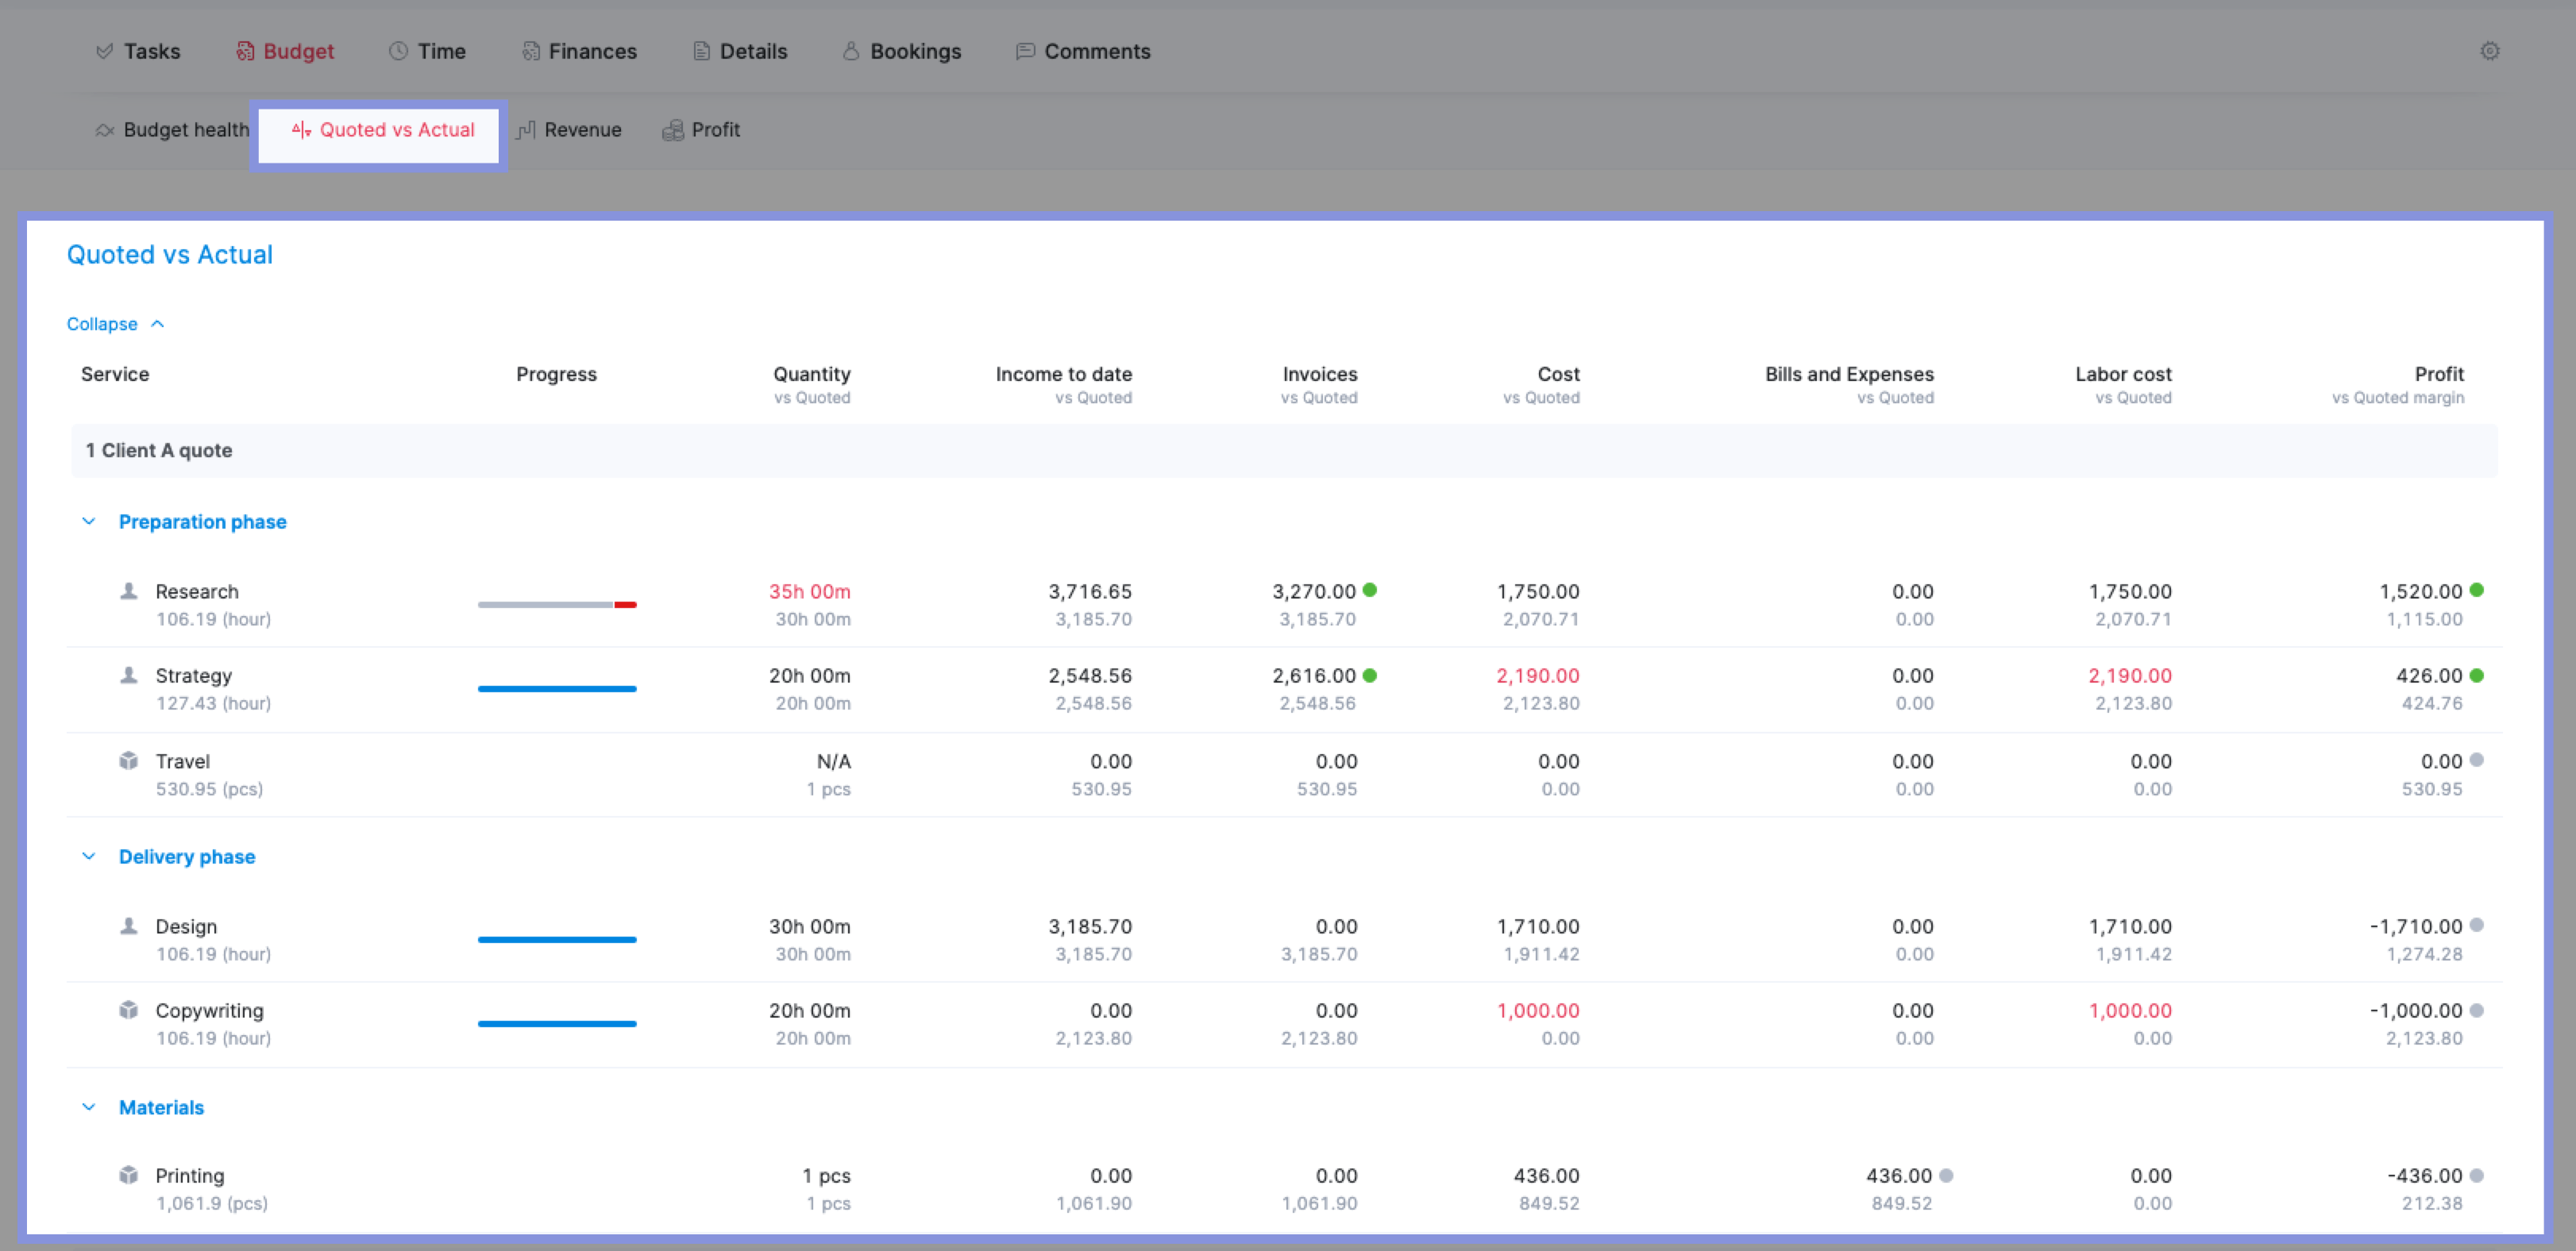
Here, you can see how profitable each project phase has been, how long your team spent on each task, and how you’re progressing in comparison to your initial quoted estimates.
The “Progress” bar uses blue for completed tasks and yellow for scheduled tasks, giving you a visual glance at how you’re progressing in each phase.
Then, look at the “Quantity” column” to get details on the time spent, “Cost” and “Bills and Expenses” to see internal and external costs, and “Profit” to see your margins.
This helps you see if you need to make adjustments to staffing, spending, or timelines to meet your financial and delivery goals.
Simplify project planning with Scoro
Creating a project plan gives you a concrete roadmap that aligns everyone—your team, clients, and other key stakeholders—on what needs to happen to deliver a successful project.
Scoro’s custom dashboards make it even easier to measure success by tracking the KPIs that matter most to you and your unique clients. Choose from a variety of different widgets and metrics to create an easy-to-read home base that keeps everyone on the same page in real time.
Ad Esse Consulting reaped the benefits of these adjustable dashboards, with Director Rhiannon Gibbs noting that the agency successfully shifted its focus “towards project execution and achieving outcomes.”
Scoro makes planning, monitoring, tracking, and communicating about your projects easy. Sign up for a free trial now and see for yourself.