
Missed deadlines despite a full team? Confusion over task ownership? Overworked employees next to underutilized ones?
These issues don’t just slow your team—they cost your business money.
Poor resource scheduling leads to wasted time, project delays, and reduced profitability.
By improving your scheduling process, you can assign tasks clearly, avoid costly delays, and ensure every team member contributes to increasing your bottom line.
Here’s how to get it right:
What is resource scheduling in project management?
Resource scheduling involves assigning tasks with defined start and end dates to specific team members. And matching individual skills and availability to daily project tasks.
The process converts high-level project plans into day-to-day work. Each task has a designated owner and timeframe to prevent confusion and delays.
For example:
- UI designer Sarah has three days to complete wireframes by Wednesday, ensuring the design phase stays on track
- Copywriter Alex is assigned to draft the website’s landing page copy, with a two-day window to deliver by Friday
- Developer Tom is tasked with coding the login feature, scheduled to start after Sarah’s wireframes are approved
- Project Manager Julie schedules a client review meeting for Friday, ensuring the team receives feedback before the next phase starts
Each team member knows what they need to do and when. Preventing bottlenecks and keeping the project moving forward smoothly.
Capacity planning vs resource planning vs resource scheduling
Resource scheduling in project management is the final, detailed step in a three-part process of managing your team’s workload.
Each step narrows the focus and moves the project from a high-level overview to individual, daily tasks:
- Capacity planning evaluates your overall ability to take on projects. It answers questions like: “Do we have enough developers to handle three new website builds next quarter?”
- Resource planning determines which roles and team members suit specific projects. For example, “Which designers have the right skills and availability for our upcoming app redesign?”
- Resource scheduling assigns precise tasks and timelines. For example, “Emma will work on the product page layouts on Monday and Tuesday and deliver at the end of the day (EOD). And Jake will work on implementing the navigation menu from Wednesday through Friday with an EOD deadline.”
Resource scheduling prerequisites: What you need before you start
Before creating your resource schedule, you first need three specific elements in place:
- Your capacity plan: A clear picture of your resource pool, considering existing workloads, skill sets, and upcoming projects and PTO. Effective scheduling ensures you have enough people with the right skills to complete the project without overworking anyone.
- Your detailed project scope: A well-defined project scope with specific deliverables and milestones. The project scope outlines what work needs to be done, which guides how you’ll create tasks and deadlines.
- Your resource plan: A clear roster of which roles and people will work on certain projects, established during the resource planning phase. This influences how you’ll create and allocate tasks.
Without them, you risk creating an inaccurate, unrealistic, or completely unworkable project schedule, leading to delays, budget overruns, and frustrated team members.
Top Tip
Scoro can help you automate and manage all these key pieces. For example, Cosmonauts & Kings was able to increase billable utilization, gain control over external costs, and improve project margins with Scoro’s unified platform.

How to schedule resources for your projects
Outlining and assigning tasks to your team members instead of just telling them what end product they need to deliver takes time and effort.
But it’s worth every minute you put into it.
With clearly defined steps in a resource schedule, you’ll see:
- Fewer mix-ups between team members
- Less scrambling to meet deadlines
- More successful projects
This all translates to projects completed on time and within budget, leading to increased profitability and happier clients.
Let’s walk through the steps to effective resource scheduling:
1. Break down the project work into tasks
Create a Work Breakdown Structure (WBS) to define the project’s key areas and tasks clearly.
Here’s what it looks like:
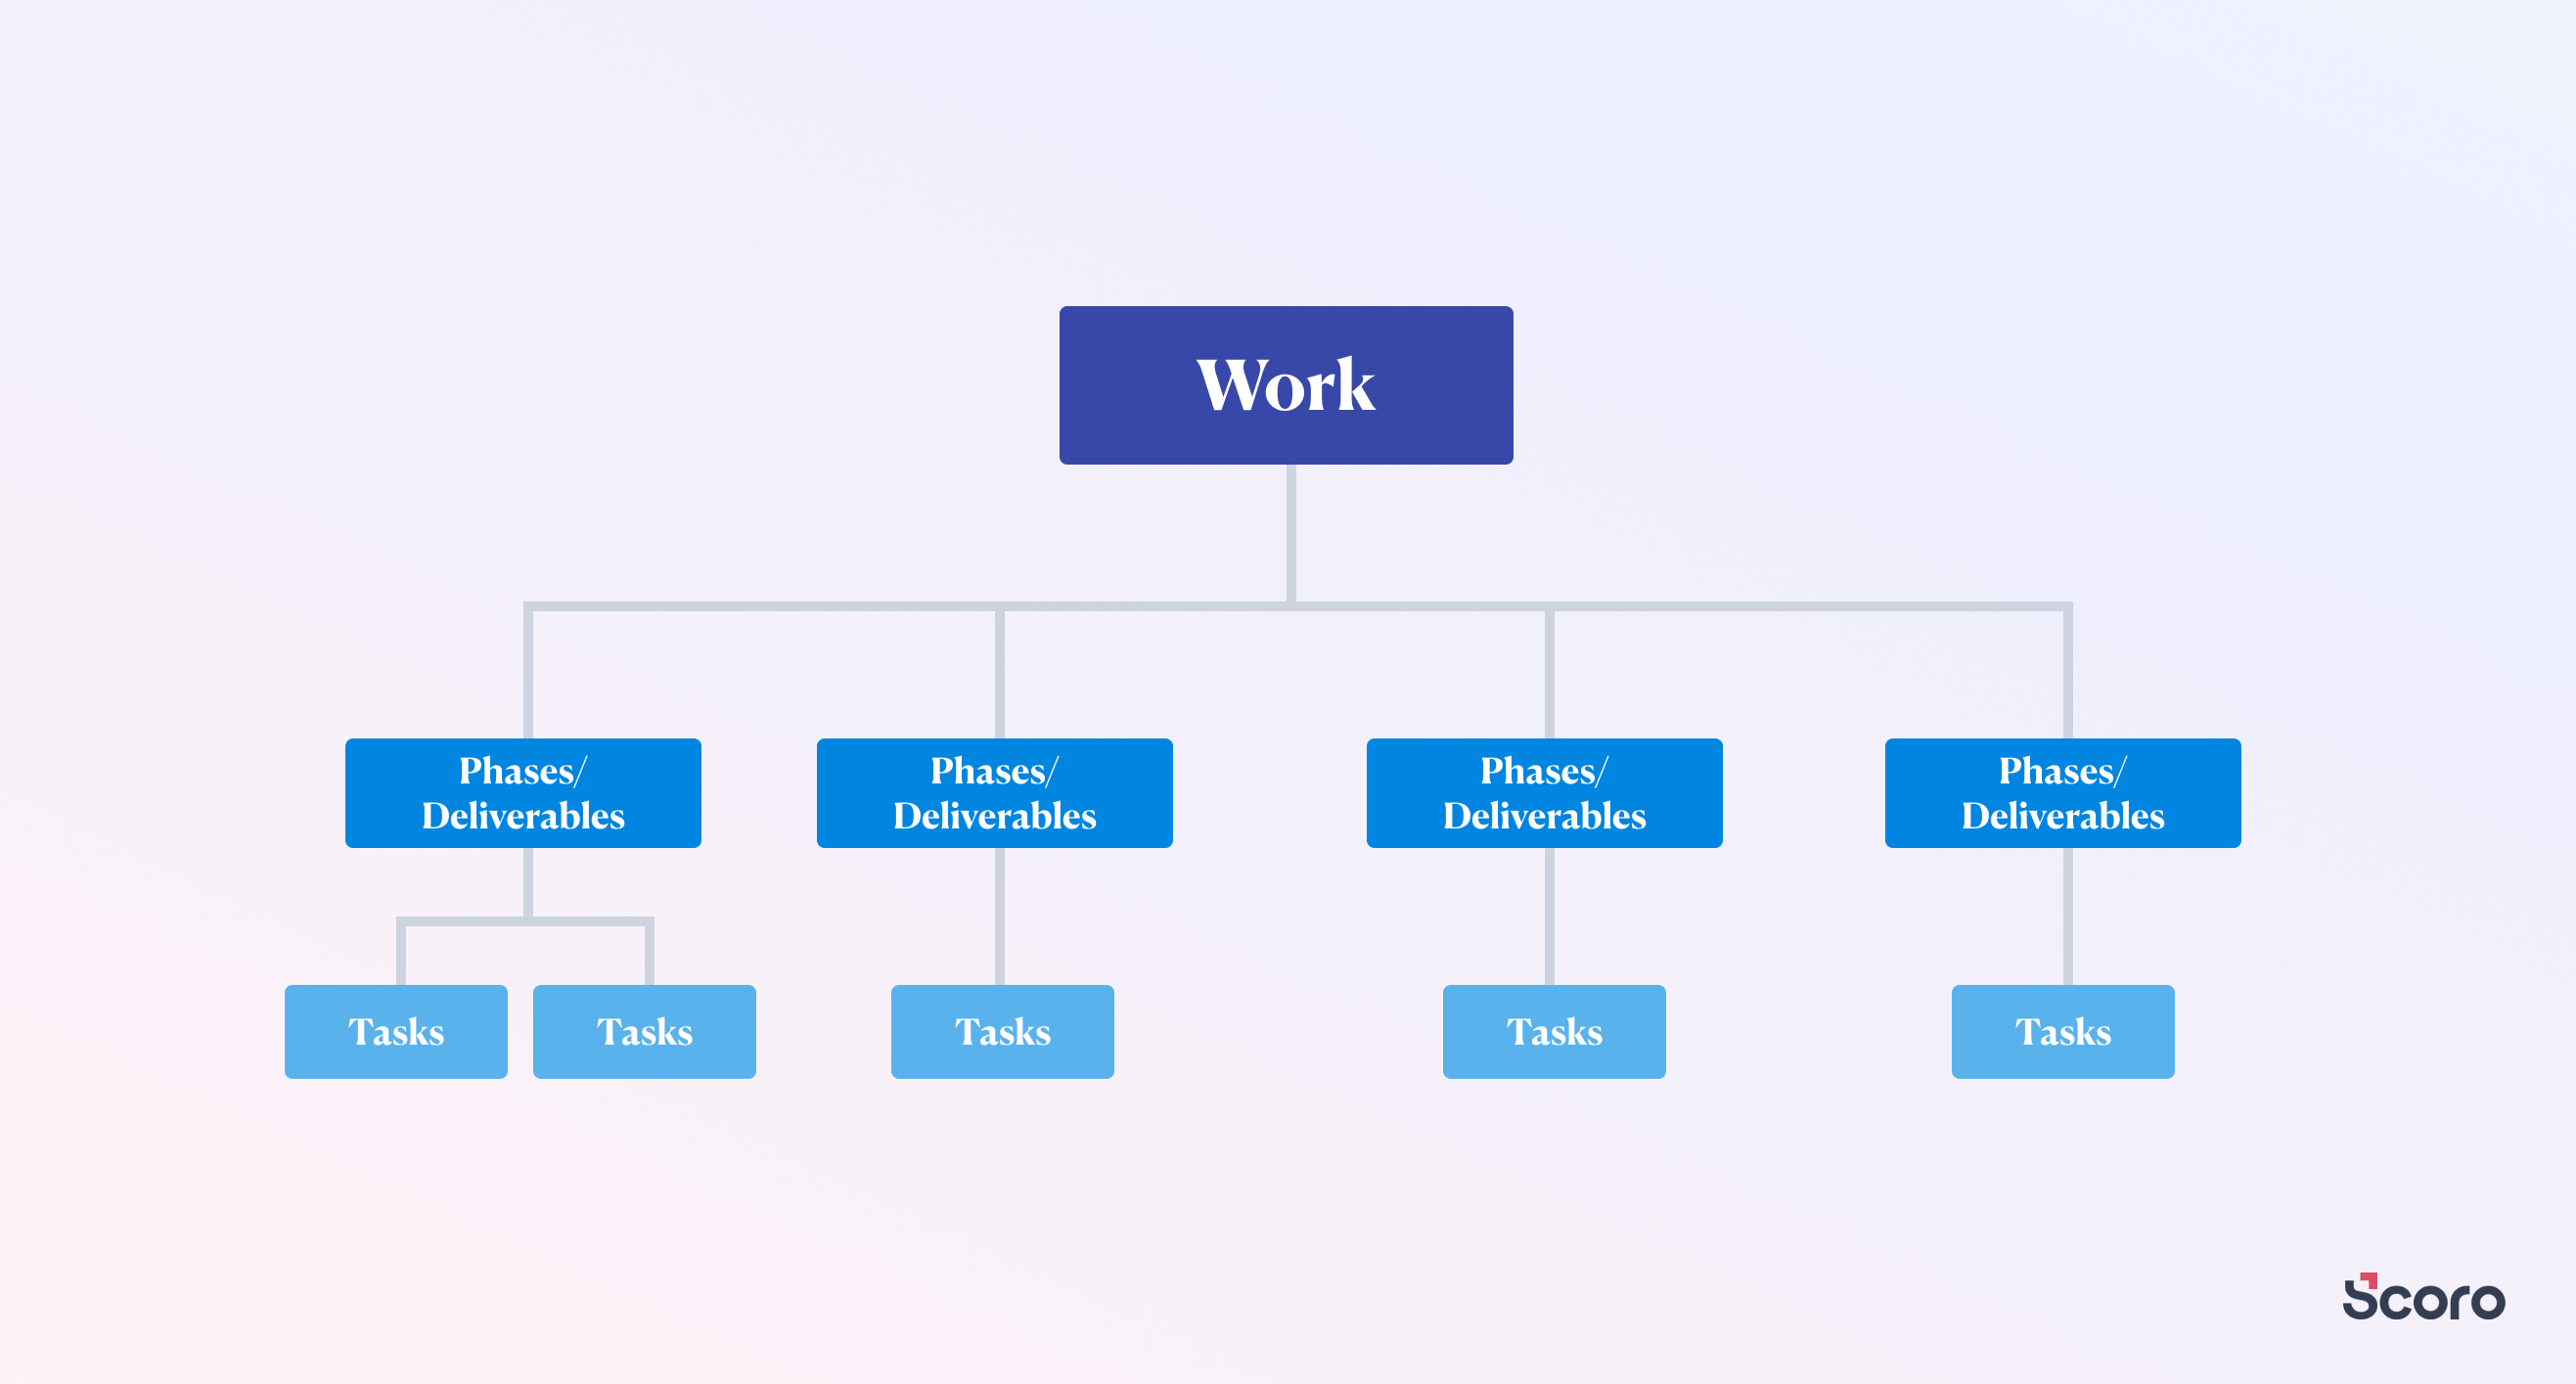
Use the info on deliverables and phases you listed out while scoping and estimating project costs as your starting point.
Now, break these down into more granular, actionable tasks. This is where you create the hierarchical structure of your WBS.
For example, if you’re working on a website redesign project, you might include these high-level phases: design, copywriting, and development.
Then, create specific tasks and task durations within each phase.
For instance:
Design phase:
- Create wireframes for homepage (Two days)
- Implement a new color scheme (One day)
- Develop responsive layouts for mobile devices (Three days)
Copywriting phase:
- Write new homepage content (Two days)
- Revise the “About Us” page (One day)
- Create product descriptions (Three days)
Development phase:
- Set up development environment (One day)
- Code homepage layout (Three days)
- Implement responsive design elements (Two days)
- Integrate content management system (Two days)
Once you’ve defined your tasks, resource scheduling software like Scoro can automate the remaining process.
In Scoro, you have two options for this: quote-to-task or task bundles.
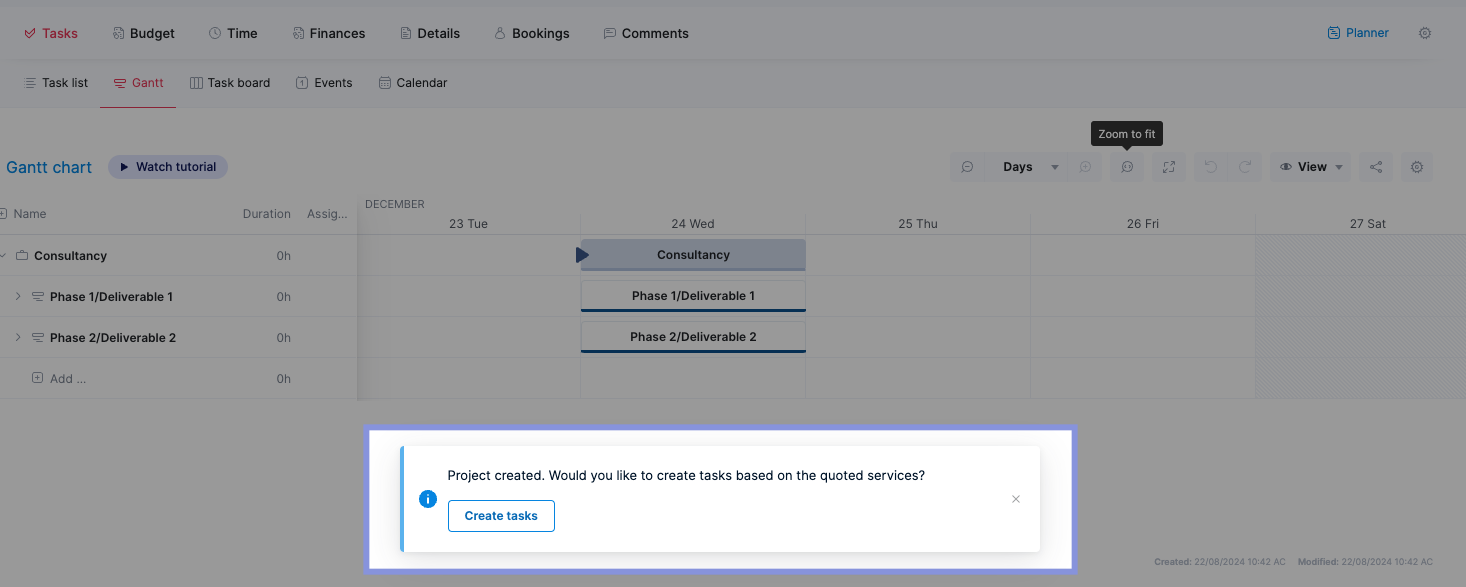
Use the quote-to-task feature if your initial quote closely mirrors your task list.
Once you turn your quote into a project, give it a project name, and hit save, you’ll see a quick-action pop-up that looks like this:
Or select “Create tasks” from within the quote:
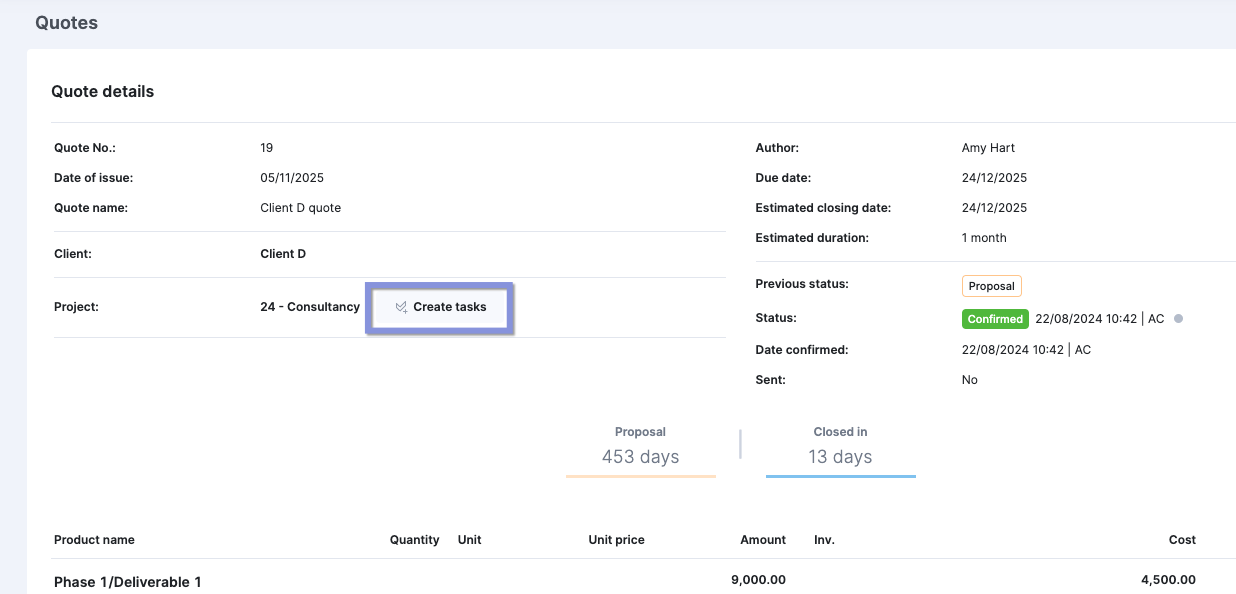
Then, select the services you wish to assign as tasks. Remove any you don’t want to convert to tasks by clicking the “X” next to each item.
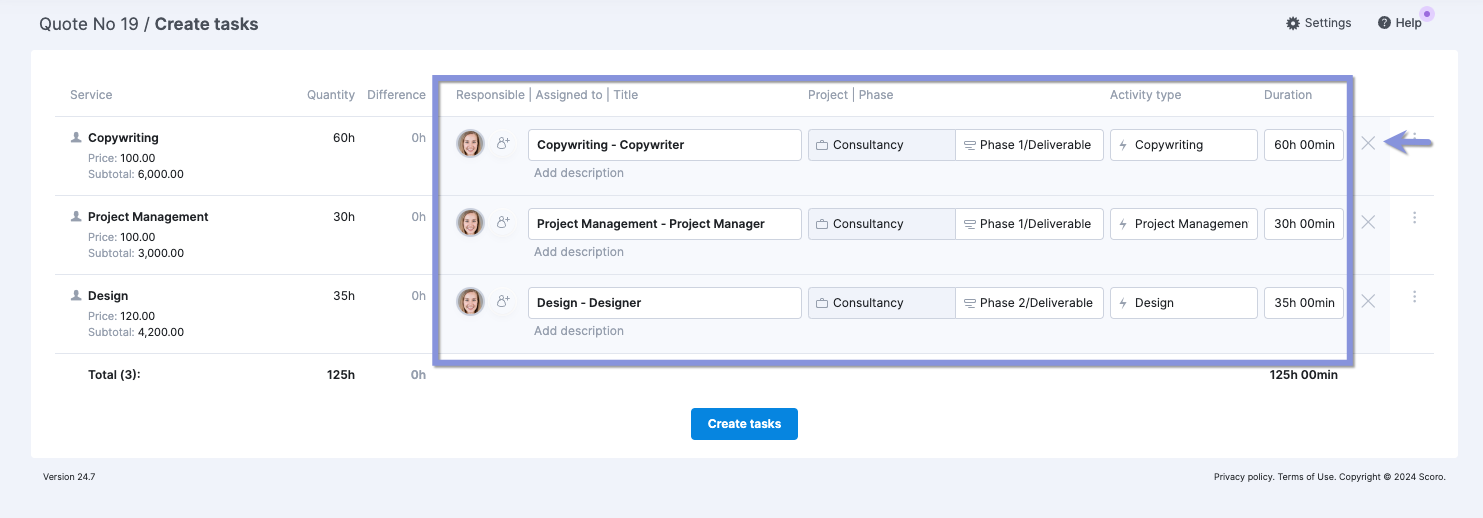
As you work through the list, you can rename the task and add or change its description if needed.
Once you’re all set, click “Create tasks.”
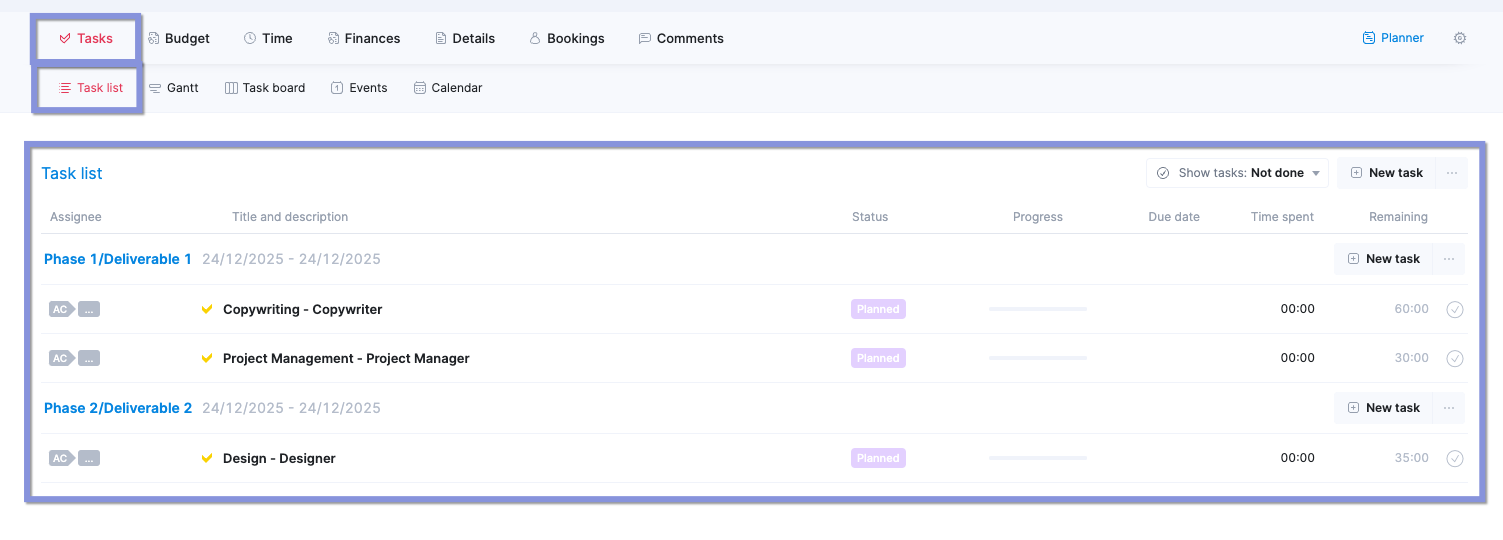
Your new tasks can be found within “Task list” under the “Tasks” tab in your project.
On the flip side, if your task list is structured differently than your initial quote, use Scoro’s task bundle option.
Task bundles are pre-defined sets of tasks you can create and save in Scoro for frequently recurring project types. This saves time and ensures consistency across similar projects.
Once you have a task bundle, you can easily add it to any new project and adjust it to specific task details.
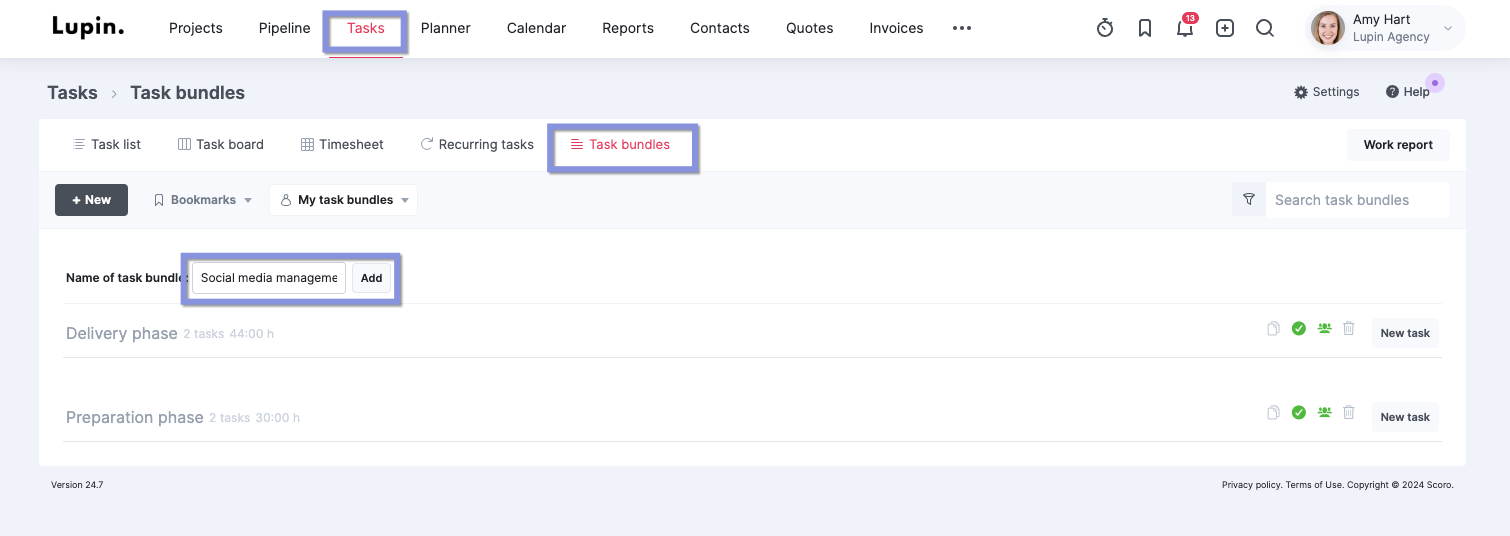
- Navigate to “Tasks” > “Task bundles”
- Click “+ New” to create a bundle
- Name your bundle (e.g., “Social media management”)
- Then, click “Add“
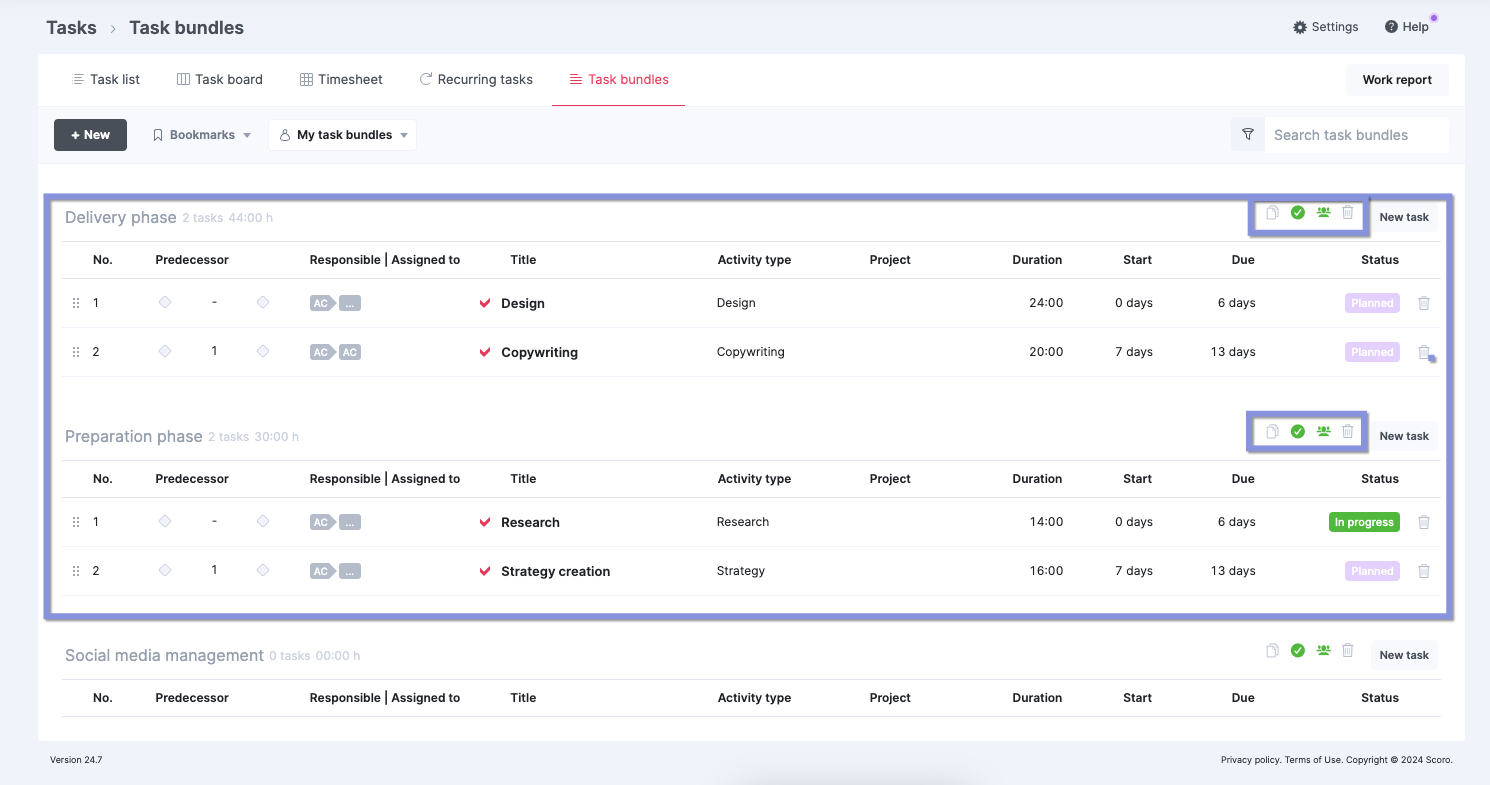
Within the newly created bundle, click “New task” to add individual tasks. You can set task durations, dependencies, assignees, and other details as needed.
Once you add the bundle, it’ll appear in the task bundle list as active, shared with other users, or empty with a green icon.
Here’s what each status means:
- Active: The task bundle is currently available for you to use in your projects.
- Shared with other users: The task bundle has been shared with other team members in your Scoro account, allowing them to use it in their projects as well.
- Empty: The task bundle does not currently contain any tasks.
2. Assign tasks to the project team
Once you’ve broken down your project into specific tasks, assign them to your team members.
When allocating tasks, consider the following factors:
- Skills: Match tasks to team members with the most relevant skills or expertise, like assigning complex coding tasks to your senior developers
- Availability: Distribute tasks based on team members’ current schedules to prevent overbooking and project delays
- Billable utilization: When assigning tasks, aim to keep your team members billable utilization rates between 70 and 80% to avoid costly burnout or disengagement
- Learning and development: Assign tasks that challenge team members and help them grow their skills, giving hands-on experience that broadens the work your existing in-house bench can take on
- Priorities: Allocate high-priority, fast-turnaround tasks to your most experienced team members to ensure they complete critical work on time
Once you decide who you want to work on each task, use the “Planner” tool to schedule work for your project team.
Here, you’ll see two main sections:
- Left panel: Shows all the unscheduled tasks waiting to be assigned
- Right panel: Shows your team members’ schedules, including their availability and any existing assignments
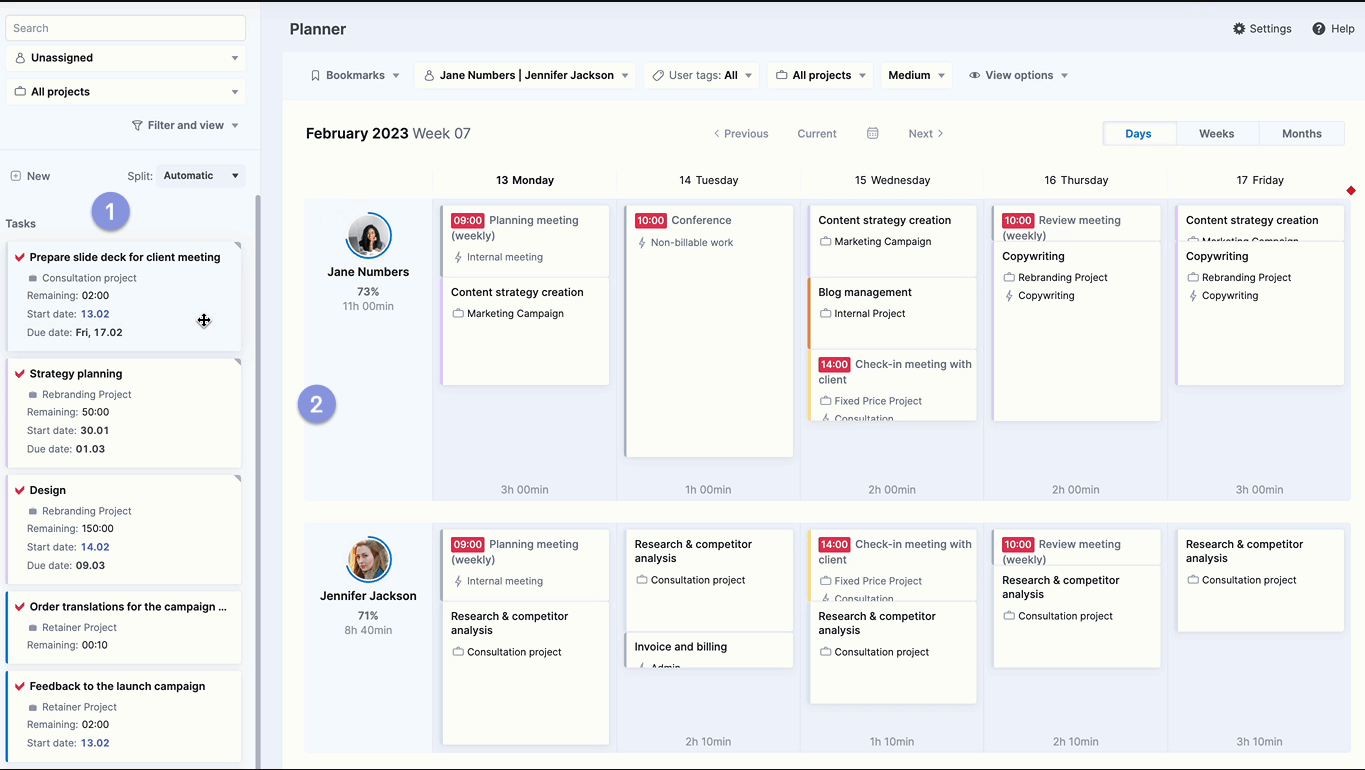
To assign a task, click on it in the left panel and drag it onto a team member’s schedule on the right.
From there, you have two main options:
- Automatic scheduling: Scoro can automatically fit them into available time slots in your team members’ schedules for shorter tasks.
- Manual splitting: For longer tasks (estimated to take multiple days or weeks) or when you need more control over placement, manually split them into smaller chunks and assign them across multiple days to ensure a balanced workload.
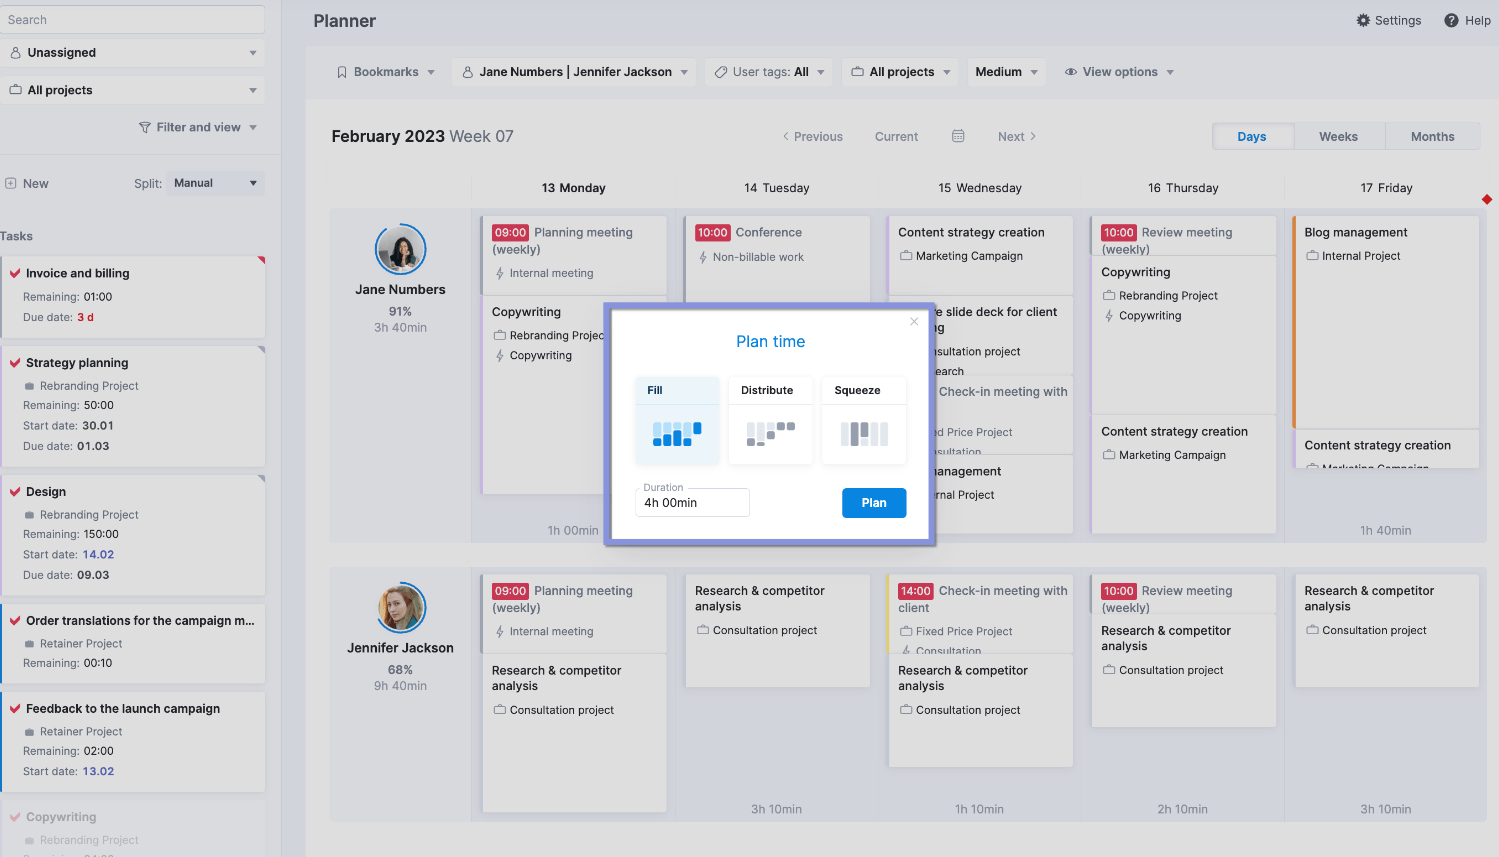
Choose from these options when assigning tasks:
- Fill: Use this when you want to utilize any free time in the team member’s schedule for the task.
- Distribute: This is useful for longer tasks that need to be spread out over multiple days, either optimizing for days with more availability or evenly distributing the work.
- Squeeze: Use this option for urgent tasks that need immediate attention, even if it means rescheduling other planned work.
Now, that team member will see the new task on their task list.
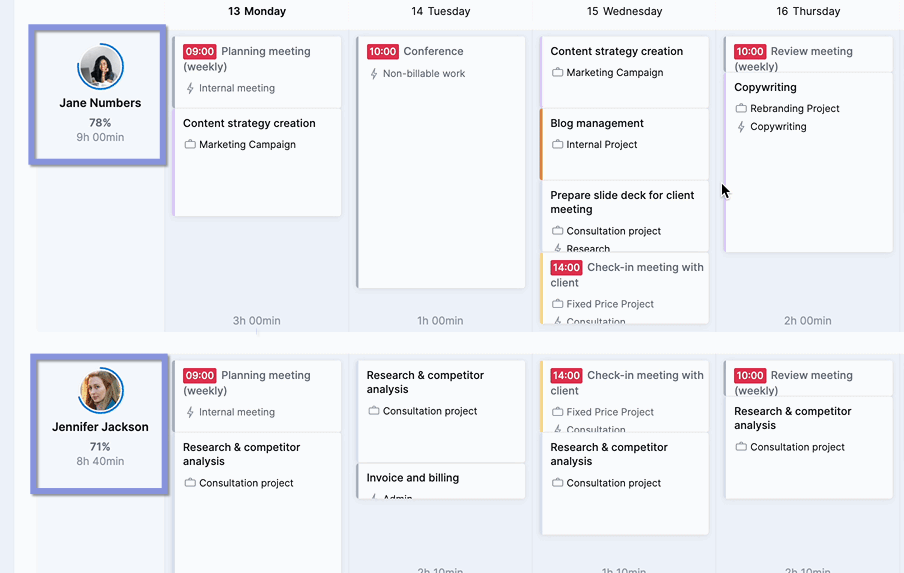
After scheduling tasks, review your team’s overall workload to make sure there’s no overbooking.
First, check the circle and percentage near each team member’s profile photo to see their resource availabiltiy.
Remember: 75 to 80% is the sweet spot for billable work. Anything over that can lead to burnout. Meanwhile, lower numbers indicate a less productive (and profitable) use of their time.
Fine-tune the schedule by reordering tasks or switching them to different team members if necessary.
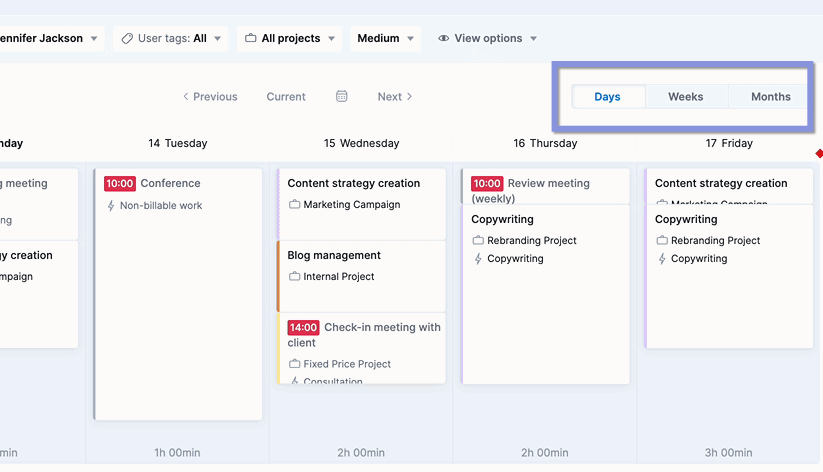
Then, use the “Days,” “Weeks,” and “Months” buttons in the upper right corner to toggle between different schedule views, making sure that any new assignments don’t conflict with future work.
3. Make it easy for your team to track their hours
With tasks assigned and schedules set, your project is ready to move into the execution phase. But to ensure your carefully crafted plan stays on track, there’s one more critical step: implementing consistent time tracking.
Accurate time logs give you a clear view of your project’s progress. This allows you to anticipate delays and helps the project stay on schedule and within budget.
Scoro offers three main ways to track time:
- Retrospective logging: Suitable for employees handling larger tasks or who prefer to log time after their work is finished
- Automatic tracking: Perfect for team members who consistently use their calendar to document their work
- Real-time tracking: Ideal for team members working on multiple smaller tasks throughout the day
As an example, let’s look at how the real-time tracker works:
Use the quick actions menu to select the clock icon. Then, select a recent task or use the search function to locate the task you’re about to start.
Click the play icon next to the task to begin tracking your time. When you’re finished, simply click the stop icon. The time you spent will be automatically logged for that task.
Or click the “Start time tracker” button in the Task view.

Want to pause and stop the timer? Just click the pause or “Mark as done” buttons.
Further reading: Time Tracking Best Practices to Get More Out of Your Time
4. Monitor and adjust workloads if needed
As your team progresses through tasks, unexpected challenges might pop up—maybe a key team member gets sick, a task takes longer than expected, or a client requests a major change.
These situations often require tweaking your team’s assignments and project timeline to keep things moving smoothly.
Regardless of the tracking method your team uses (manual time entries, the Scoro timer, or even third-party integrations, Scoro links all time entries automatically to their respective tasks and projects.
You can also see how your team uses their time in the “Utilization report.”
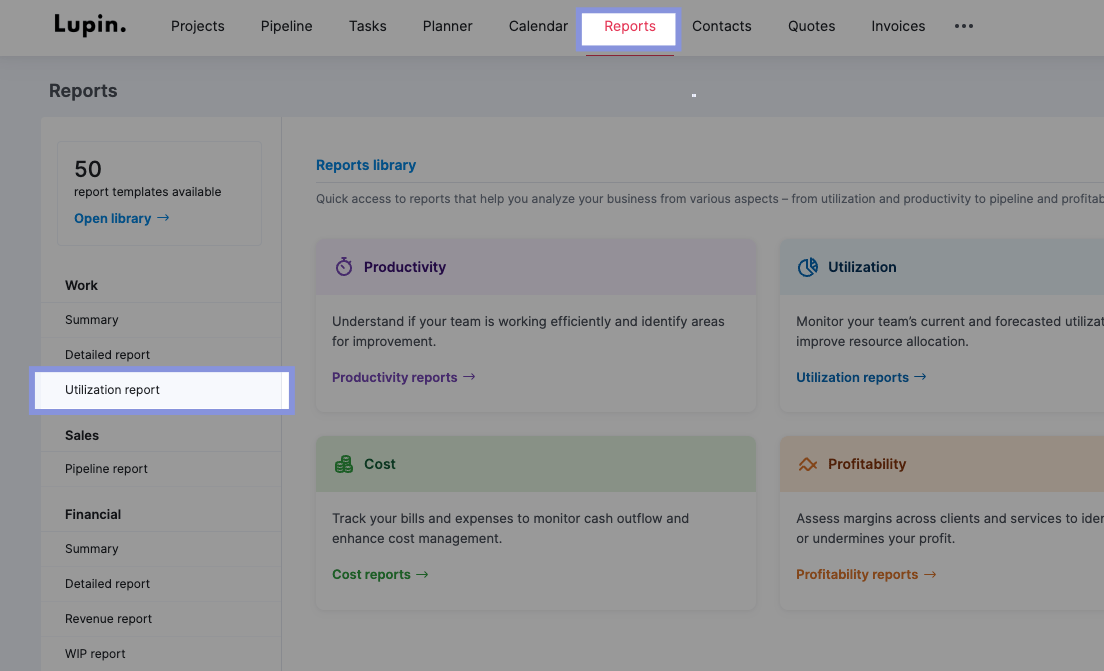
Click “Reports” from the main navigation menu. Select “Utilization report” from the panel on the left.
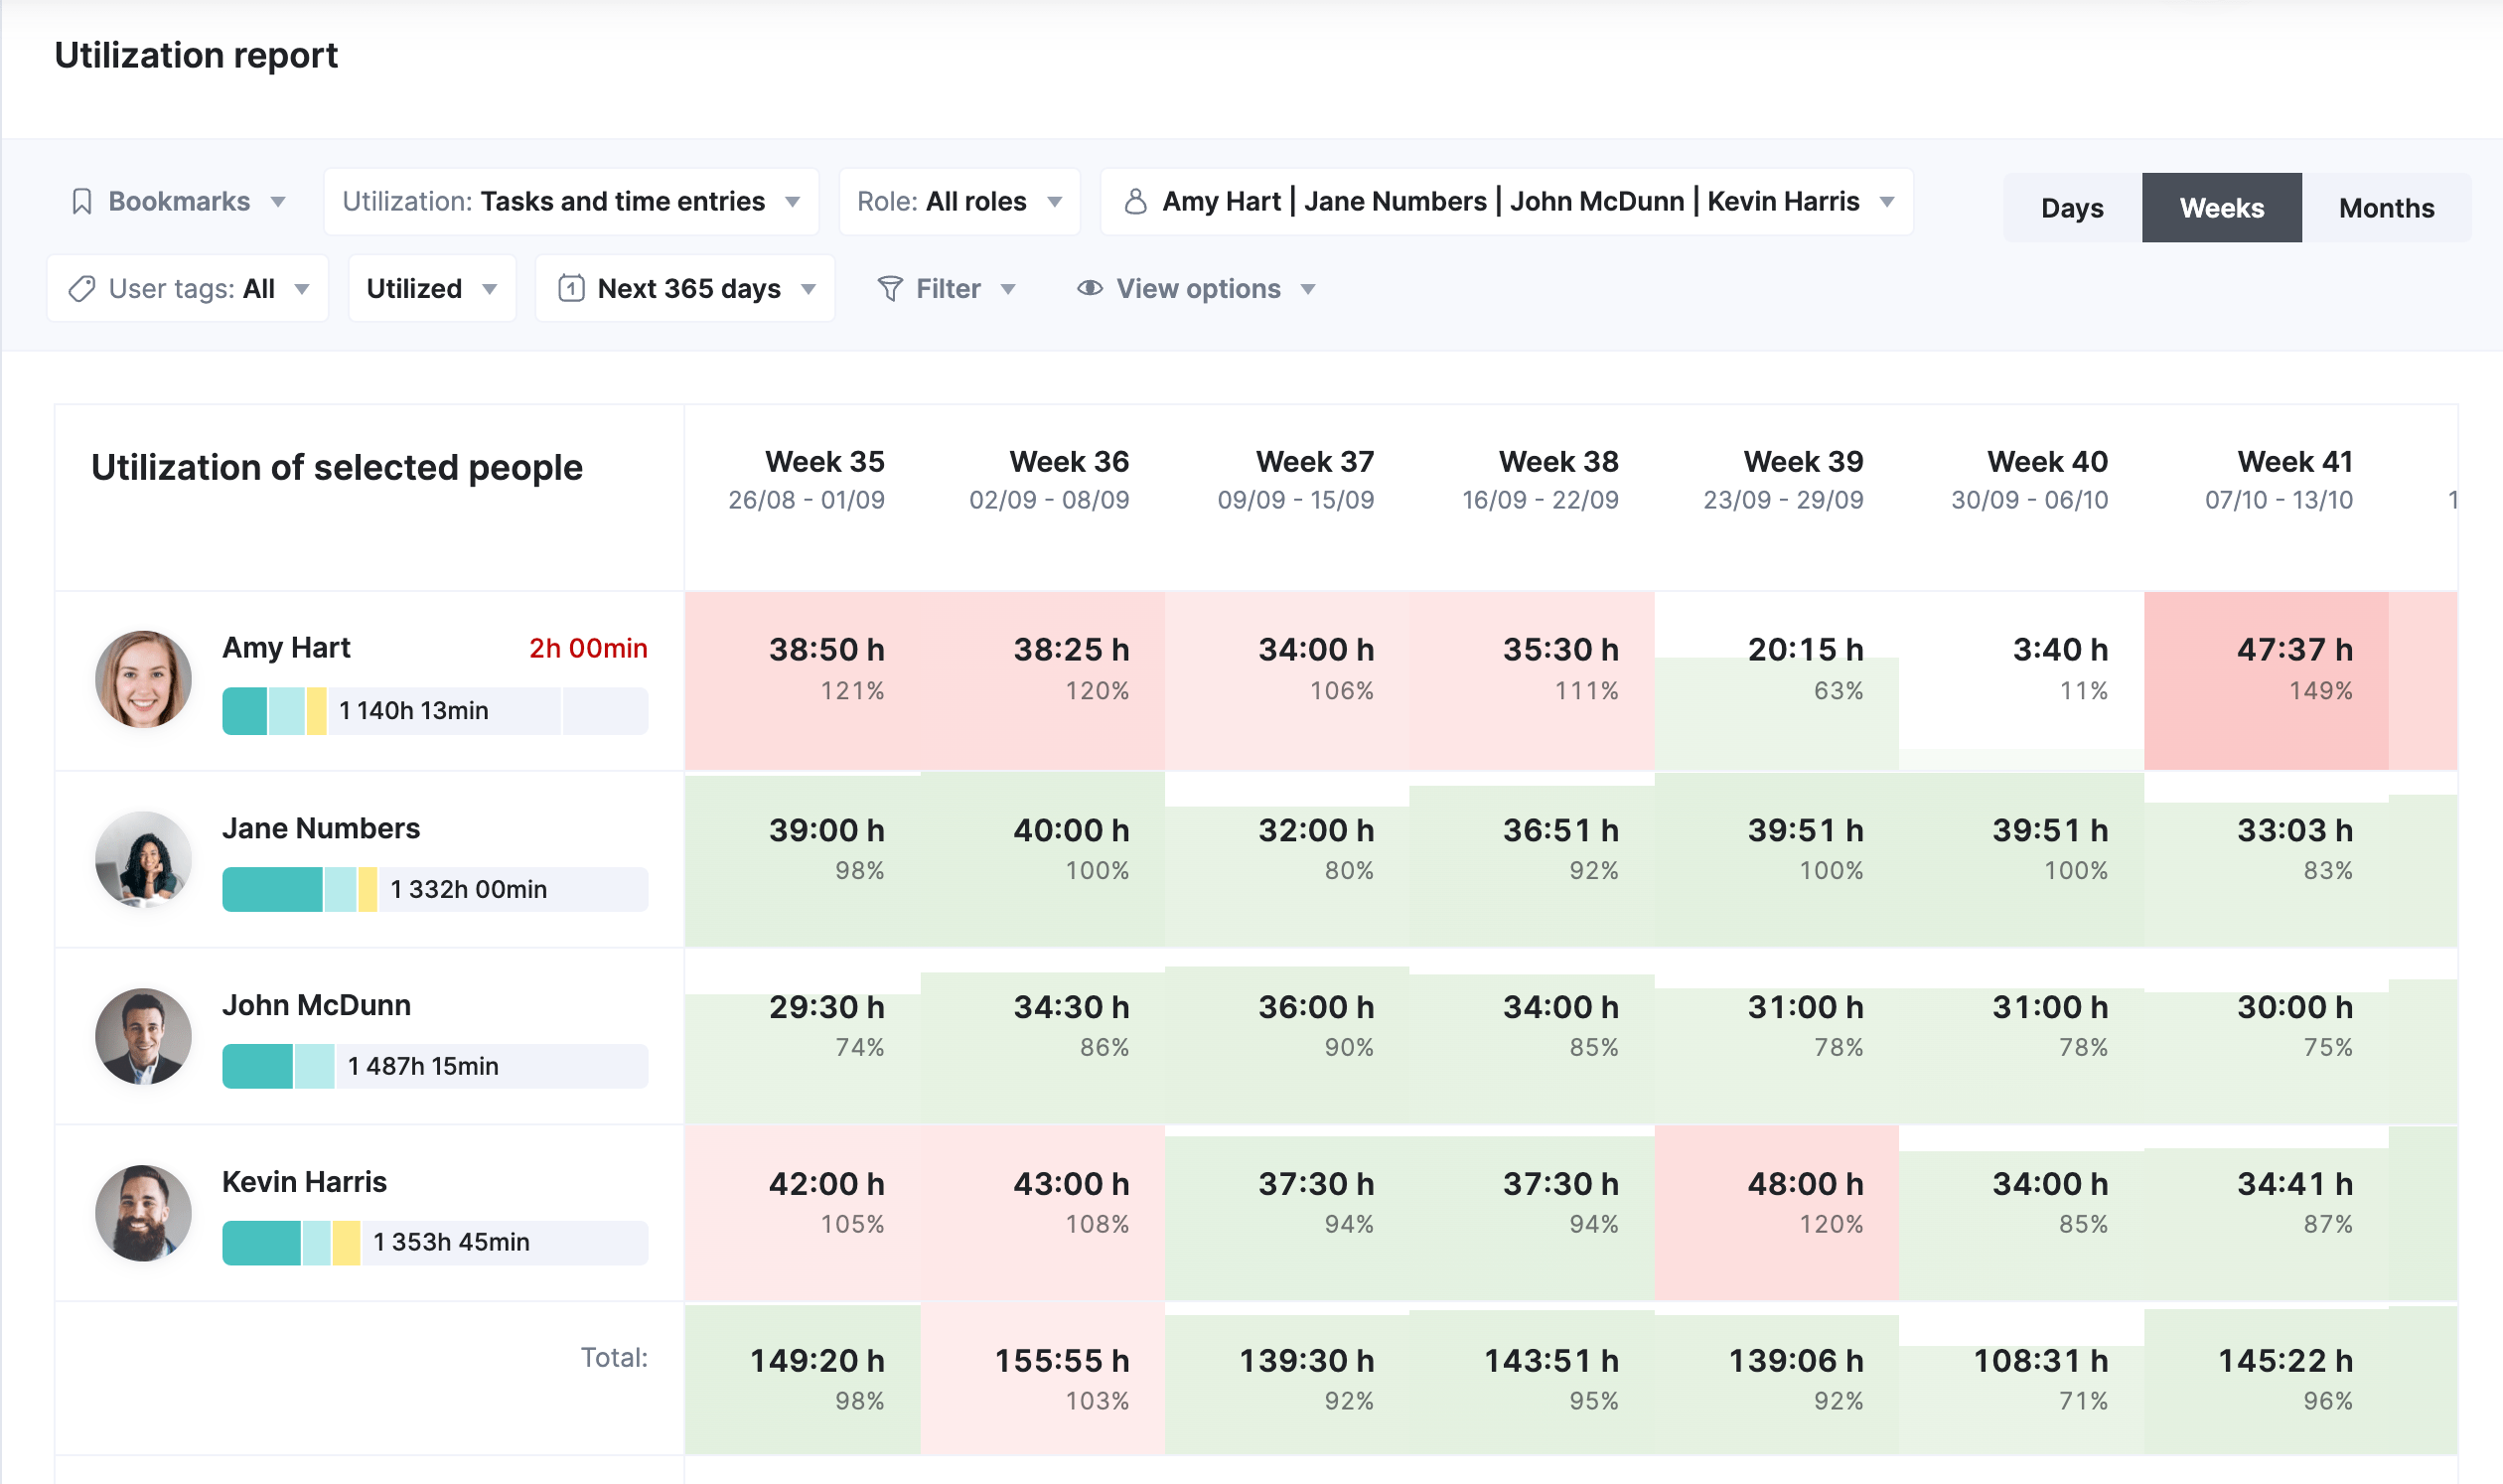
The “Utilization report” uses color-coded indicators to highlight workload levels:
- Green: Indicates a healthy workload, usually around 70-80% resoruce utilization
- Yellow: Signals a team member is nearing full resource capacity and might need attention to avoid burnout
- Red: Indicates overutilization. The team member has more work assigned than their capacity allows, increasing the risk of burnout and potential project delays
The summary column on the left provides a quick view of each person’s utilization percentage, with red text flagging those who are overutilized.
Further reading: Learn more about utilization reports in our guide: Employee Utilization Reports 101: Your Ultimate Guide
Suppose you’re managing a website redesign project. After a week of time tracking, you review the Utilization report and notice:
- Your senior designer’s utilization is at 110%, indicating potential burnout
- A junior developer is only at 60% utilization, suggesting they have the capacity for more work
- The content writer has logged significantly more time on product descriptions than initially estimated
With this data, you can:
- Redistribute some tasks from the overworked designer to the underutilized developer
- Adjust the project timeline to account for the unexpected complexity in writing product descriptions
- Refine future estimates for similar content creation tasks to avoid delays and preserve quality
These actions help prevent team burnout, improve resource use, and keep the project on track—all thanks to accurate time tracking and utilization reporting.
Scoro’s Gantt chart further enhances your ability to monitor all your projects and determine where you might need to get involved.
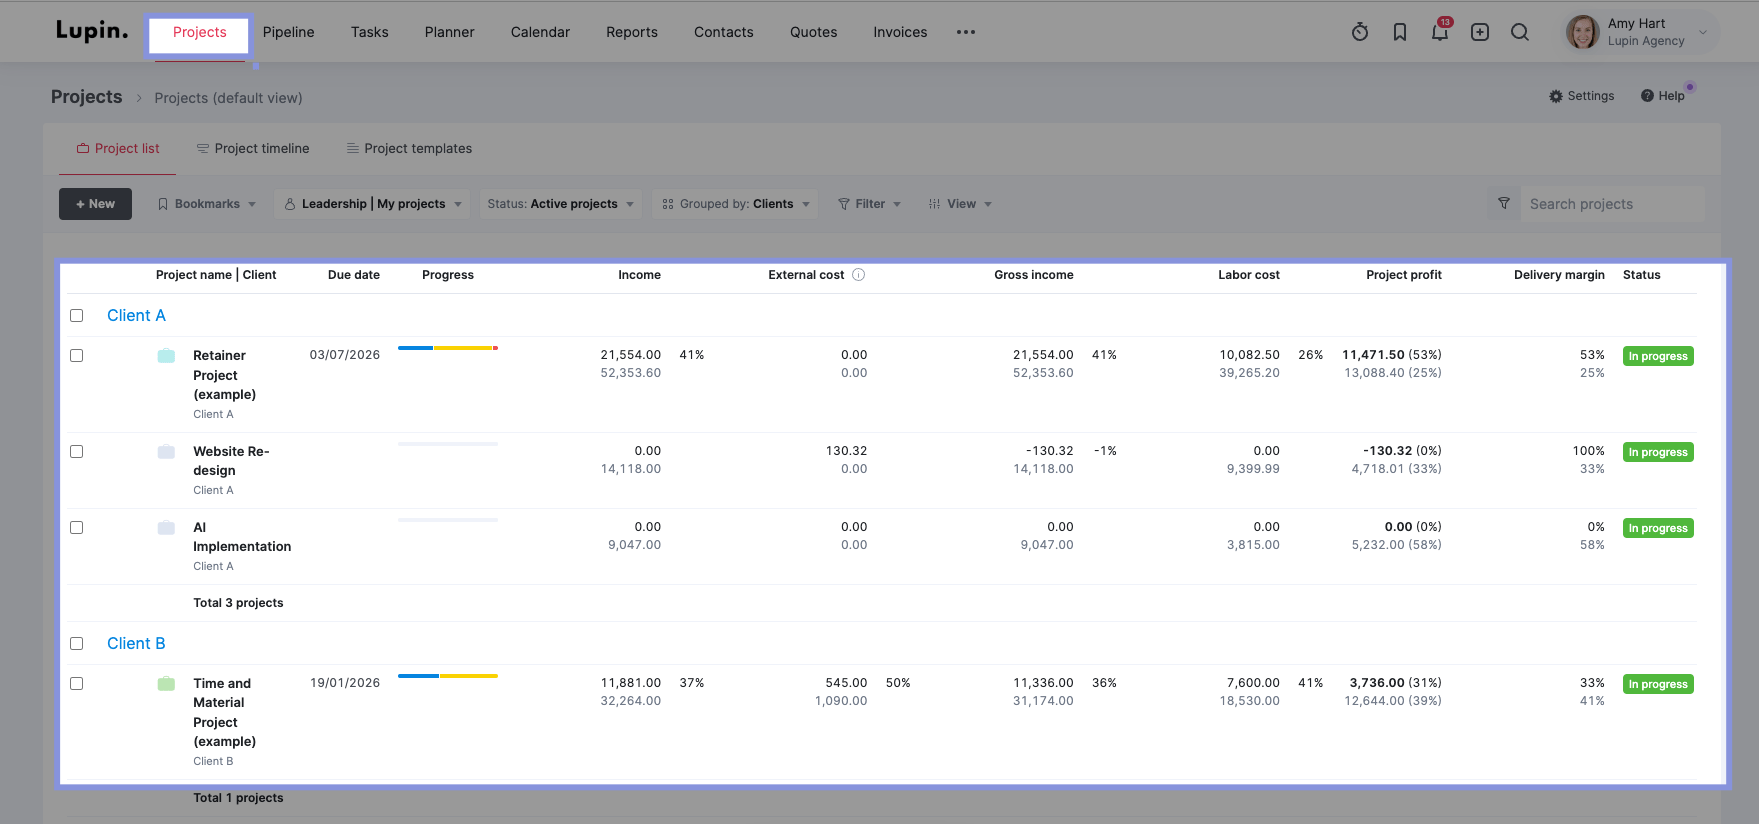
To access the Gantt chart, select “Projects.” Then, open your project from your list of projects.
Then, navigate to “Tasks” → “Gantt chart.”
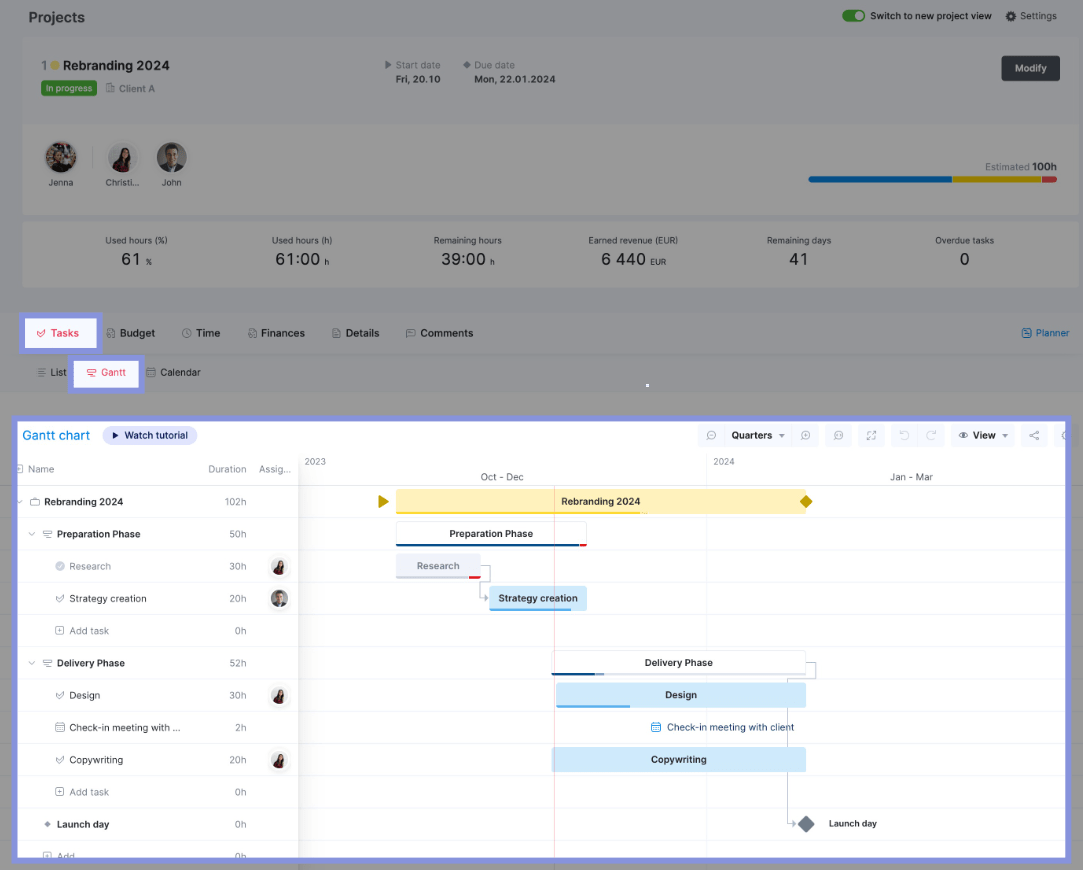
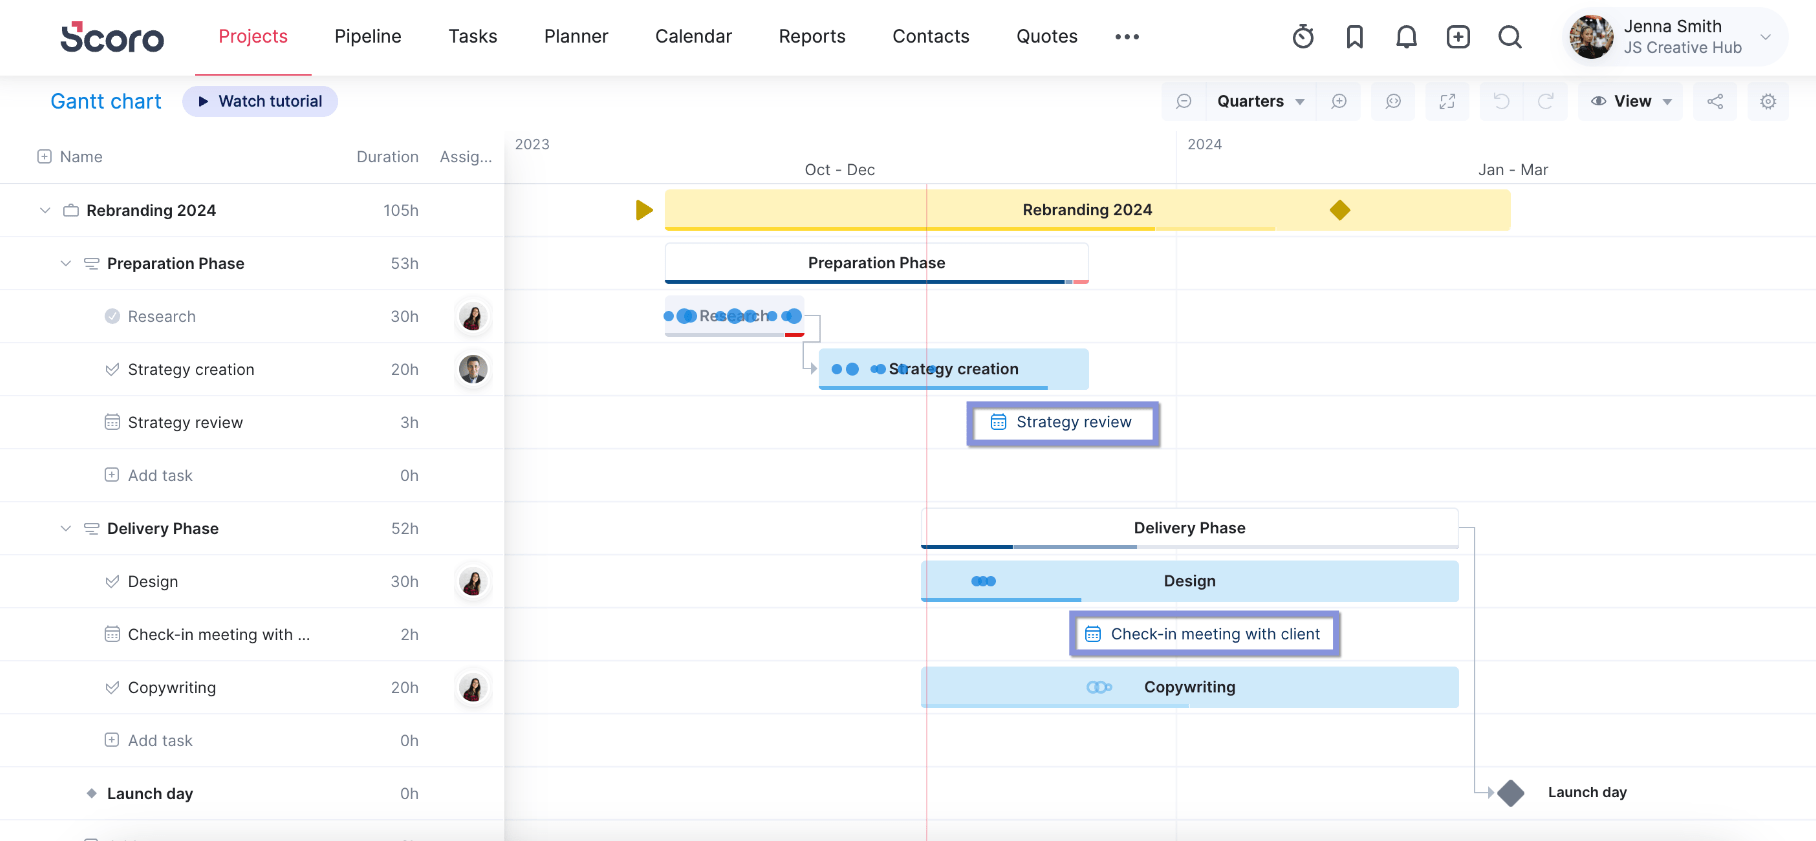
The Gantt chart provides a clear, visual overview of your project, including:
- Project phases (represented as bars)
- Milestones (represented as diamond shapes)
- Individual tasks (represented as bars within phases)
- Task dependencies (shown as lines connecting tasks)
- Scheduled time entries (shown as dots or circles on task bars)
- Calendar events (displayed on the chart)
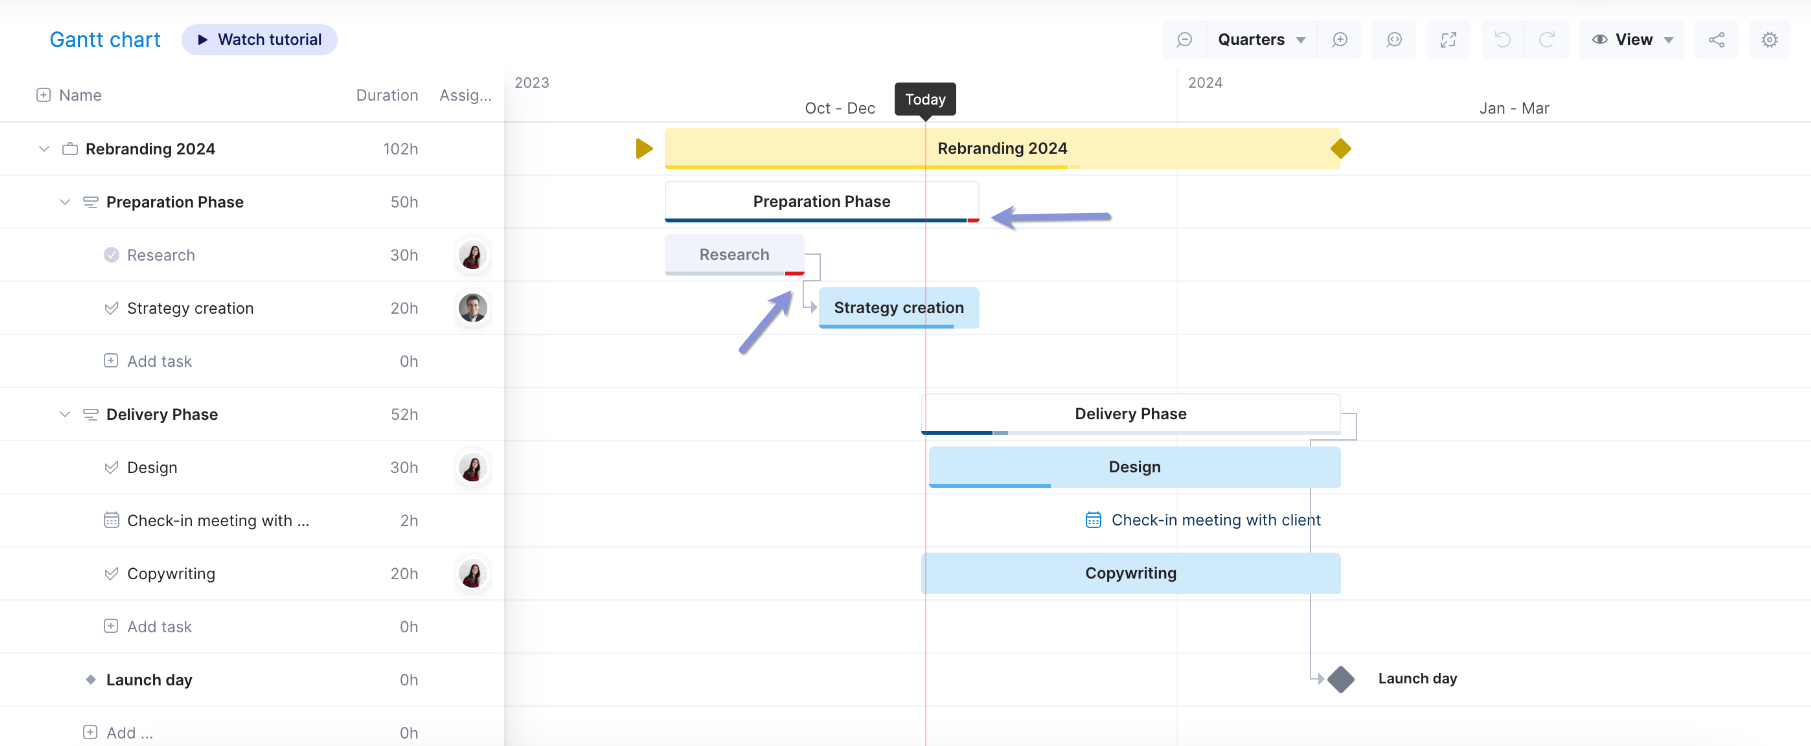
The red, vertical line represents the current date, letting you see exactly how ahead, on, or behind schedule different tasks are. If any task goes over its initial planned due date, its progress bar will turn red.
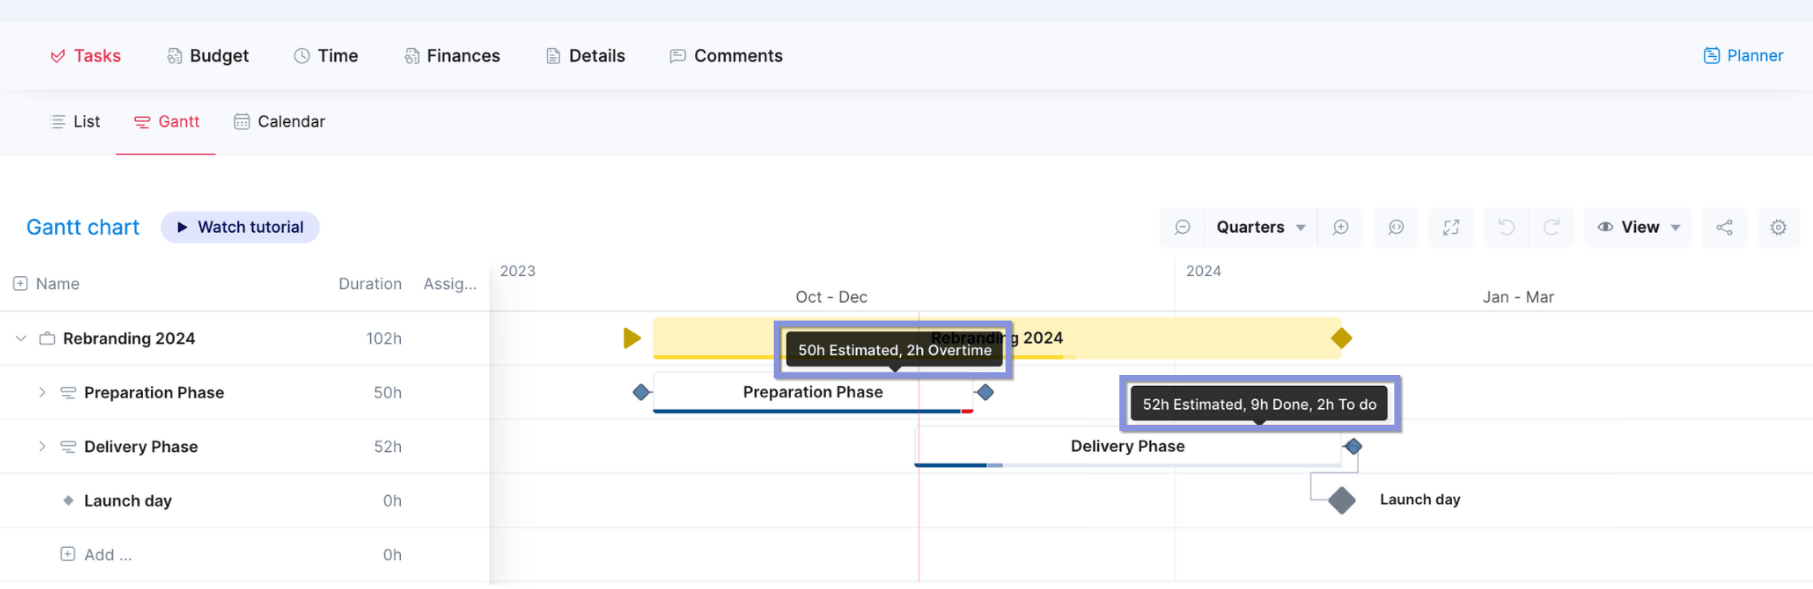
For more details about each task, hover over its name to see what’s:
- Estimated: Planned duration of the task
- Done: All completed time entries
- To-do: Scheduled time entries not yet marked as done
- Overtime: Time entries exceeding the task’s planned duration
- Overscheduled: Uncompleted time entries exceeding planned duration
To adjust task durations or dates, just click and drag the taskbar. From there, Scoro will automatically reschedule dependent tasks and time entries. It also factors in any scheduling conflicts and finds the next available time slot for team members.
Support your team and your projects with accurate resource scheduling
Effective resource scheduling ensures clarity, accountability, and balanced workloads across your team. So, team members can clearly understand their daily responsibilities, avoid missed tasks and deadlines, and deliver high-quality results—all while avoiding burnout and maximizing productivity.
Pair resource scheduling with Scoro’s robust quoting and budgeting tools to improve your project resource management even further. Gain complete financial oversight, track project costs in real time, and ensure your projects stay profitable from start to finish.